
7 Mix-and-Match Nail Sets You Can Plan Before Painting

Mix-and-match nails look easier to plan when you stop thinking of them as five unrelated designs. A strong set usually repeats something: a small palette, a shape, a finish or a consistent amount of empty space. That repeated element lets the nails differ without looking as though they came from separate manicures.
The seven sets below are complete starting plans. Each uses a limited palette and a few simple details, with plain nails included on purpose. You can paint them with ordinary polish, adapt the motifs with suitable stickers or use the plan as a clear reference for a salon appointment.
Give the set one rule
Before choosing individual nails, write a short rule such as “two colors, one dot accent” or “cream backgrounds with different brown shapes.” This prevents the design from expanding every time you see another idea you like. A rule is useful because it tells you what to leave out.
Next, choose an anchor nail: a plain color or a simple accent that represents the overall palette. Build the other nails around it. If the anchor is chocolate brown, a cream nail with a brown dot already feels connected. A bright blue glitter nail would need another reason to belong in the same set.
Finally, decide how many detailed nails you want. Two accents and three solids can create plenty of variety. You do not need five different techniques just because there are five fingers. Our two-color manicure guide is a useful starting point if you want to simplify the palette before adding mixed details.
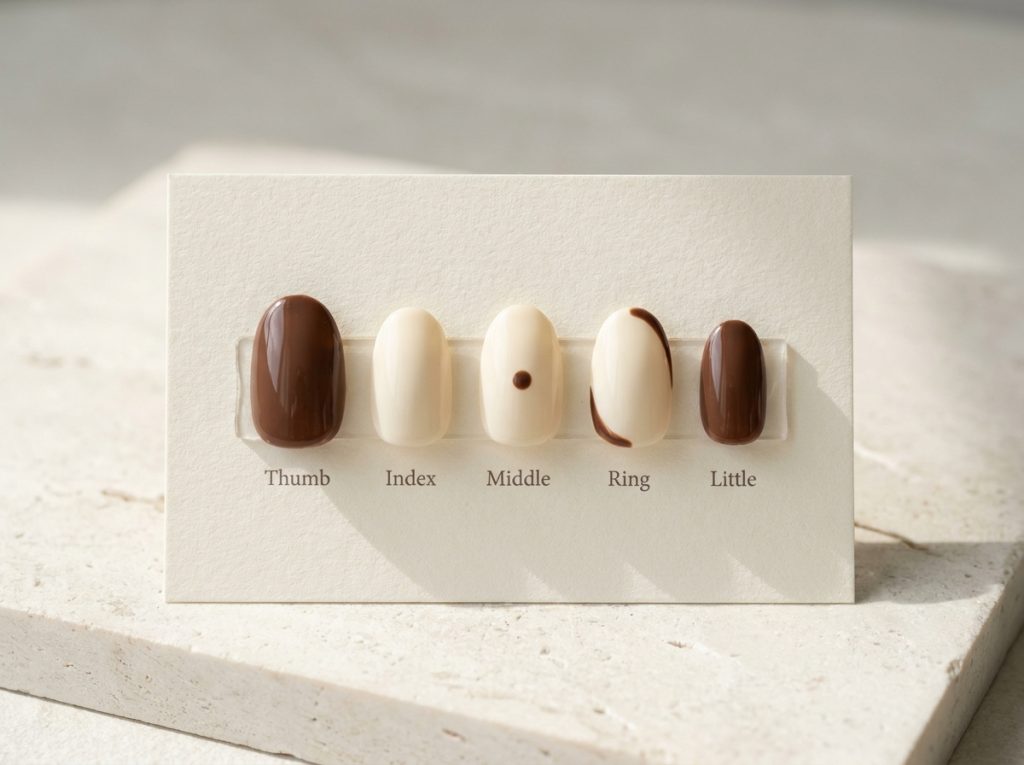
1. Cream and chocolate with dots and one curve
Use chocolate on the thumb and little finger, cream on the index and middle finger, and cream with a small chocolate curve on the ring finger. Add a single chocolate dot to the middle nail if you want a second detail.
The set works because both accents use the same dark color over the same light background. The plain chocolate nails frame the hand, while the plain cream index gives the eye a rest between details. Keep the curve short and the dot small so they do not compete.
For the second hand, repeat the same order or mirror the curve direction. Do not add a new motif just to make the hands different. If you want asymmetry, swap the dot and curve between the middle and ring fingers while keeping the rest unchanged.
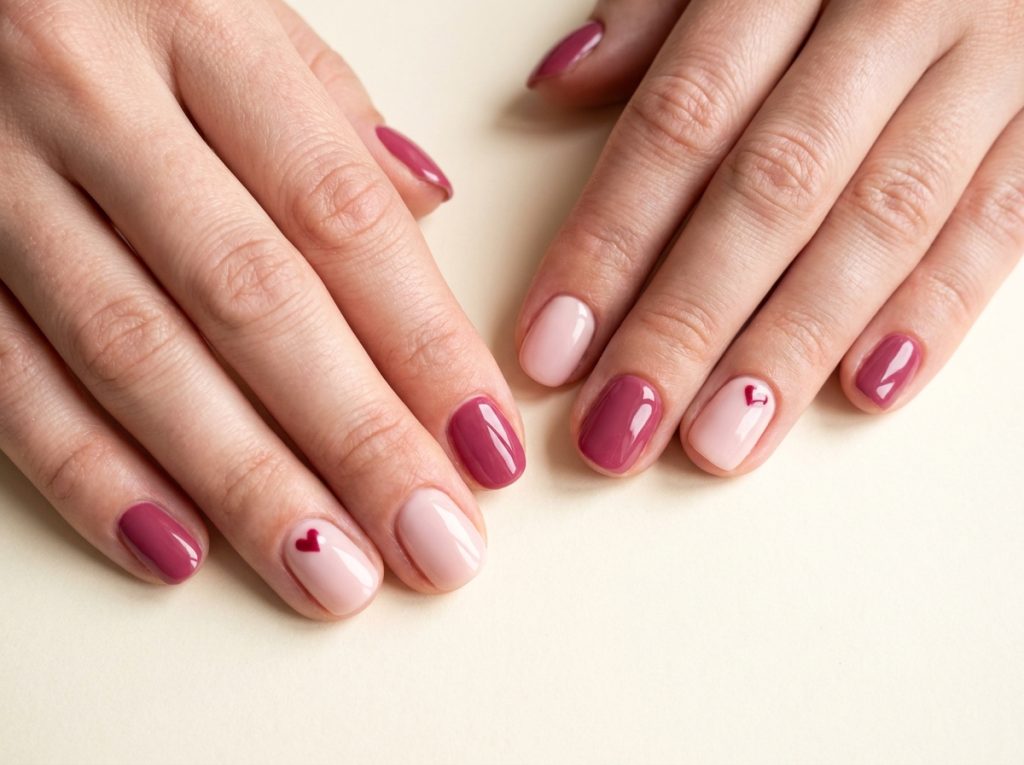
2. Dusty pink and berry with one heart
Paint the thumb and ring finger berry, the index and little finger dusty pink, and the middle finger dusty pink with a small berry heart. The solid berry nails repeat the motif color and make the heart feel like part of the palette rather than an isolated decoration.
Keep the heart simple. A tiny painted version or a flat sticker is enough. If the shape becomes difficult, replace it with a berry dot and keep the rest of the arrangement. The color plan still works without the specific motif.
This set can be made softer by using a muted rose instead of deep berry. It can be made bolder by using a lighter pink base. Adjust the contrast before adding more details. Our cute accent guide explains small hearts and dot alternatives when you want to practice the centerpiece separately.
3. Blue and cream with one diagonal block
Use blue on the thumb, middle and little finger. Paint the index cream and the ring finger cream with a small blue diagonal corner. The accent connects the two whole-nail colors without introducing another shade.
Choose navy for a crisp set or a softer medium blue for a gentler one. If the blue is very sheer, use it as a whole-nail color and choose a compatible opaque detail product for the corner, or simplify the accent to a solid blue nail. Do not build a thick block simply to force a translucent polish to cover.
Keep the corner small enough that cream remains visible on most of the accent. A large diagonal split can also work, but it changes the balance of the set. Sketch both versions before painting if you are unsure which proportion you prefer.
4. Muted autumn colors with one plain center
Choose cream, rust and chocolate. Paint the thumb chocolate, index rust, middle cream, ring rust and little finger chocolate. This is a mix-and-match set made entirely from solid colors, which makes it one of the easiest plans to apply.
The symmetrical order gives the three shades a clear structure. The cream center brightens the set, and the darker outer nails keep it from feeling random. You can use beige instead of cream for a quieter result or navy instead of chocolate for a cooler contrast.
If you want an accent, put one small rust dot on the cream middle nail. Stop there first. The palette already does most of the work. Our fall color combinations offer other three-shade directions if these particular colors are not in your collection.

5. Pale pink with a reflective accent
Paint most nails pale pink, use a reflective pink or champagne finish on the ring finger, and add a small plain-color dot to the thumbnail if you want another detail. The set mixes finishes more than colors, so it can remain very restrained.
Decide whether the reflective nail should look pearly, shimmery or mirror-like. Those effects are not interchangeable, and the application may differ. Our finish comparison guide explains the visual distinctions so you can choose a product or salon reference that matches your intention.
Keep the other nails simple. A reflective accent already changes as the hand moves, which adds visual activity. Adding a flower, a stripe and several metallic dots elsewhere may make the set much busier than the soft palette suggests.
6. Olive and beige with two related shapes
Use olive on the thumb and little finger, beige on the index, and beige backgrounds on the middle and ring fingers. Put a small olive dot on the middle nail and a rounded olive side patch on the ring nail.
The two shapes differ, but their color and background are identical. That repeated relationship makes the set coherent. Keep the side patch modest so it does not overwhelm the small dot next to it. The plain beige index is an intentional pause, not an unfinished nail.
For a softer version, use taupe instead of olive. For a brighter version, use blue. The layout is reusable because its structure does not depend on a particular season. Once you like the proportions, you can change the palette while keeping the same placement plan.
7. A small Halloween set with one motif
Choose black, orange and cream. Paint the thumb and little finger black, the index orange, the middle cream and the ring black with a small white ghost or pair of pale eyes. The single motif gives the set its theme while the solid colors provide variety.
If you use a white ghost, cream and white can both appear in the set, but keep the difference subtle or replace the cream nail with white. A very yellow cream beside a bright white ghost creates another contrast that you may or may not want.
Do not add a pumpkin, web and star just because they fit the holiday. One recognizable motif is enough. Our easy Halloween ideas provide alternatives, but choose one main feature for this set and let the color arrangement support it.
Map the fingers before opening the polish
Write the sequence from thumb to little finger for each hand. Include both the base color and any detail, such as “cream with brown dot.” This is more useful than a loose note saying “brown and cream nails,” because it removes decisions while your hands are wet.
Then check the balance. Are the darkest nails all on one side? Are all the detailed nails adjacent? Is there a plain nail between two busy ones? You do not need symmetry, but you should be able to explain why the arrangement looks the way it does.
If you are using stickers, select the sizes before painting. Lay out the ones for each hand so you do not discover halfway through that only one of the main motif remains on the sheet. A smaller matching pair is often better than two noticeably different large stickers.
Paint in a practical order
Group the work by product when possible. Paint all nails needing the same base shade, then move to the next shade, following the timing and layering directions for your system. This reduces unnecessary bottle switching and makes it easier to track which nails need another layer.
Add details only when the base is ready for them. Keep the placement plan beside you so you do not accidentally decorate a nail intended to remain plain. Open tools and packaging beforehand; searching for a sticker with wet nails is an avoidable source of dents.
Work on the more difficult hand while you still have patience. If a detail proves too challenging, simplify the corresponding nail on both hands. Our non-dominant hand practice guide offers ways to improve control, but the finished manicure does not need to serve as a difficult exercise every time.
Make asymmetry look intentional
Different hands can still belong together if they share a palette and a design rule. You might put the heart on the left middle finger and right ring finger, for example, while keeping the same base and motif size. The variation becomes a deliberate shift rather than an unrelated design.
Avoid changing everything at once. If the colors, motifs, finishes and accent positions all differ, the set has fewer visual connections. Keep at least two elements stable while changing another. A consistent two-color palette can support quite a lot of variation in shape.
Take a photograph of both hands together before deciding one side needs more decoration. A hand that looks quiet on its own may balance a busier hand well. Adding details to make each hand equally busy can remove the contrast that made the pair interesting.
Know when the set is finished
A common mix-and-match problem is treating every plain nail as an invitation to add something. Plain nails are part of the composition. They repeat the palette, frame the accents and stop small motifs from competing for attention.
Before adding another detail, ask what it contributes. Does it repeat a useful color? Does it balance a focal point? Or are you adding it only because there is empty space? If it has no clear role, leave the nail plain and look at the full set again later.
Keep a photograph and a short note about what you would change next time. You may decide the dot should be smaller or the light nail should move to another finger. That is a more useful adjustment than making the next manicure entirely different before you understand what worked.
Make a simpler backup plan
Before starting, circle the most difficult nail in your sketch and write a plain-color replacement beside it. If that accent becomes frustrating, you already know how to finish the set without redesigning everything with wet nails. A cream nail with a brown curve can become solid cream, while a heart accent can become one dot. Keep the original palette so the replacement still belongs to the manicure.
Common questions
How many colors should a beginner use?
Two is the simplest starting point, with three useful when one is a neutral background. More colors can work, but they add decisions about contrast and placement. Learn the layout with a small palette before expanding it.
Does each nail need different art?
No. A mix of solid colors and one or two accents is still a mix-and-match manicure. Repeating a detail can make the set stronger, especially when the nails are short or the palette already has a lot of contrast.
Can I combine stickers and painted details?
Yes, provided the products are suitable for your polish system and you follow their directions. Keep the visual style related: a small flat sticker can sit comfortably beside a simple dot, while a large ornate sticker may dominate a very minimal set.
What should I simplify first if the plan feels difficult?
Replace the most demanding motif with a solid accent or a dot. Keep the palette and finger arrangement. This preserves the main idea while reducing the technical work, which is often more effective than abandoning the whole design.