
12 Easy Halloween Nail Ideas with Black, White and Orange
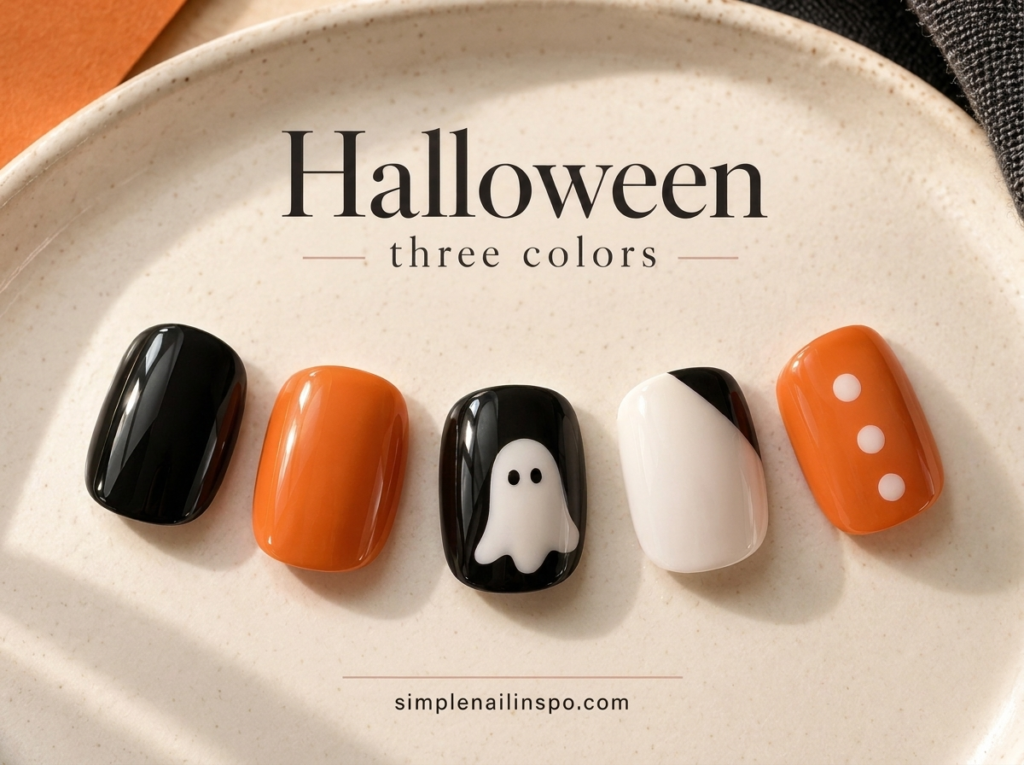
Halloween nail art becomes much easier when you stop trying to paint a different scene on every finger. A black, white and orange palette can suggest ghosts, pumpkins, moonlight and candy without a drawer full of supplies. The trick is to give each manicure one recognizable detail and leave enough space around it for that detail to show.
These twelve ideas use ordinary air-drying nail polish. Some need only the bottle brush; others benefit from a small dotting tool or a fine nail-art brush. You can also replace the painted motif with a nail sticker. Choose the version you can repeat comfortably on both hands, rather than making the first hand so complicated that the second becomes a chore.
Choose your first Halloween design
If you have never painted nail art, start with the orange accent, scattered dots or alternating colors. If you can place two small dots without joining them, try ghost eyes. Save the web corner and pointed pumpkin shapes for a practice tip before attempting them on your nails.
| Design type | Useful tool | Best starting point |
|---|---|---|
| Solid accent | Bottle brush | One orange nail among black nails |
| Dots and eyes | Small dotting tool | One pair of eyes on each ring finger |
| Ghost or pumpkin | Small detail brush | One larger motif on a thumbnail |
| Web corner | Fine liner brush | Three short lines on a practice tip |
Before opening any polish, draw five simple nail shapes on paper and mark where your accent will go. This takes little effort and prevents the familiar moment when every nail has acquired a different idea. For a shorter canvas, the placement rules in our short Halloween nail guide are especially helpful.
1. One pumpkin-orange accent
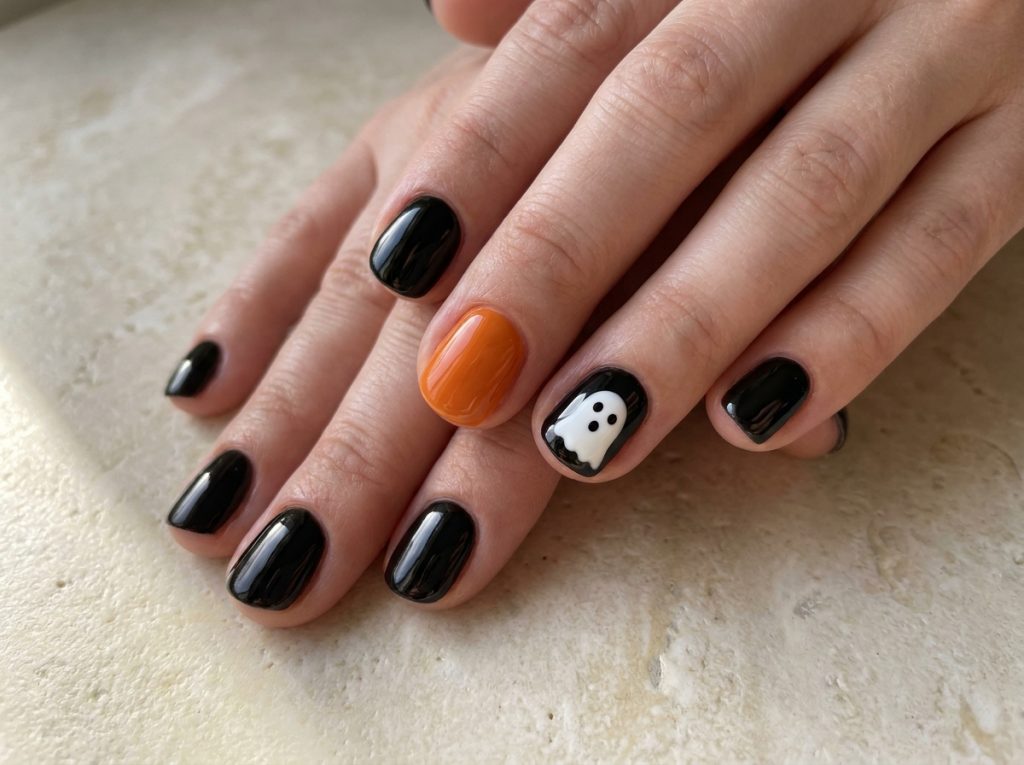
Paint four nails black and the ring finger orange. That is a complete Halloween manicure; it does not need a face, glitter or an extra border. A slightly muted orange gives a softer result, while a bright orange makes the contrast more graphic.
For a balanced pair of hands, repeat the accent on the same finger. If you prefer an asymmetric look, use the opposite thumbnail instead. Keep the finish consistent across both colors. Glossy black beside glossy orange looks deliberately coordinated, whereas an accidentally dull patch can make an otherwise simple set appear unfinished.
If black feels too stark, use a blackened brown you already own. You will lose a little of the classic Halloween contrast but gain a manicure that works comfortably through the rest of October.
2. Tiny ghost eyes on black
A pair of white dots is enough to suggest eyes peeking out of the dark. Put them slightly above the middle of one black nail, leaving a small, visible gap between them. Add smaller black pupils only if the white dots have room for them.
Test your dot size on a spare tip first. A tool loaded with too much polish makes an expanding puddle instead of a tidy circle. Touch the surface lightly, lift straight up and reload before the next pair if needed.
Make the eyes look in one direction by placing both pupils toward the same side. Avoid adding more pairs to every nail immediately. One pair on each ring finger often reads more clearly than ten crowded pairs that disappear when your hand is relaxed.
3. A rounded white ghost
Choose a black base and reserve the largest comfortable nail for the ghost. Paint a small white oval with a slightly longer lower edge. A few shallow curves at the bottom suggest a sheet without requiring an exact cartoon outline.
Once the white polish is ready for another layer according to its directions, add two black dots for eyes. Leave the mouth out on a very small ghost; those two eyes already communicate the idea. On a wider thumbnail, a third dot can become a surprised expression.
The common mistake is enlarging the ghost repeatedly to correct its outline. Decide its approximate footprint before you begin and stop while black space still surrounds it. An uneven but compact ghost usually looks more charming than a perfectly rounded white blob covering the whole nail.
4. Orange nails with one black dot
Use orange as the main color and place a single black dot near the upper third of each nail. Keep the dot away from the skin and away from the very edge. The repetition creates a graphic set that feels seasonal without illustrating a specific character.
Try the dot on only the two middle fingers if you want a quieter variation. Keep its size similar across those fingers rather than making it proportional to every nail. The repeated detail becomes the link between them.
This is also a practical design for testing your control before attempting more detailed Halloween art. If placing the dots feels difficult, use the supported hand position in our non-dominant hand practice plan, then return to this simple motif.
5. A white nail with a black corner
A diagonal black corner over white gives a crisp, costume-friendly manicure without a tiny illustration. Imagine a line running from one side of the nail to the free edge, then fill only the small corner outside that line.
You can paint the boundary freehand with a detail brush or use a nail-art guide as directed once the base is sufficiently dry. Do not assume a surface that feels dry will tolerate adhesive immediately. Test the combination on a spare tip if you have not used it before.
Repeat the corner on each nail or restrict it to two accents. An orange thumbnail adds a Halloween cue, but the black-and-white version stands alone if you want something that also works after the holiday.

6. A small pumpkin silhouette
Paint an orange circle that is slightly wider than it is tall on a white accent nail. Add a tiny black stem at the top. You do not need ribs, a face or a curling vine for the shape to suggest a pumpkin.
Place the circle a little below the center so there is room for the stem. If the circle reaches the sidewalls, start smaller on the next attempt instead of trying to squeeze the stem into the remaining space. The white margin is part of the design.
For a softer harvest version, use a rounded orange shape without any black face. For a more playful Halloween version, add two small triangular eyes only on a larger nail. A dot-based pumpkin is much more manageable than a miniature carved portrait.
7. A three-line web corner
Choose one corner of a black accent nail. From that corner, paint three thin white lines that fan outward. Connect them with one shallow curve. Stop there first and look at the nail from normal viewing distance before adding another curved connection.
A web does not have to cross the entire nail. A small corner web lets the black base remain visible and reduces the number of lines you need to control. Keep the lines light; repeated tracing often makes the intersections bulky.
If the brush starts dragging, clean it according to the tool instructions and reload with fresh polish. Do not keep pulling a partly dried strand across the nail. A decal is a sensible substitute when the lines feel frustrating rather than enjoyable.
8. Black and orange alternating nails
Alternate black and orange across one hand, beginning and ending with orange. Mirror the same sequence on the other hand for a clear, uncomplicated set. The middle finger becomes black or orange depending on where you start; check the arrangement before painting.
For less contrast, use black on only the thumb and ring finger and orange everywhere else. This is a useful way to keep the Halloween palette while avoiding tiny detail work entirely.
The important choice is coverage. If your orange is translucent and the black is opaque, the finish may look uneven in a way you did not intend. Choose an orange that reaches the coverage you like within its recommended application rather than adding increasingly thick layers to force a match.
9. White dots scattered over orange
Start with three white dots on one orange nail, arranged as a loose triangle. Add a fourth only if the first three have comfortable space between them. This creates a playful candy-like pattern without needing perfectly spaced rows.
Vary placement across the accent nails but keep the dots approximately the same size. That makes the scatter look intentional. A few dots near one side can be more effective than filling every available gap.
Leave the other nails plain orange or alternate them with white. If you enjoy this technique, our cute dot and small-shape accents show ways to reuse the same tool for designs that work beyond October.
10. An orange side stripe
Paint a black base, then place a narrow orange stripe along one side of an accent nail, leaving a small black border between the stripe and the skin. The stripe can curve gently with the nail instead of remaining ruler-straight.
On short nails, stop the stripe before it reaches the tip if a full-length line looks crowded. On a longer nail, extending it creates a stronger graphic effect. Match the direction on both hands or mirror it deliberately.
If your orange is too sheer to show over black, use an opaque nail-art polish intended for that purpose or reverse the colors. A black stripe over orange is usually easier to see. Do not build a thick ridge simply to make a translucent orange cover the dark base.
11. A white moon and two dots
A small white crescent on black can be created with a suitable nail sticker or painted as a curved sliver. Pair it with two tiny white dots instead of a full sky of stars. Place the moon on one accent nail and keep the rest black.
For a painted version, practice the crescent on a tip first. Think of it as a curved tapered stroke rather than two circles that must align perfectly. If the shape becomes too thick, it can simply become a white oval with black ghost eyes.
That fallback is useful: choose designs that can change direction when a small mistake occurs. You do not have to remove an entire manicure every time the first idea develops into something slightly different.
12. A three-color dotted border
On a white nail, place a few black and orange dots in a shallow curve near the tip. Leave white visible between each dot. This suggests a decorative border without requiring the continuous line of a French manicure.
Keep the border to one or two nails if your dot sizes vary. On the remaining nails, use a single solid color from the same palette. The set will still feel connected, and the dotted nails become deliberate accents.
Count your dots on the first accent and use that count as a starting point on the second hand. The spacing may need to change with nail width, but a similar rhythm helps both hands look like the same manicure.

Finish without smearing the details
Use the top coat and timing recommended for your polish system. Dragging a nearly empty top-coat brush repeatedly through a fresh black detail can pull pigment across white. Load enough product for a controlled pass and avoid pressing the brush into the artwork.
If a detail smears, decide whether the problem is local before repainting everything. One blurred dot may be replaced with a slightly larger intentional shape after the surface is ready. Several merged lines are usually easier to remove and redo on that nail than to hide under more polish. Our smudging troubleshooting guide separates brush drag, dents and heavy layers so you can change the right part of your process.
Questions before you start
Can I do these designs without gel?
Yes. These ideas are planned around ordinary air-drying polish. Follow your product directions for layering and finishing. A lamp is not a shortcut for drying a regular lacquer formula, and these instructions are not a gel-curing guide.
Should every nail have Halloween art?
No. One recognizable motif per hand is enough. Solid nails give your eyes somewhere to rest and make a small ghost or pumpkin easier to notice. Start with one accent, then add another only if the overall set needs it.
What if I only own two of the three colors?
Black and white work for ghosts, moons and web corners. Black and orange work for alternating colors, dots and stripes. Orange and white create a softer seasonal set. Choose a design that fits the bottles you have instead of buying a third shade for one tiny detail.
Which idea is easiest to repeat on both hands?
The solid orange accent is the simplest starting point because it uses your normal painting motion. Alternating colors comes next. A single dot is a useful first step into detail work, especially when your hand and tool are supported on the table.