
10 Simple Two-Color Nail Ideas for an Easy Manicure
Two colors are enough to make a manicure look designed. The difference between a plain pair of polishes and a coherent set is usually placement: which shade dominates, where the second shade appears and whether the arrangement repeats across both hands. You can create variety without buying more colors or learning detailed illustration.
These ten ideas range from simple whole-nail arrangements to small painted accents. Start with two ordinary air-drying polishes that behave predictably for you. If one is sheer and the other opaque, treat that as part of the design rather than expecting them to look identical in coverage.
Choose a clear relationship between your colors
For strong contrast, combine a light shade with a dark one. Cream and chocolate, pale pink and navy, or light gray and berry are easy examples. For a quieter look, choose two colors close in depth, such as dusty pink and taupe. The second option may be less visible from a distance, which is useful when you want understated nails.
Decide which color is the main one before painting. A manicure that is mostly cream with one brown nail feels different from one that is mostly brown with one cream nail. The proportion controls the overall mood more than the names of the shades do.
Keep your first attempt in one finish family if possible. Two glossy cream polishes make color placement easy to judge. A matte shade beside a glitter polish adds another design choice, which can work but makes the set more complex. You can explore that once you know you like the basic arrangement.

1. One accent nail
Paint four nails in the main color and the ring finger in the second color. Repeat the same placement on the other hand. This is the simplest way to make a two-color manicure feel deliberate, and it needs no tools beyond the bottle brushes.
Use the lighter color for the accent if you want it to stand out. Use a shade close to the main color if you want a subtler change. A pale pink accent among deep brown nails creates a clear focal point; a medium taupe accent creates a quieter shift.
Leave the accent plain for the first version. A different color is already a design element. If you immediately add dots, stripes and a sticker, you may lose the clean effect that made the two-color idea appealing.
2. Two neighboring accents
Paint the middle and ring fingers in your second color and the remaining nails in the main shade. The adjacent pair creates a larger block of color across the hand, which feels different from two scattered accents.
This arrangement is useful when the two shades are close in depth. Giving the second shade more space makes the distinction easier to see. It also works well with short nails because the design happens across the hand rather than requiring a lot of room on each individual nail.
Mirror the placement on the other hand for an orderly set. If you want asymmetry, put the second color on the thumb and index finger of the other hand, but keep the same two shades and finish. Choosing the difference deliberately is what makes it feel planned.
3. Alternating colors
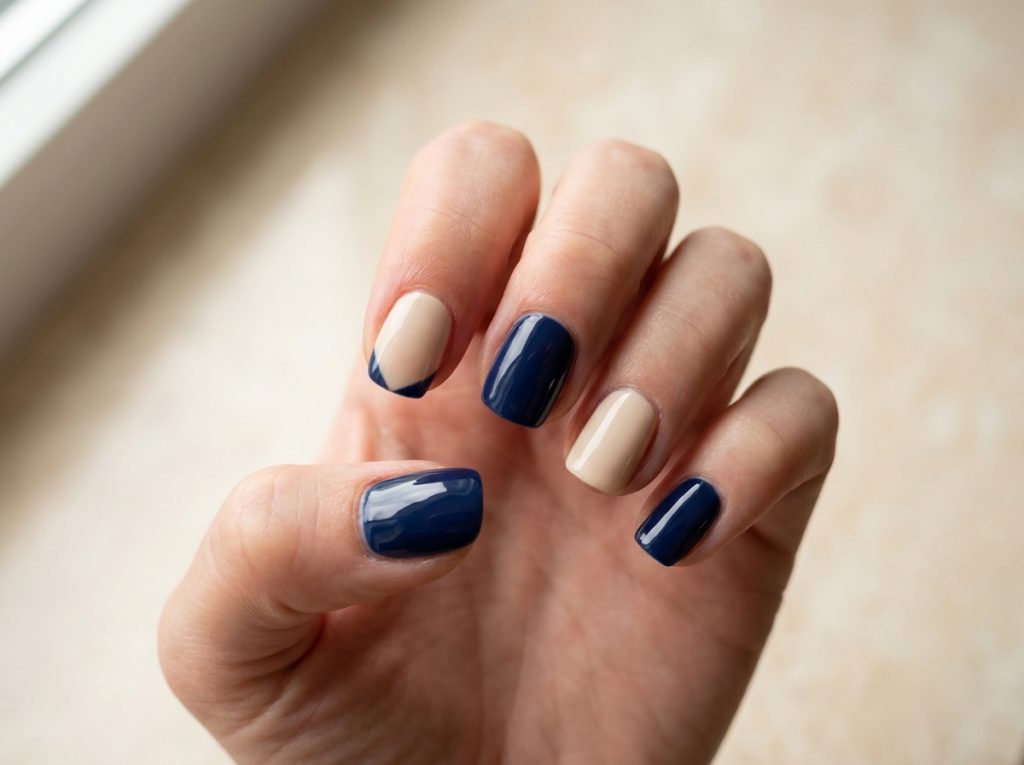
Alternate the shades from thumb to little finger. The first color will appear three times and the second twice, so decide which one you want to dominate slightly. Repeat or reverse the sequence on the second hand depending on whether you prefer matching or balanced asymmetry.
A high-contrast pair makes this arrangement graphic. Two neighboring shades make it softer. Try cream and navy for a clear pattern or caramel and chocolate for a tonal version. The technique remains ordinary single-color painting on each nail.
Write the sequence down before starting. It is easy to lose track when you are moving between hands and layers. A simple note such as “pink, brown, pink, brown, pink” prevents an unintended change halfway through the manicure.
4. Different colors on each hand
Paint one hand in the first shade and the other in the second. This is a bold placement choice with very simple application. It works especially well when the colors share a similar finish and depth, because the hands look related even though they do not match.
Choose a pair you enjoy seeing together: blue and green, pink and berry, or beige and chocolate. If one shade is much lighter, the contrast between hands will be more obvious. Check whether that is the effect you want before painting all ten nails.
You can connect the hands with one swapped accent on each ring finger. That adds a clear link without requiring artwork. If you prefer the cleaner full-hand version, leave it alone; the relationship between the two colors is enough.
5. A single dot in the second color
Paint every nail in the main shade and add one dot in the second color to each ring finger. This keeps the manicure mostly uniform while giving it a small detail. Place the dot in a similar area on both accent nails and leave room around it.
A dark dot on a light base is usually easier to read than two colors with nearly the same depth. If your second color is sheer, test the dot over the base first. You may prefer a whole accent nail rather than building a thick dot that still does not show clearly.
For more arrangements using this small movement, see our dot and shape accent ideas. The useful skill is controlling the size and placement of one mark, not filling every nail with a pattern.

6. A small side block
On one accent nail, paint a narrow block of the second color along one side, leaving the rest in the main color. The block can be a simple rectangle-like area or have a gently curved boundary. Keep the other nails solid so the accent is easy to read.
Choose a boundary that is comfortable to paint. A perfectly straight line is not necessary if the shape looks intentional. On a rounded nail, a soft curve may fit the outline better than a rigid vertical division.
If you use a guide, follow its instructions and test it on a sufficiently dry base. Pulling adhesive from polish that is not ready can disturb the layer underneath. A small detail brush is another option, but avoid repeatedly tracing the boundary until the block becomes much wider than planned.
7. A diagonal corner
Paint a small triangle-like corner in the second color near the tip of an accent nail. The main color should remain dominant. This is easier to fit on short nails than a large diagonal division running across the entire surface.
Try a dark corner over a light base for a clear result. If you want the lighter color over the dark one, check coverage first. Not every pale polish is intended to create an opaque detail over a deep shade, and extra thickness can create a different problem from the one you are trying to solve.
Repeat the corner on the same finger of each hand, or use it on all nails once you are comfortable with the motion. Our short color-block layouts include ways to scale corners and side blocks without crowding the nail.
8. A loose three-dot cluster
Place three dots of the second color on one accent nail, arranged as a small triangle. The dots can be similar in size or deliberately graduate from large to small. Decide which approach you want before you begin so the result does not look like an unintended size change.
Keep the cluster off-center if you want a relaxed arrangement. A centered cluster looks more orderly. Both work, but leave a visible background around the group rather than scattering extra dots into every empty area.
This design is a good bridge between a single dot and more complex art. You are still repeating one motion, but you are also learning to judge spacing. If the cluster looks crowded on a narrow nail, reduce it to two dots or move it to a wider accent nail.
9. A short curved stroke
Add a short curve in the second color near one side of a solid base. Think of it as part of a circle rather than a full outline. The curve can sit near the tip or slightly above the center, depending on the shape of your nail.
Practice the motion with your hand supported. A continuous gentle movement often looks cleaner than several small attempts to connect a line. If the curve becomes uneven, do not keep thickening it without a plan. A broader intentional color block may be a better fallback.
Our curved nail-art guide explains several placements for arcs and waves. Start with one accent per hand, then decide whether repeating the curve on another finger improves the set or makes it busier.
10. A repeated color swap
Paint the nails in an alternating sequence, then put a small dot of the opposite color on each ring finger. For example, a pink ring nail gets a brown dot and a brown ring nail gets a pink dot. The swapped detail ties the two colors together.
This works best when both colors can make a visible small mark over the other. If one is too sheer, keep the dots only on the lighter base. The design does not need perfect symmetry to remain coherent; it needs a clear repeated idea.
Avoid adding a third color to fix a contrast problem. Change the placement or simplify the detail instead. Working within two colors is useful because it encourages you to solve the design with proportion and space rather than more decoration.
Make a five-finger plan
Draw five short rounded shapes on paper and label them from thumb to little finger. Fill them with your two colors or write the shade names inside. This makes it easier to compare arrangements without repainting your nails.
Look at the sketch at a small size. Does one color dominate as intended? Are the accents grouped or scattered? Is the darkest shade concentrated at one end of the hand? There is no single correct answer, but these questions help you see the structure of the manicure.
For a more varied arrangement using the same planning method, our mix-and-match guide shows how to repeat a palette while changing the detail on selected nails. Start with the two-color version before adding more motifs.
Troubleshoot the color relationship
If the colors seem to clash, compare them in daylight before changing anything. Warm indoor light can alter your impression of pink, beige and gray. If you still dislike the combination, change the proportion: a strong shade used as one accent can feel very different from the same shade on five nails.
If the detail disappears, increase contrast or make the area larger. A tiny taupe dot on beige may be almost invisible, while a whole taupe accent nail remains clear. More coats are not always the solution; sometimes the design simply needs a larger color area.
If the set looks busy, remove the smallest details and keep the whole-nail arrangement. A two-color manicure can be complete without any dots or lines. The simplest version is often the easiest to repeat neatly on both hands.
Common questions
Do two-color nails need matching shades?
They need a relationship you like, which might be harmony or strong contrast. Two close neutrals create a quiet effect; blue and orange create a much bolder one. Use swatches and a placement sketch to decide how much of each color feels right.
Which design is best for a beginner?
One accent nail, neighboring accents and alternating colors all use ordinary polish application. Start there if you do not want detail work. A single dot is a manageable next step once you are comfortable with the base manicure.
Can I use one sheer and one opaque polish?
Yes, if you want that contrast. Keep in mind that the sheer nail may show the natural nail beneath it while the opaque one does not. Treat this as a deliberate finish choice rather than trying to force the sheer product to behave like a dense cream formula.
How do I make the second hand easier?
Choose the arrangement in advance, support your hands and simplify any detail that becomes difficult. A whole accent nail is a good substitute for a fine line. Our non-dominant hand practice plan offers specific ways to work on control without expecting instant symmetry.