
24 Korean Nail Art Ideas: Blush, Syrup Jelly, and Delicate Details

A translucent wash of color, a softly blurred pink center, or a tiny clear accent can make a manicure interesting without making it visually heavy. Those are useful starting points when you are drawn to Korean nail inspiration but are not sure which finish to ask for.
This gallery brings together 24 Korean-inspired nail art ideas across several distinct looks. Some rely on color transparency, some on soft gradients, and others on small surface details. You can choose one direction or combine two carefully, keeping the base and palette consistent.
Korean nail art is not a single uniform style, and these techniques are used by artists in many places. For reporting from Korean salons, see Allure’s Seoul nail-art gallery. The combinations below are design suggestions to adapt with your own artist.
Choose your version
Start with the effect you notice first in a reference image. If the nail looks see-through and colored all over, you may want a syrup or jelly effect. If the center is rosy and the edges fade away, choose blush. If a band of light changes as the hand moves, look at magnetic finishes.
A still photograph can flatten these differences. Ask the salon for a short video or a sample moved under ordinary light when the finish matters. Then decide on shape, color, and decoration as separate choices rather than requesting a whole set by a trend name alone.
| Your priority | Looks to consider | Detail to specify |
|---|---|---|
| Transparent color | 1–4 | Syrup depth and visible nail |
| A soft rosy center | 5–8 | Blurred edge and placement |
| Small luminous accents | 9–12 | Scale and surface height |
| Movement in the light | 13–16 | Magnetic glow or pearl |
| Quiet painted details | 17–20 | Open space around the mark |
| A carefully mixed set | 21–24 | One repeated palette |
Syrup and jelly color
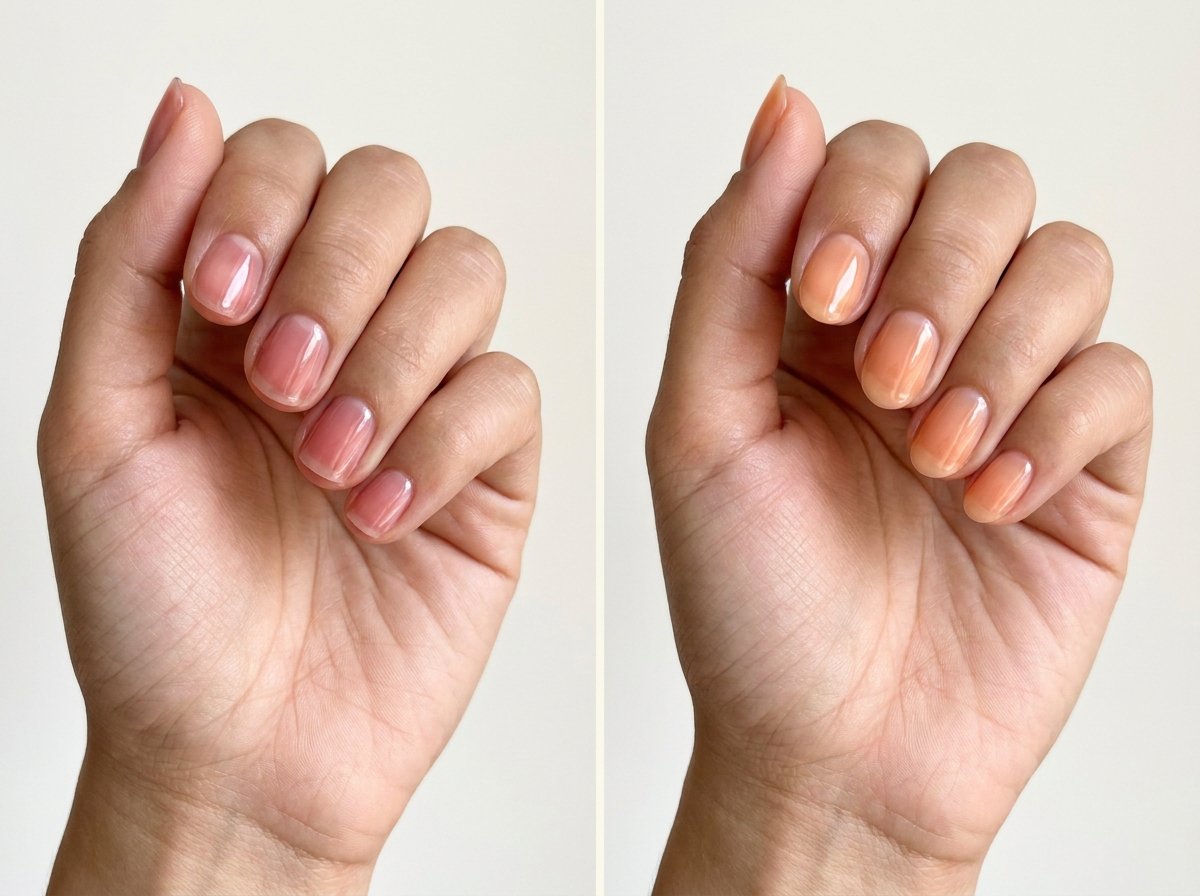
1. Rose syrup rounds
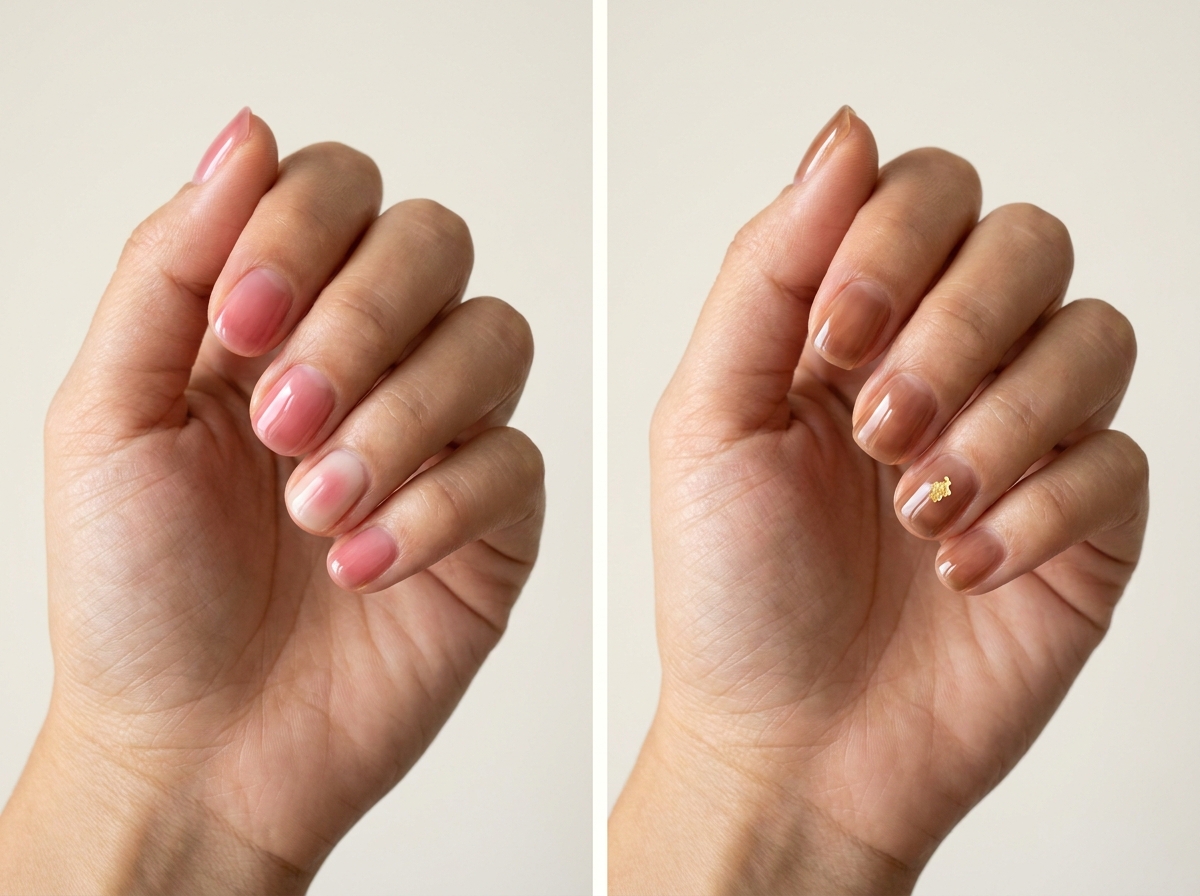
A translucent rose tint on short rounded nails is an easy introduction to the syrup look. The nail remains visible beneath the color, creating depth without a solid pastel layer. A glossy finish keeps the surface looking fluid.
Choose the amount of pink by looking at a sample over a natural-colored base. The same tint can appear much brighter over white, so a bottle image alone is not a reliable visual reference.
2. Apricot jelly ovals
Apricot jelly brings warmth to a transparent manicure. Keep the shade more peach than orange and let the natural free edge remain visible. A short oval outline makes the color feel soft and wearable.
This is a useful choice if you enjoy pink syrup but want a warmer variation. Leave it plain at first; the clear-looking depth and glossy surface provide enough detail without needing a motif.
3. Tea-brown translucent nails
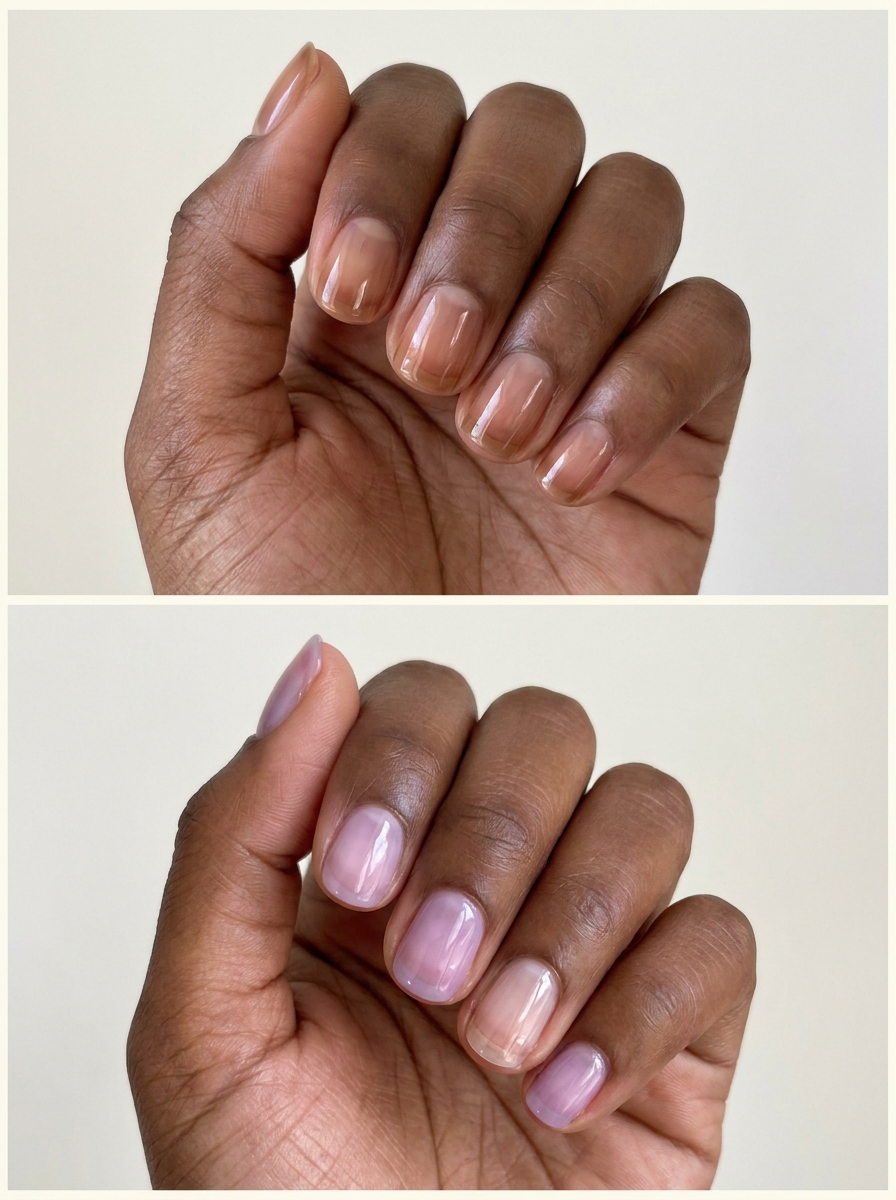
A sheer tea-brown gives the syrup effect a neutral direction. The color should resemble a light tint through glass, with the nail still contributing to the final appearance. Short squovals give the soft shade a tidy structure.
Ask for a brown that remains translucent rather than a diluted-looking opaque beige. That distinction changes the depth of the manicure and helps preserve the lightness that makes this version appealing.
4. Lilac jelly with one clear nail
Use a sheer lilac on most fingers and leave one nail nearly clear. The transparent accent makes the colored nails feel deliberate and gives the hand a little breathing room. Keep the same shine and shape throughout.
The lilac should remain visibly purple without becoming an opaque pastel. If the color is very cool, a neutral rather than pink base can help it retain the tone you liked in the reference.
Blush and soft gradients
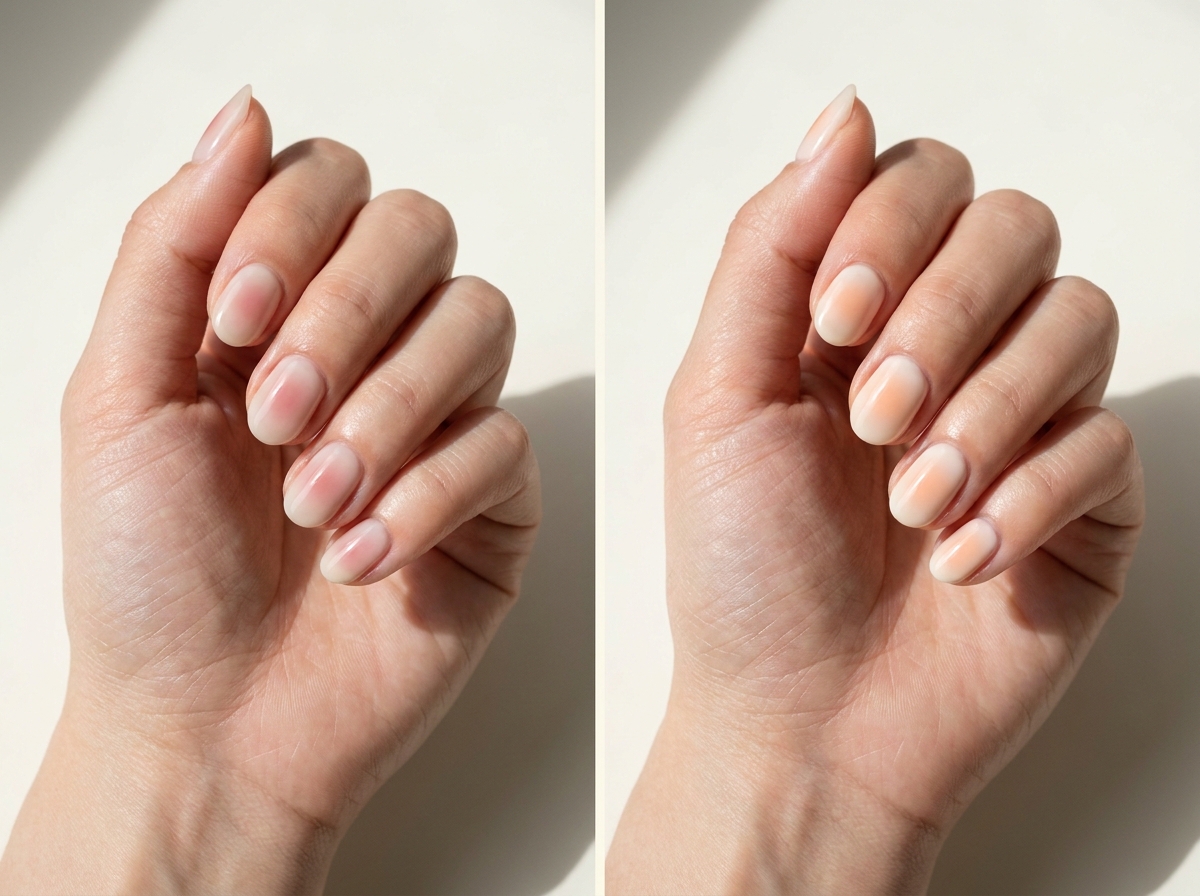
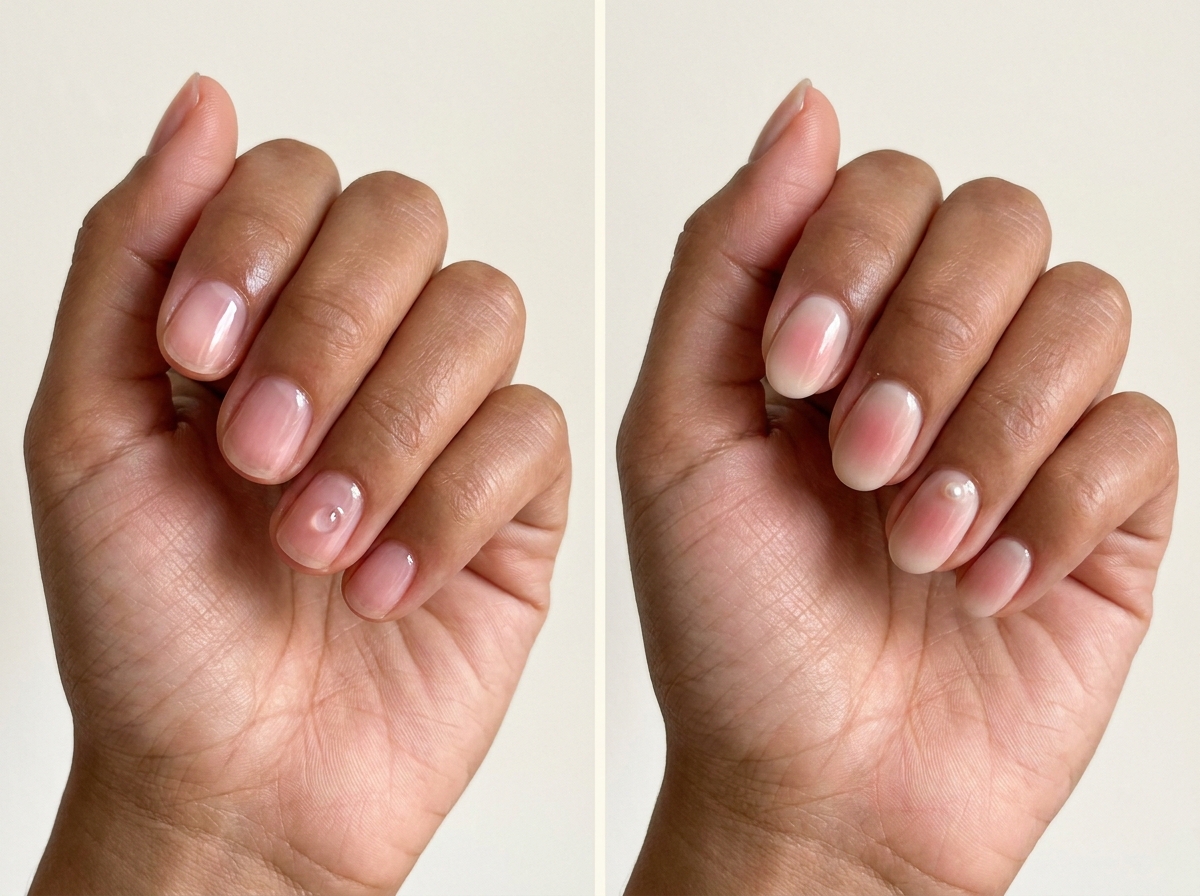
5. Classic rosy blush centers
A soft pink center fading into a pale neutral base creates a gentle blush effect. Keep the color concentrated in a rounded area, with no hard circular boundary. Short oval nails suit the soft composition.
The center does not need to be identical on every finger, but it should have similar visual weight. Ask for the strongest pink to stay within the nail rather than spreading all the way to the sides.
6. Peach blush on cream
Use a warm peach center over a softly creamy base for a less rosy interpretation. The cream should remain light enough to let the blur feel delicate. A small center keeps the manicure from becoming an all-over peach set.
This is a good option if you prefer warm clothing colors. Keep any added decoration cream or pale gold so the peach remains the main source of warmth.
7. Lavender halo blush
A muted lavender center gives blush nails a cooler mood. The color should soften outward into a translucent base instead of forming a sharply painted dot. Keep the shape round or oval for a gentle result.
Try the lavender on one accent nail before choosing it across the whole hand if you are unsure. It can look more unusual than pink while using exactly the same restrained placement.
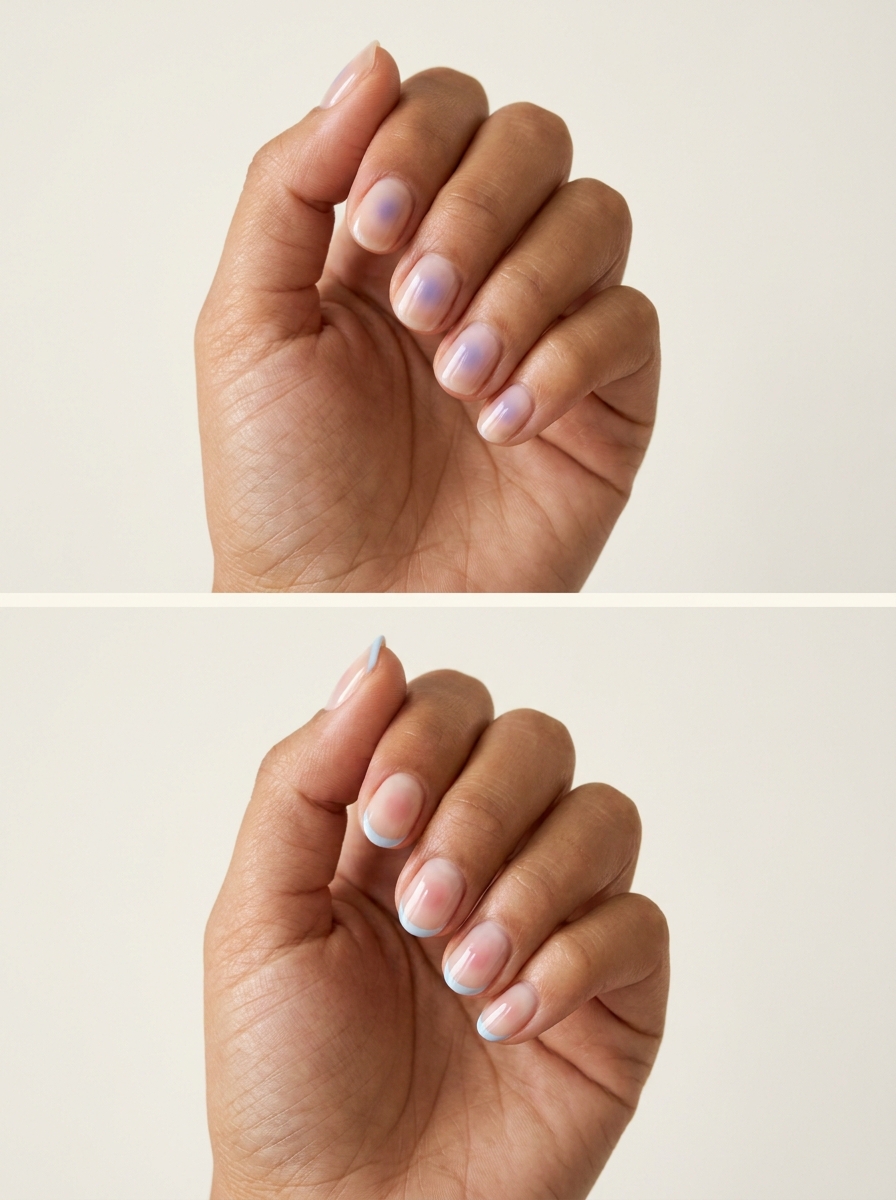
8. Blush with a powder-blue edge
Combine a small rosy center with a fine powder-blue tip. The two details occupy different areas, leaving a narrow zone of quiet base between them. That separation keeps the manicure readable.
Use a very shallow French curve on short nails. If the blush and tip nearly meet, reduce the size of one rather than adding more coverage. Both ideas need enough room to remain distinct.
Clear accents and delicate decoration
9. One clear raindrop accent
A small clear raised detail on one translucent pink nail gives the impression of a droplet. Keep the rest of the set plain so the surface change becomes the focus. A low profile is easier to integrate into an everyday manicure.
Discuss placement and the appropriate product with your artist. The reference is about the visual effect; a blob of ordinary topcoat is not automatically a suitable substitute for professionally constructed raised art.
10. Tiny pearl beside a blush center
Place one small pearl-like accent slightly beside the pink center of a blush nail. The offset position lets both details remain visible. Leave the other nails simple, using either plain blush or a translucent base.
Choose a restrained size rather than a large pearl that covers the gradient. If you prefer a completely smooth surface, a painted pearl effect can echo the color and shine without creating the same raised texture.
11. Short clear wave accent
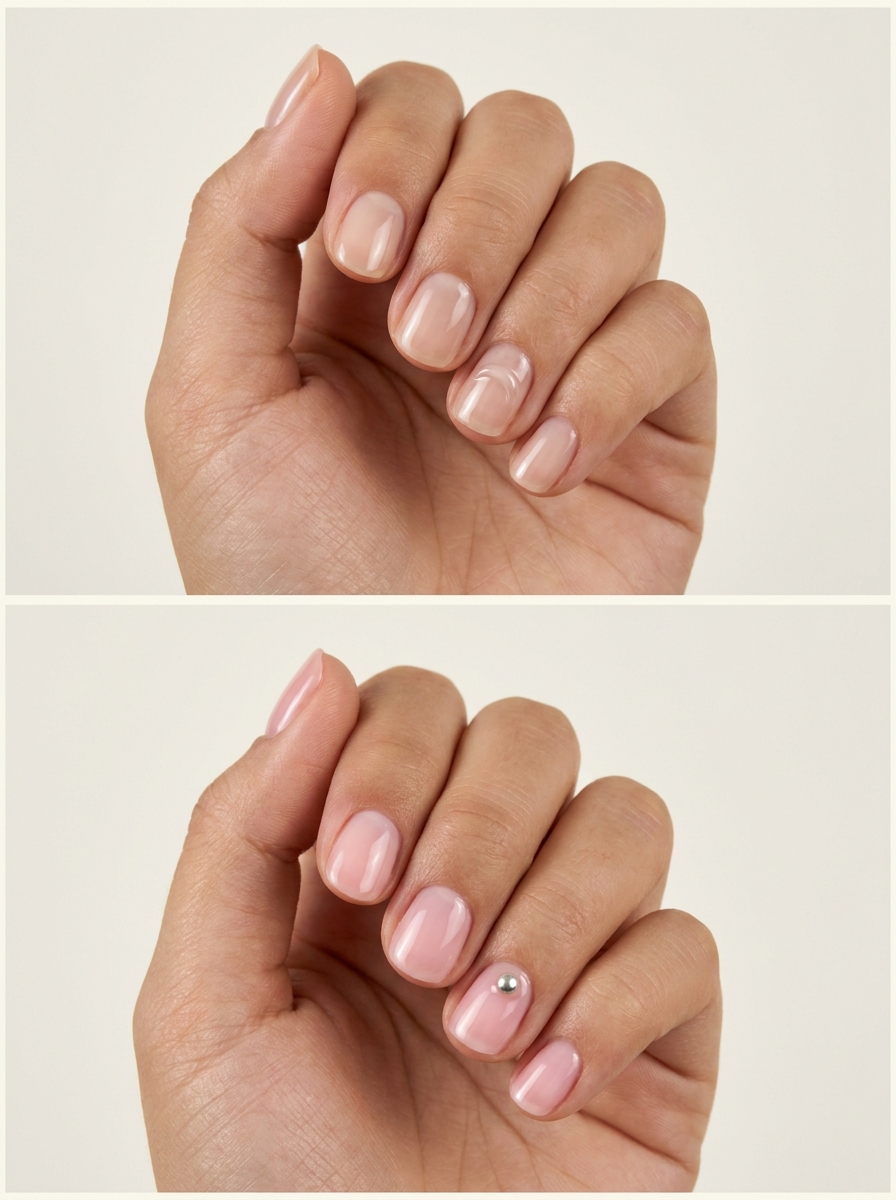
A small transparent curved ridge on one neutral nail introduces texture without adding color. Keep it within the center area and away from the side edges. Plain glossy nails around it allow the shape to read clearly.
Ask for a low, smooth version if you want something practical for daily wear. A dramatic sculptural wave is a different design choice and may need a different placement or length.
12. Miniature silver bead detail
One small silver-colored bead or bead-like accent can act like nail jewelry. Put it on a clear-looking or softly tinted base, with the rest of the hand kept quiet. The metal contrast makes a tiny detail visible.
Decide whether you want a genuinely raised piece or a flatter painted interpretation. Show the artist your preferred scale so the finished accent remains delicate rather than becoming the center of a heavily decorated nail.
Luminous finishes
13. Champagne magnetic glow
A pale champagne magnetic finish creates a moving glow across a short nail. Keep the background light so the result feels airy instead of dramatic. The effect should appear as reflected light within the color rather than a dense glitter surface.
Look at a moving sample before choosing. Magnetic finishes can appear very different when viewed head-on and from the side, so one photograph may not show the effect you will see most often.
14. Rose velvet-like shimmer
A pink magnetic finish with a broad, softly dispersed glow gives a velvet-like visual effect. Keep the actual surface glossy and smooth; velvet here describes how the light looks. Short rounds reinforce the softness.
Choose this when you want more movement than plain syrup but no extra artwork. A small change in the direction of the light can provide enough variety across the nails on its own.

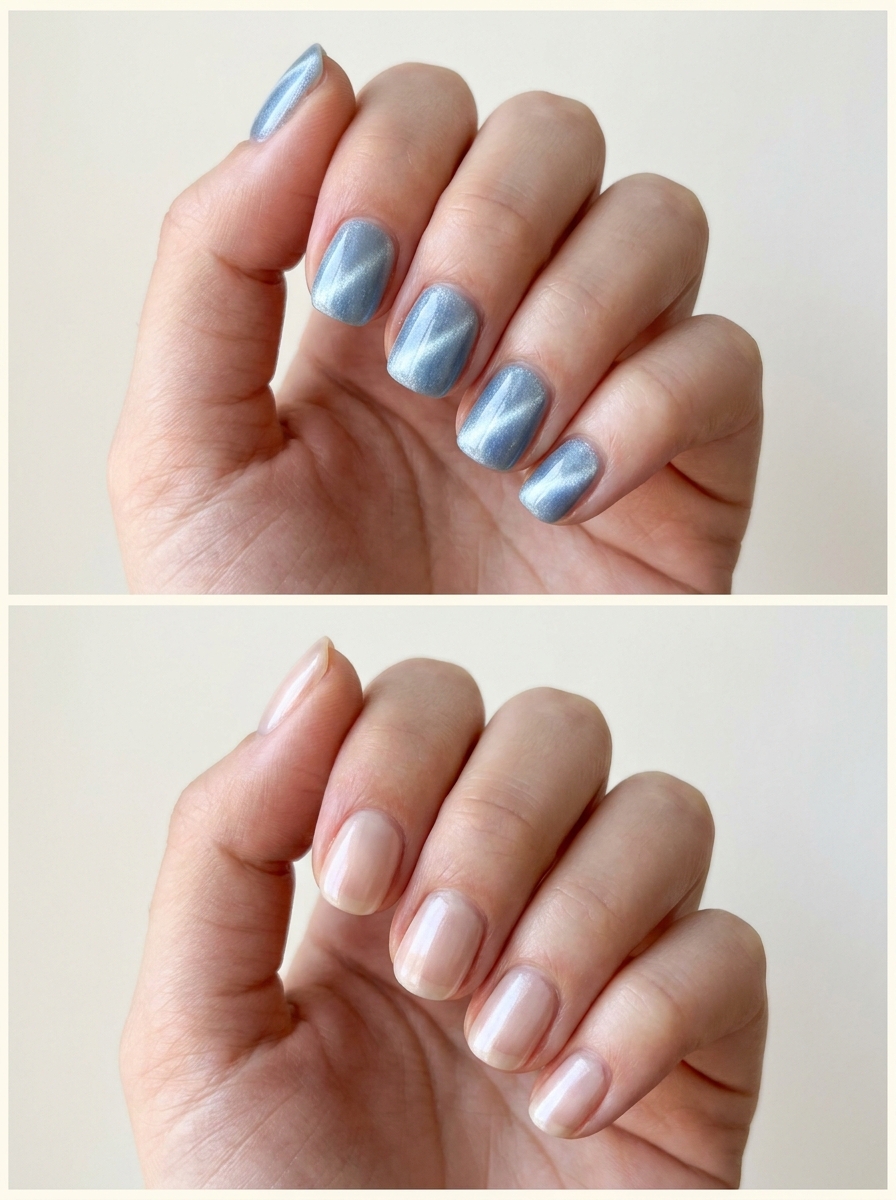
15. Icy blue diagonal light
A cool blue magnetic finish with a diagonal luminous band gives a more defined cat-eye look. The diagonal adds movement while the pale color keeps it gentle. Short squovals provide a clean frame.
Keep the direction broadly consistent across the hand if you want a coordinated set. Randomly changing the angle on every nail can create a busier effect, especially when the light band is strong.
16. Neutral pearl veil
A light pearly reflection over a translucent nude gives a quiet alternative to magnetic shimmer. The effect changes with viewing angle, but it does not create the same traveling band. Keep the color mostly neutral.
Choose a restrained pearl rather than an intense rainbow shift if you want the natural nail to remain the focus. This is useful for pairing with one small charm or a tiny painted detail.
Small painted details
17. Sparse cocoa speckles
A few small cocoa flecks on a cream-tinted nail create an irregular, organic pattern. Leave large areas of base visible so the speckles feel light. Keep the pieces varied in size rather than evenly spaced like polka dots.
Use the pattern on two accents and leave the rest plain cream for a quieter set. The warm brown gives less contrast than black while retaining the character of the scattered marks.
18. One fine white bow outline
A tiny white bow outline on a sheer rose nail adds a recognizable motif without filling the surface. Use slender loops and short tails, and keep it on one accent nail. The neutral base provides the space the shape needs.
A wider thumbnail can be a better canvas than a tiny ring fingernail. Let the artist choose a readable scale rather than insisting on a bow so small that its lines merge.

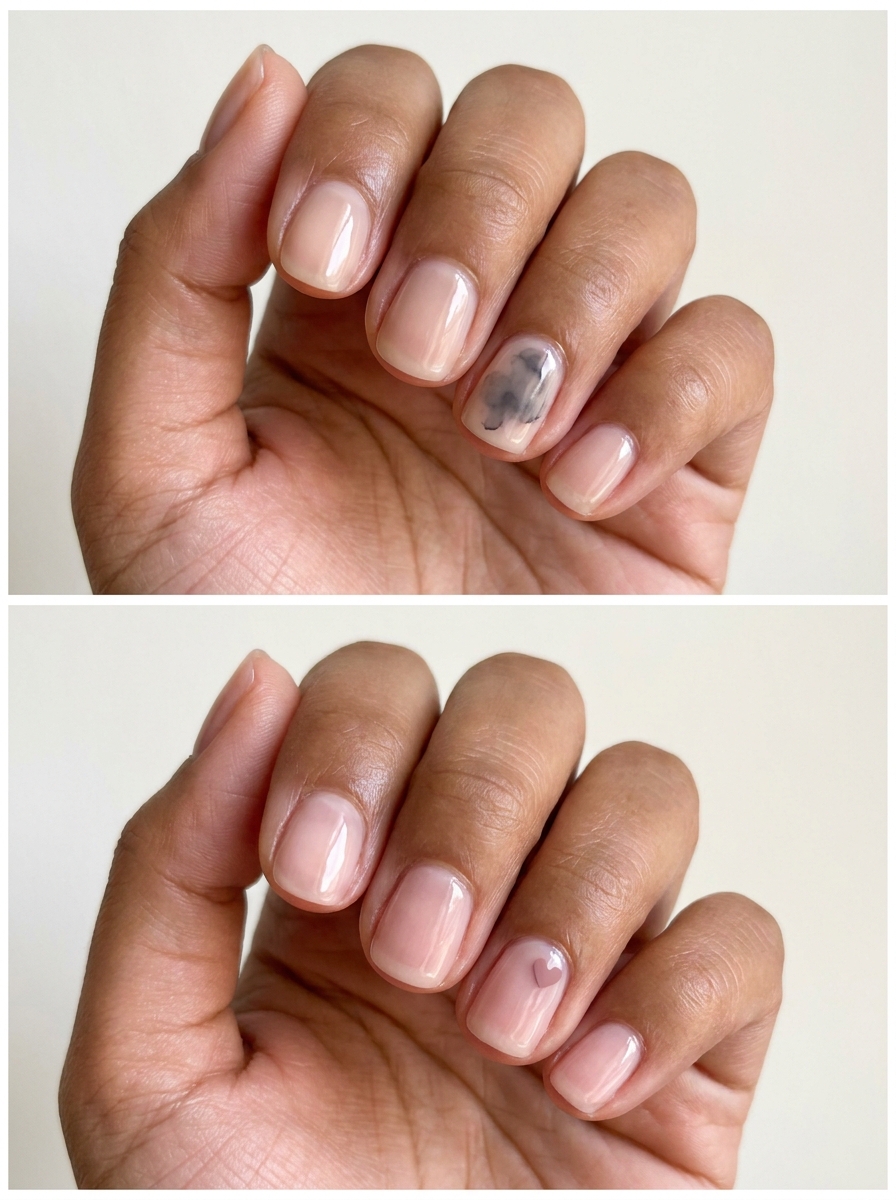
19. Soft gray ink-like cloud
A diffuse gray wash on a translucent accent nail gives an abstract, clouded effect. Keep the edges irregular and the color light. Plain nude nails around it prevent the detail from looking like a full marble set.
Ask for an airy wash rather than dark veins if softness is the goal. The visual direction is more about gentle color drift than a specific stone pattern.
20. Tiny pink heart near the edge
Place one small pink heart near the upper side of a clear-looking nail. The location makes it feel like a little detail discovered close up. Keep the remaining nails softly tinted and plain.
Choose a heart only moderately deeper than the base. Bright red produces a stronger statement; a muted rose keeps the design within the same delicate palette as the rest of the manicure.
Mix two ideas without crowding the set
21. Syrup pink with one blush accent
Use an even rose syrup tint on most nails and a softly concentrated blush center on one. The shared pink keeps the set cohesive while the distribution of color changes. This is an easy first mixed-effect manicure.
Match the warmth of the two pinks. A cool blush beside warm coral syrup may feel like two unrelated designs, whereas closely related tones make the difference in technique easier to appreciate.
22. Tea jelly with a gold fragment
A translucent tea-brown base paired with one small gold-colored fragment feels warm and quiet. Keep the metallic detail irregular and limited to one nail. The contrast between transparent color and opaque reflection supplies the interest.
Avoid scattering gold over every finger if you want a minimal result. One fragment can echo a ring or bracelet while allowing the glossy brown to remain the main impression.
23. Blue syrup with a clear accent ridge
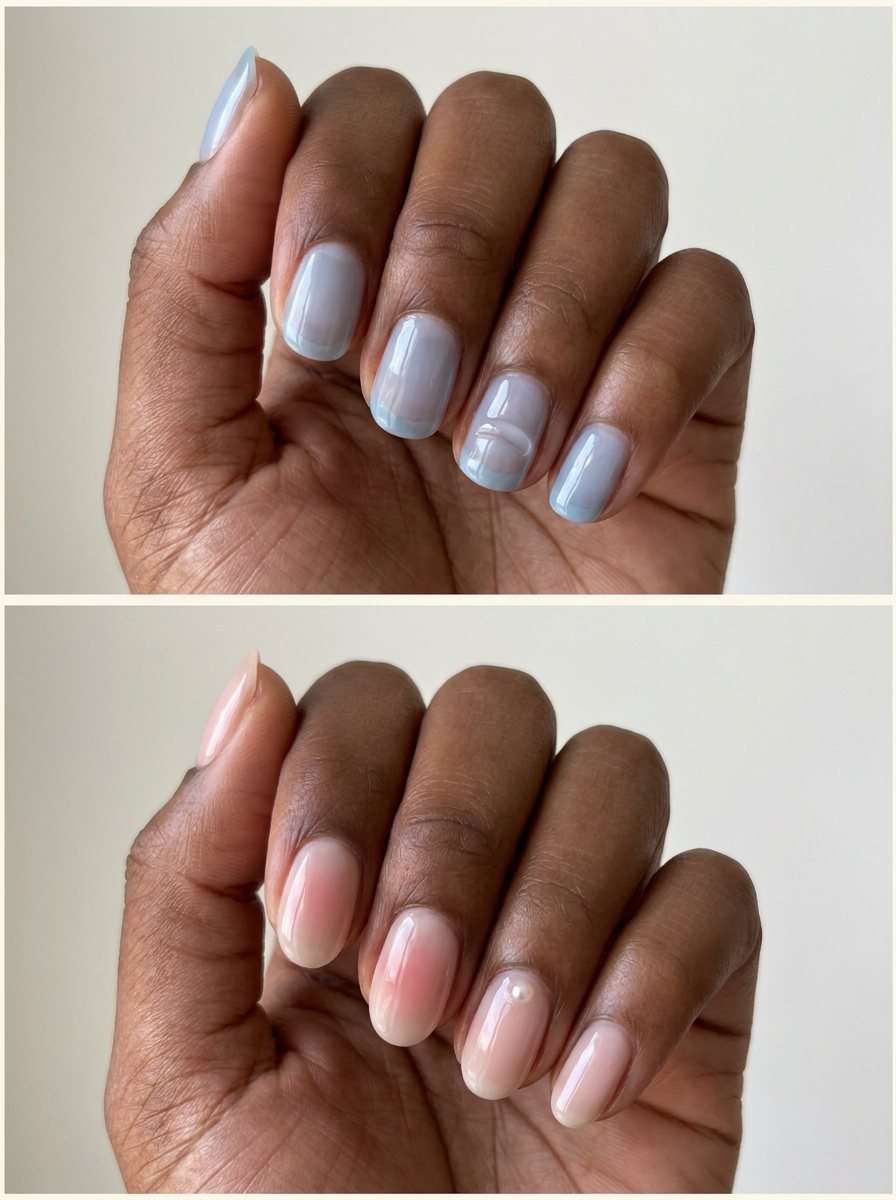
Combine a pale blue transparent manicure with a single low clear ridge on one accent nail. The blue provides color; the ridge changes how light moves across the surface. Keep the rest of the nails smooth.
Choose a small curved ridge rather than a full network of waves. The limited texture lets the set feel airy and makes the distinction between plain syrup and raised detail easier to see.
24. Blush, plain gloss, and one pearl
Build a restrained mixed set with two blush nails, two plain translucent nails, and one tiny pearl accent. Use the same base across all five so the details feel related. The plain nails are an intentional part of the composition.
Plan the finger placement before starting. If the blush is strong, choose a smaller pearl; if the blush is faint, the pearl can provide the main point of contrast without needing additional art.
Turn a saved reference into a clear salon request
Describe the main finish first
Use a sentence such as “I want sheer rose color with one soft blush accent and no raised decoration.” That establishes transparency, palette, and texture. Then discuss shape and length. A trend label can start the conversation, but the details make the request useful.
Limit a mixed set to two main ideas
Syrup plus blush, magnetic shimmer plus one plain nail, or a translucent base plus a single charm can all feel balanced. Combining gradients, chrome, flowers, multiple charms, and different base colors may produce a beautiful maximalist set, but it will no longer have the quiet effect shown here. Choose the elements that matter most to you.
Check the effect in motion
Ask to see magnetic, pearl, and raised details from more than one angle. A finish that looks subtle in a still image may be highly reflective in sunlight. A charm that seems small from above may have more height than expected. Those are useful practical choices to settle before completing the whole hand.
Explore related finishes
Our finish comparison helps distinguish several kinds of shine. For subtle edge details, browse short French tips. Byrdie’s Korean nail inspiration provides another editorial reference point when you are deciding which visual direction to explore.
Frequently asked questions
Are syrup nails and blush nails the same?
They can share translucent products or colors, but they describe different appearances. Syrup usually emphasizes sheer colored depth across the nail. Blush emphasizes a concentrated soft center that fades toward the edges.
Do Korean-inspired nails need to be long?
No. Transparent color, a small blush center, sparse speckles, and one tiny accent can work on short nails. Large sculptural details need more planning, but length is not a requirement for the overall aesthetic.
Does every design need gel?
Not every visual idea does. Some color washes and painted details can be interpreted with regular polish or finished press-ons. Magnetic and sculptural effects depend on the products and technique chosen. Ask your artist about a suitable option rather than improvising product combinations.
Is a Korean-inspired style the same as Douyin nails?
The labels should not be treated as interchangeable origins. Douyin refers to a Chinese platform and its associated beauty references. Nail techniques travel across countries, so describe the actual effect and credit specific artists or sources when their work is the reference.
Choose the feature that first caught your eye: transparency, a blurred center, moving light, or one tiny accent. Keeping that feature clear will make your manicure more satisfying than adding every detail from several different references.