
7 Subtle Halloween Nail Ideas for Everyday October Outfits

Subtle Halloween nails work by suggestion. A dark berry base, a tiny moon or a warm orange dot can make a manicure feel right for October without turning every finger into a costume. This is useful when you want a seasonal detail that still sits comfortably beside the clothes you wear most days.
The seven ideas below keep the palette restrained and the artwork small. They are style options rather than rules about what is appropriate at work; dress codes vary, and your own preferences matter. Choose the level of contrast you like, then adjust the accent to suit the space on your nails.
Decide how much Halloween you want
There are three easy ways to make a manicure more understated. You can soften the colors, reduce the number of accent nails or simplify the motif. You do not need to do all three at once. A clear black moon on one pale nail can be quieter overall than a faint pattern repeated across all ten fingers.
Think about what you want to notice first. If the answer is the overall color, choose a mostly solid manicure with one small detail. If you want the motif to be the first thing people see, give it more contrast but keep the surrounding nails plain.
Look at the polish beside an outfit you actually wear. A burnt orange may feel very natural next to camel and denim, while a dusty lavender might fit better with charcoal and navy. Seasonal styling does not have to mean buying the exact shades shown in an inspiration photograph.
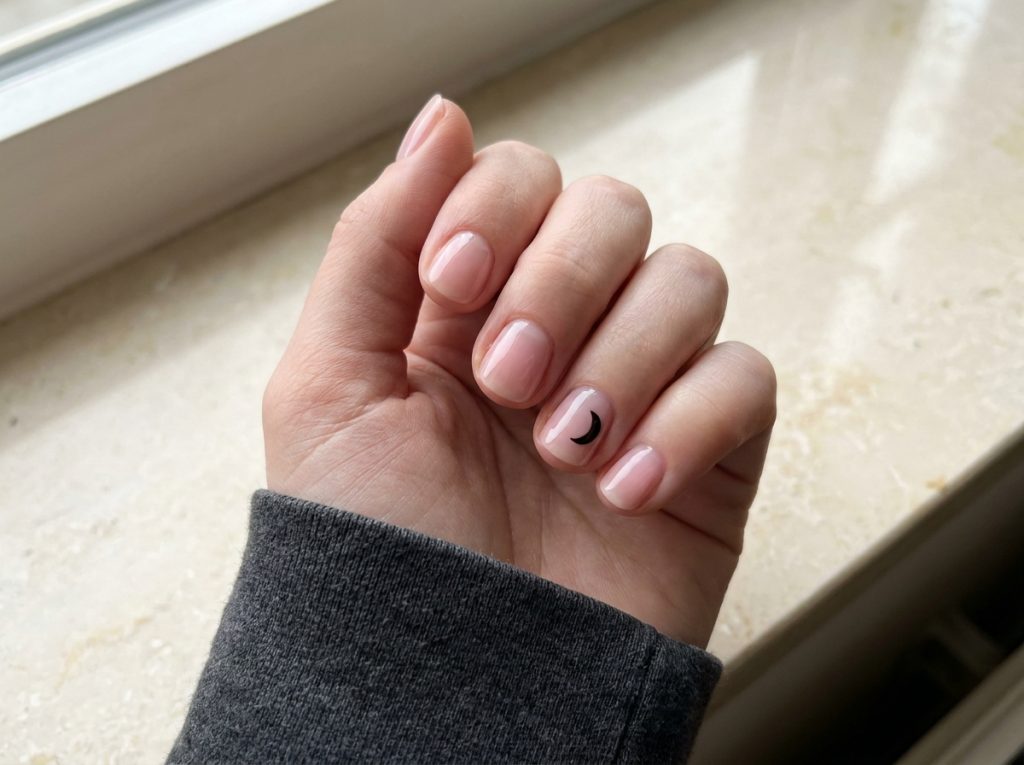
1. Sheer pink with a small black moon
Start with a sheer pink finish that you already enjoy wearing. Place one tiny black crescent on each ring finger, leaving a generous border of pink around it. A flat nail sticker is the simplest route if you do not want to paint a curved shape.
Choose a pink that looks even at the coverage you prefer. A deliberately sheer base can show the natural nail beneath it; that is different from a patchy attempt at an opaque color. If pale polish tends to look streaky on you, our pale-polish application guide helps you decide whether the issue is technique or the finish you are asking the formula to produce.
The black moon provides enough contrast on its own. Skip extra stars unless the nail genuinely has room for them. For an even softer version, use deep brown instead of black and place the moon slightly off-center rather than directly in the middle.
2. Chocolate nails with one copper dot
A glossy chocolate manicure can feel autumnal before you add any art. Place a single copper-colored dot on one nail per hand to make the set more festive. Use a metallic nail polish intended for nail application, not loose craft materials.
Position the dot in the upper third of the nail, with space between it and the skin. Keep it small enough to look like a detail rather than a second color block. A copper dot on the thumbnail can be a quiet option if you prefer the accent to be less obvious when your hand is resting flat.
Check the contrast in ordinary daylight. Copper and warm brown can blend together under yellow indoor light. If you want the dot to show clearly, choose a lighter metallic shade or a deeper brown. If you like a barely visible accent, that close color relationship can be the point.
3. A cream manicure with one pumpkin-colored oval
Use cream on most nails and place one small orange oval on an accent nail. Leave out the carved face. A short dark stem is enough to suggest a pumpkin, and the shape can also read as an abstract autumn detail when viewed from a distance.
A muted orange makes the result softer, but bright orange can work if the motif stays small. Place the oval slightly to one side so it does not look like a large central spot. The cream background should remain the main feature of the nail.
This is a useful choice when you want a manicure that lasts beyond a single Halloween event. You can enjoy it as a harvest-inspired design throughout October. If you prefer more color combinations in the same mood, see our fall palette guide for ways to pair rust, cream, brown and deeper accent shades.
4. Deep berry with a fine black arc
Paint a deep berry base and add a short black curve on one accent nail. Keep the curve near one side instead of outlining the whole nail. The contrast is deliberately low, so the detail may become visible only when the light catches the surface.
Choose this for a quiet, moody effect rather than a design you expect to read clearly from across a room. If your berry is almost black, a black line may disappear entirely. In that case, use a slightly lighter berry or switch the line to a muted metallic shade.
The arc does not need to be perfectly symmetrical. It should follow a smooth path and stop before crowding the edges. Practice the same movement on a tip first. Our curved nail-art guide explains ways to use arcs and partial curves without trying to paint a complete ring around the nail.

5. Smoky gray with two pale dots
Choose a medium or deep gray and add two small pale dots to one nail. They can suggest ghost eyes without requiring a white ghost shape. Keep the dots close enough to read as a pair and leave the other nails plain.
White gives the strongest contrast. A pale cool pink or soft cream will make the eyes less graphic. You can omit pupils for a very simple version or add tiny dark pupils if the dots are large enough to hold them without merging.
Gray is useful when black feels too strong beside your usual clothes. A blue-gray works well with navy, while a warmer gray can sit comfortably beside beige. These are visual pairings, not restrictions based on skin tone. Hold the bottle beside your hand and choose the shade you enjoy looking at.
6. A dark red manicure with one sheer nail
Paint most nails a glossy dark red and leave one accent in a sheer pink or clear finish appropriate to your polish system. Add a tiny dark red dot to that accent. The repeated red connects the two finishes without a literal Halloween symbol.
The design feels seasonal because of the depth of the red and the contrast with the lighter accent. If you want an extra Halloween cue, replace the dot with a small star sticker. Keep the sticker flat and comfortably within the nail edges.
Plan the accent finger before painting. A sheer ring finger is an obvious focal point; a sheer thumbnail is more discreet. Do not feel obliged to use both. One lighter nail on each hand already creates a complete arrangement and lets the red remain the main color story.
7. A muted orange side detail on beige
Paint a beige base, then add a short curved orange stroke near one side of an accent nail. Think of it as a small brush mark rather than a full stripe. Leave beige visible between the detail and the skin.
A rust or terracotta shade gives a softer effect than fluorescent orange. If your beige and orange are close in depth, the detail will be quiet. If you want it to show more clearly, choose a lighter beige rather than making the orange stroke thicker and thicker.
Repeat the detail on one nail of each hand and keep the rest beige. This is an easy design to adapt later: replace orange with blue, olive or berry using the same placement. The seasonal part comes from the palette, while the layout remains useful all year.
Build a manicure around one accent
An accent needs support from the surrounding nails. If your motif is black, repeating black as the main color can make the whole set stronger, but it can also make the accent disappear. A pale base around the motif creates contrast; solid dark nails elsewhere provide balance.
Try sketching two versions before you paint. In the first, use the same background on all nails. In the second, put a lighter background only on the accent. Compare them at a small scale. The simpler sketch often tells you which version will remain readable on your actual hand.
You can also use finish rather than color to create a difference, but check that your products are compatible. A glossy accent among matte nails is more noticeable than it sounds. If your aim is a quiet manicure, a consistent finish across the set may be easier to wear than several competing textures.
Keep the application simple
These ideas are intended for ordinary polish or suitable nail stickers. Follow the directions for your base, color and top coat, including the recommended time before applying another layer. Do not add a gel top coat as an improvised way to speed up an air-drying manicure.
Set out the detail tool before painting the base. Searching through a bag for a sticker sheet with freshly painted nails is an avoidable way to smudge your work. Open packaging, choose the sticker size and make your placement sketch while your hands are still bare.
If you are painting a dot or a short curve, practice it at nail size on a spare tip. Large practice marks can hide control problems that become obvious when you shrink the design. A few small repetitions are more useful than covering a whole sheet with shapes you will never paint at that scale.
Make the manicure work in photographs
Small details can vanish under a bright reflection. Before deciding that your design is too subtle, move the hand slightly and look at it in soft daylight. A window off to one side often reveals the art more clearly than a light reflected directly in the center of each nail.
Use a plain background that does not compete with the manicure. A charcoal sleeve can help a pale moon design stand out, while a cream background may suit a deep berry set. Keep props away from the accent nail so they do not hide the very detail you want to show.
If you share the design on Pinterest later, take both a whole-hand photograph and a closer image of the accent. The wider photograph shows how understated the set feels; the closer one explains the small detail. Neither image needs heavy color editing, which can make the polish look unlike the actual result.

Common questions
Are subtle Halloween nails always neutral?
No. A bright orange manicure with one small black dot can be simple even though the color is bold. Subtlety can come from the amount of detail, the number of accent nails or the contrast between colors. Choose the combination that matches your own idea of understated.
Can I wear these after Halloween?
The chocolate, berry and abstract curve designs work as general autumn manicures. A pumpkin without a face also feels more seasonal than costume-specific. A ghost or moon is more clearly themed, but there is no practical reason you must remove it on a particular date if you still enjoy it.
What should I ask for at a salon?
Describe the base shade, the accent finger and the approximate size of the detail. For example: glossy chocolate on every nail, with one small copper dot on each ring finger. Show a reference for the placement if you have one, and discuss the product system and removal method with the technician separately from the design.
How can I make a bold inspiration image quieter?
Keep one motif and remove the others. Reduce the number of accent nails, soften one color or use a smaller version of the main shape. Avoid shrinking every element from a busy long-nail design onto a short nail. Our short Halloween layouts give examples of choosing a single readable feature instead.
What is the easiest option for a first attempt?
Choose chocolate with one copper dot or dark red with a sheer accent. Both rely mostly on ordinary polish application. A moon sticker is another simple route if it fits your nail comfortably. Save fine curved lines for a day when you want to practice rather than rush.