
9 Short Halloween Nail Ideas That Leave Room for the Details
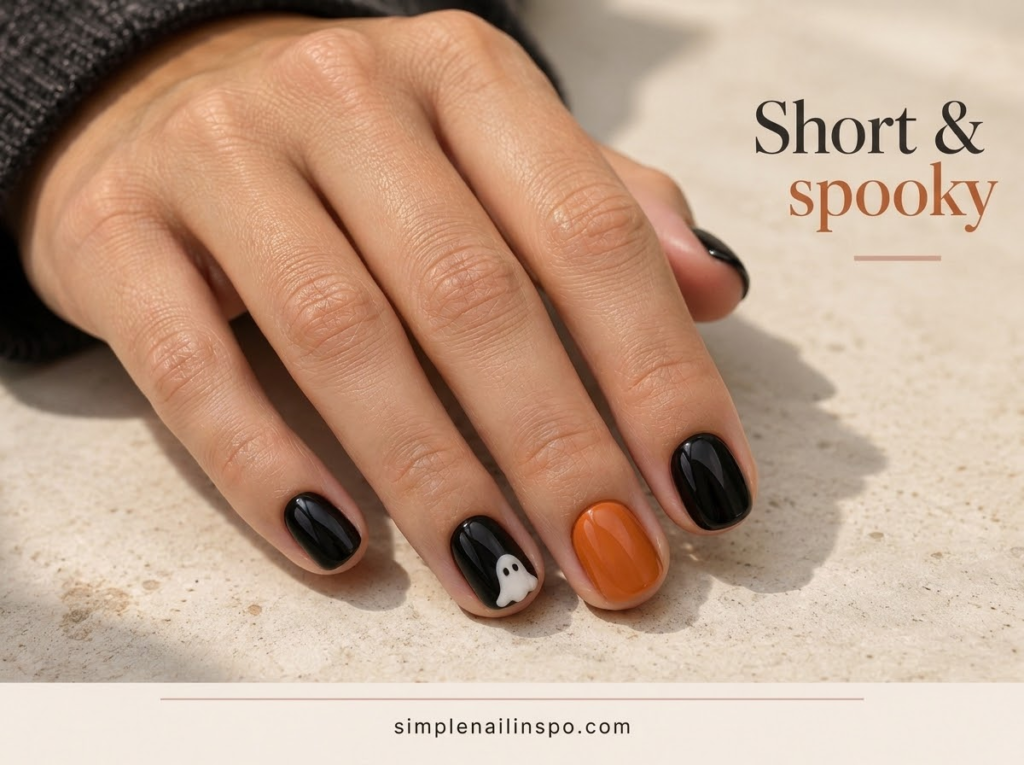
Short Halloween nails do not need miniature versions of the elaborate sets you see on long extensions. They need a different layout. A pair of eyes, an off-center pumpkin or a small crescent can carry the theme when it has a clear background. Trying to fit a whole haunted house onto the same space usually makes the details harder to read.
This guide focuses on where to put the art, how large to make it and what to leave out. The nine ideas work with ordinary polish or suitably sized nail stickers. You can keep your current comfortable length; there is no need to grow a free edge just to wear a seasonal design.
Start with the space you actually have
Look at your nails with your hand relaxed on a table. The widest visible area is not always the center of the nail. A rounded thumbnail may have room for a pumpkin, while a narrow little fingernail may look better in one solid color. Plan each finger as its own small surface rather than forcing identical artwork onto all five.
Decide which nail will carry the main motif. The thumb gives you more room, but it can be less visible when your hands are resting naturally. The ring finger is a familiar accent position; the middle finger can work well when you want the motif visible in a photograph of your whole hand.
A useful starting rule is to leave a clear strip of background on every side of the motif. This is a visual choice, not a measurement you need to calculate. If the shape touches both sidewalls in your paper sketch, simplify it before trying it in polish.

1. A ghost that starts at the tip
Instead of fitting a complete ghost in the middle of the nail, let its white body enter from the free edge. Paint a small rounded white rise over a black base, then add two black eyes within the white area. The lower part of the ghost can disappear beyond the tip.
This approach removes the need for a wavy hem and gives you more room for the face. Keep the eyes close enough to read as a pair but separate enough that they do not merge. A mouth is optional; on a very short nail, leave it out.
Use this on one nail per hand and keep the others black, white or muted orange. If the white section becomes too large, you can treat it as a white accent nail with a face rather than trying to redraw the boundary several times.
2. A pumpkin placed to one side
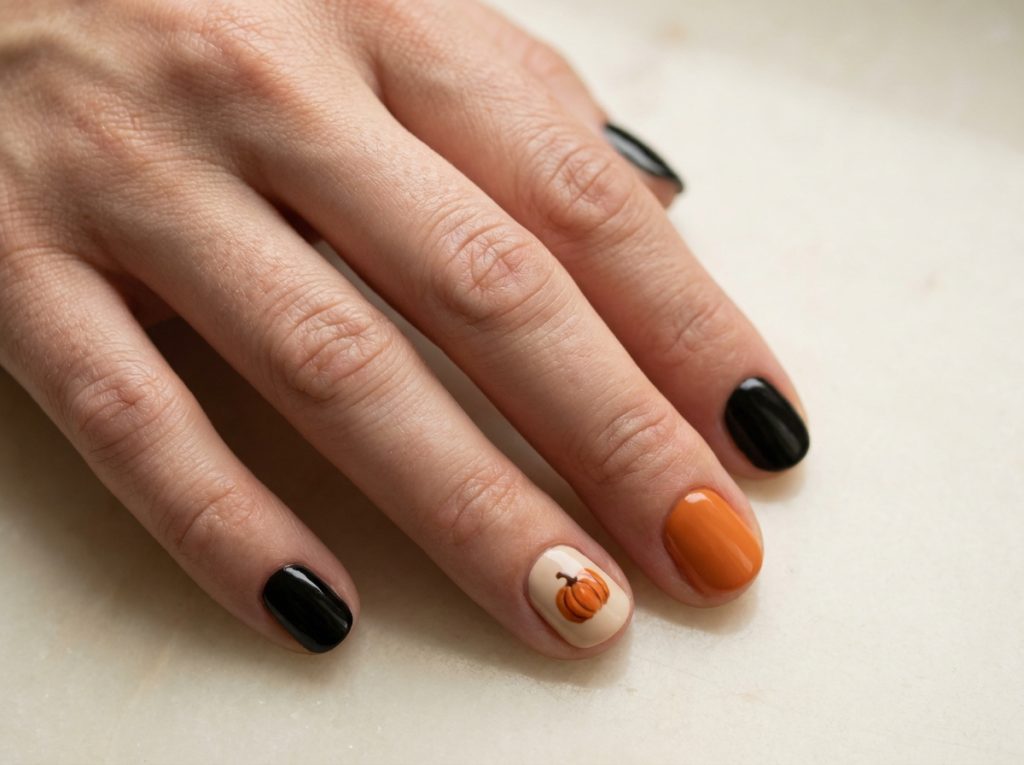
Put a small orange oval slightly to the left or right of center on a pale base. Add a tiny stem and stop before adding ribs or a face. The offset placement feels more relaxed than trying to center a perfect circle on every nail.
Choose a base that lets the orange remain visible. A pale pink, cream or warm beige can soften the contrast. If your orange is translucent, test it over the chosen base first; several heavy layers are not a good substitute for a polish that gives the coverage you need.
A pumpkin sticker can make this even easier. Compare its width with your nail before peeling it away from its backing. A design that looks small in a product photograph may still be too wide for your little finger. Put the larger sticker on the thumb and leave the small nail plain.
3. Two eyes, no face
On glossy black nails, two tiny pale dots suggest eyes without taking up much space. Place them across the upper half of one nail, not directly against the skin. White creates strong contrast; pale yellow gives a softer, slightly eerie effect.
If you want pupils, make the first dots large enough to accept a smaller black dot. Otherwise, the two pale dots can stand alone. There is no requirement to turn every detail into a fully illustrated character.
When your second dot is bigger than your first, resist the urge to enlarge both repeatedly. Let the pair dry as directed, then judge the result from arm’s length. A small difference may add expression rather than look like an error. For more control practice, use the dot exercises in our beginner tool guide.
4. A tiny orange corner
A small diagonal corner of orange over a black or deep brown base creates a Halloween palette with no illustration at all. Keep the orange section shallow so most of the nail remains dark. Repeat it on two nails, or use a single corner accent beside solid orange nails.
The diagonal does not have to cross the same proportion of every nail. On a narrow nail, make the corner smaller; on a broad thumbnail, let it extend a little further. What matters is the repeated direction and color relationship.
You can reverse the palette and put black over orange if your orange does not cover a dark base well. This is often the simpler painting order. Test the colors on a practice tip before committing to the whole set, especially when one shade is much more sheer than the other.
5. A small moon on a dark base
Put one pale crescent slightly above the center of a navy or black nail. Keep the surrounding nails plain. A tiny moon decal is a practical choice if painting a curved sliver is more difficult than you want this manicure to be.
If you paint it, practice the curve at the size you actually need. A beautiful large crescent on paper does not necessarily translate into a small nail. Shorten the curve and leave more space around it than your first sketch suggests.
Add one dot on another nail if you want a connection across the hand. Avoid filling the entire set with stars immediately. The moon becomes the focal point because the other nails are quiet. This works particularly well with the understated ideas in our subtle Halloween manicure guide.

6. A dotted candy border
Arrange three small dots in orange, white and black near the tip of an accent nail. The dots can follow a shallow curve or form a loose cluster on one side. Leave background visible between them instead of creating a solid band.
This design is forgiving because it relies on color rather than detailed shapes. If three dots crowd your nail, use two. If the thumb has room, use four. Keep the dot size similar across the set so the arrangement feels related even when the count changes.
Try the dots over a sheer pink or cream base for a lighter manicure. Over orange, use only black and white dots to avoid losing the orange ones. This small contrast decision matters more than matching a particular inspiration photograph exactly.
7. A web that stays in one corner
Reserve a corner of one dark nail for a short web. Paint two or three fine lines from the corner, then connect them with a shallow curved line. There is no need to continue the web across the full surface.
Keep the intersection away from the skin. If the lines begin right at the sidewall, they can become difficult to see and awkward to paint cleanly. A small margin of dark base frames the web and gives the brush room to move.
This is one of the more demanding options in this list. Use a sticker if your smallest brush still makes lines that are too thick. The goal is a readable result on your actual nail, not proving that every part of the manicure was drawn freehand.
8. One black star sticker
Place a flat black star on a pale orange accent nail and keep the rest of the hand in the same orange. Choose a sticker that sits within the nail surface without crossing the edges. Follow its application and finishing directions rather than assuming all decals work in the same way.
A star centered slightly above the middle of the nail often leaves a comfortable border around its points. If you prefer an offset arrangement, move it toward one side while keeping all points on the nail. Avoid placing it so low that the bottom point sits against the skin.
You can use a white star on black for a night-sky version. One star per hand is enough. A second smaller star can be added to the thumb if it fits, but repeating the same large sticker on every nail can make the set feel crowded.
9. A Halloween color sequence
For the simplest short-nail option, use the sequence black, orange, cream, orange, black across one hand. Mirror it on the other hand. The cream middle nail brightens the set and gives the palette a deliberate center.
This arrangement works without any art tool. It also makes a useful base for adding a single ghost or pumpkin later, provided your polish system supports the extra layers and the existing finish is suitable. You can enjoy the plain version first instead of committing to detail work immediately.
If you only own black and orange, repeat one of them in the middle. A two-color sequence is still complete. Our simple two-color manicure guide includes other arrangements you can reuse when Halloween is over.
Make both hands look related
Matching hands do not require identical brush strokes. Choose three things to repeat: the palette, the accent finger and the approximate size of the motif. Those repeated choices make the set feel coherent even if one ghost leans slightly or one pumpkin is rounder.
Paint your harder hand first while you have more patience. If a motif is too difficult with your non-dominant hand, simplify both sides. For example, replace a full pumpkin face with an orange oval and stem on each hand. This usually looks more intentional than keeping a detailed face on one hand and a large smudged version on the other.
Take a quick photograph after finishing one accent. It can help you compare placement while painting the second hand without twisting your fingers into an awkward position. Keep the photograph as a reference, not a demand for perfect symmetry.
A short-nail layout checklist
- Choose the accent nail before opening the detail color.
- Check that the motif leaves visible background on all sides.
- Reduce the number of details before reducing them to unpaintable sizes.
- Use the thumb for a larger sticker instead of forcing it onto a narrow nail.
- Keep one or two nails plain when the set starts to feel crowded.
- View the design with your hand relaxed, not only inches from your face.
Fix common placement problems
The design looks cramped
Remove a detail rather than adding another border. A ghost with eyes needs less room than a ghost with eyes, mouth, cheeks and arms. A web corner needs fewer lines than a full web. If you are using a sticker, select a smaller one instead of trimming away the parts that make the motif recognizable.
The two hands do not match
Compare the overall arrangement first. A different accent finger or an extra color often creates a larger mismatch than a slightly uneven shape. Bring the palette and placement into agreement before correcting tiny differences. You may find that the small variations no longer matter once the set has a clear repeated pattern.
The motif disappears in photographs
Move the hand into soft light and check that reflections are not covering the detail. A glossy highlight can hide a tiny pair of eyes. If the design is still unclear, the colors may be too close in value or the motif too small. Increase contrast on the next attempt rather than adding unrelated decoration around it.
The shortest nail cannot fit the idea
Make that nail solid. A complete manicure is allowed to contain different levels of detail. Repeating the main background color on the shortest nail keeps it connected to the set and avoids painting into the skin just to make a motif fit.
Questions about short Halloween nails
Do I need a square shape for these designs?
No. Rounded, softly square and oval short nails can all carry small seasonal details. Work with the outline you already have. A corner design may need a shallower angle on a round nail, while a centered dot or sticker usually needs very little adjustment.
Can I skip the base color?
You can choose a sheer or clear look if it suits your polish system, but the motif will have less contrast than it does over a solid base. Test the detail first. Pale ghosts can become hard to see over a light natural nail, while a black star or orange dot may remain clear.
Which design should I try first?
Start with the color sequence if you want no detail work, or the two-eye accent if you want a small painting challenge. For a broader selection of motifs using the same bottles, see our black, white and orange Halloween ideas. Pick one and leave the other ideas for another manicure.