
20 Milky French Nail Ideas: Soft Tips, Micro French, and Blended Whites
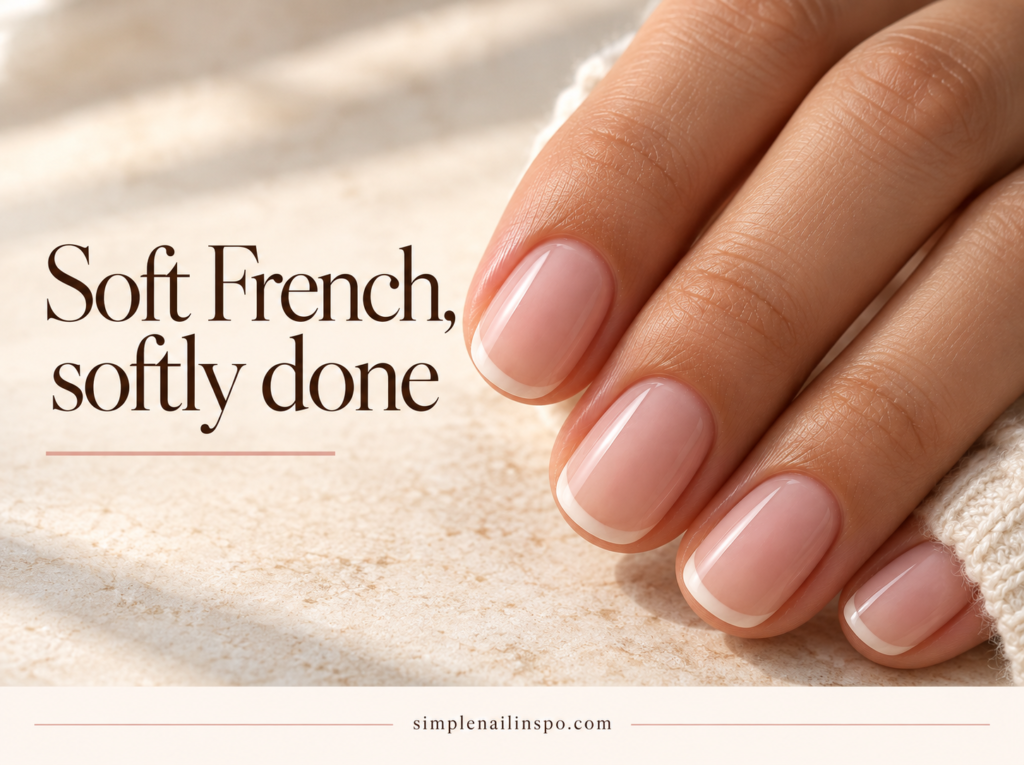
Milky French nails make the familiar white tip feel softer. Instead of a transparent pink base and a bright, sharply separated edge, the nail has a veil of white, nude or pale pink underneath. The tip can be crisp, barely visible, blended into the base or reduced to a thin line. Small changes in opacity and tip width make a much bigger difference than the name “milky French” suggests.
This collection compares 20 versions in pairs, so you can see what to ask for before your next manicure. There are options for very short nails, natural-looking sets, medium almond shapes and a few delicate accents. Each image is planned as one two-look comparison: the caption identifies exactly which design appears on each side. Start by deciding how visible you want the tip to be, then choose the base tone and shape.
If you want the simplest salon request, say: “I’d like a translucent milky base, a soft white French tip and a glossy finish. Please keep the tip shallow enough for my nail length.” The French manicure ideas discussed by Allure show how tip width, color and texture can change the classic. Here, the milky base remains the common thread.
Choose your milky French finish
Look at the boundary between base and tip in your reference photo. A clear line gives you a traditional French silhouette; a blurred boundary gives you an airy gradient. Next, look at the free edge: a thin line works on short nails, while a wider band needs more length to keep the proportions balanced. Finally, inspect the base. Milky white reads brighter; milky pink adds warmth; a translucent beige can look closest to your natural nail.
| Your preference | Start with | Key request |
|---|---|---|
| A recognizable French manicure | 1 or 2 | A defined white tip on a milky base |
| Very short natural nails | 5, 6 or 7 | A fine tip that follows the free edge |
| A soft, almost seamless transition | 9, 10 or 11 | A diffused gradient rather than a painted stripe |
| A little color without a bold set | 13, 14 or 15 | A muted tip with the milky base still visible |
| Light-catching detail | 17, 18 or 19 | Pearl, fine chrome or one small accent |
If you are still deciding on the base, compare a sheer white, oat, pink and pastel swatch on your own hand before choosing the tip. For a simpler seasonal project using regular polish, the October nail ideas for beginners offer smaller details to practice first.
Classic and soft white tips
1. Classic white tip on a milky white base
The base is softly translucent; the tip is white enough to be visible but not so thick that it becomes the whole manicure. This is the easiest reference to take to a salon when you want a recognizable French with a gentler overall finish. On a short squoval nail, ask for a shallow band. On a medium almond, a slightly deeper curve can follow the tapered sides without overwhelming the nail bed.
What to ask for: A milky white base with a clean, soft white smile line. Show where you want the line to begin on the sides. If the base and tip become indistinguishable, choose a tip shade with a little more coverage rather than making the base opaque.
2. Warm ivory tip on vanilla milk
Switch cool white for a creamy ivory tip and the same French shape becomes warmer. A vanilla-toned base keeps the pairing cohesive, especially if you prefer gold jewelry and warm neutrals. The tip should still be a little brighter than the base, or the manicure will read as one solid cream shade from a distance.
Best on: Rounded-square or oval nails with enough free edge for a slim curve. Ask to see the ivory beside your skin in daylight; a warm white can look flattering and soft, while an overly yellow tip may not produce the clean finish you imagined.

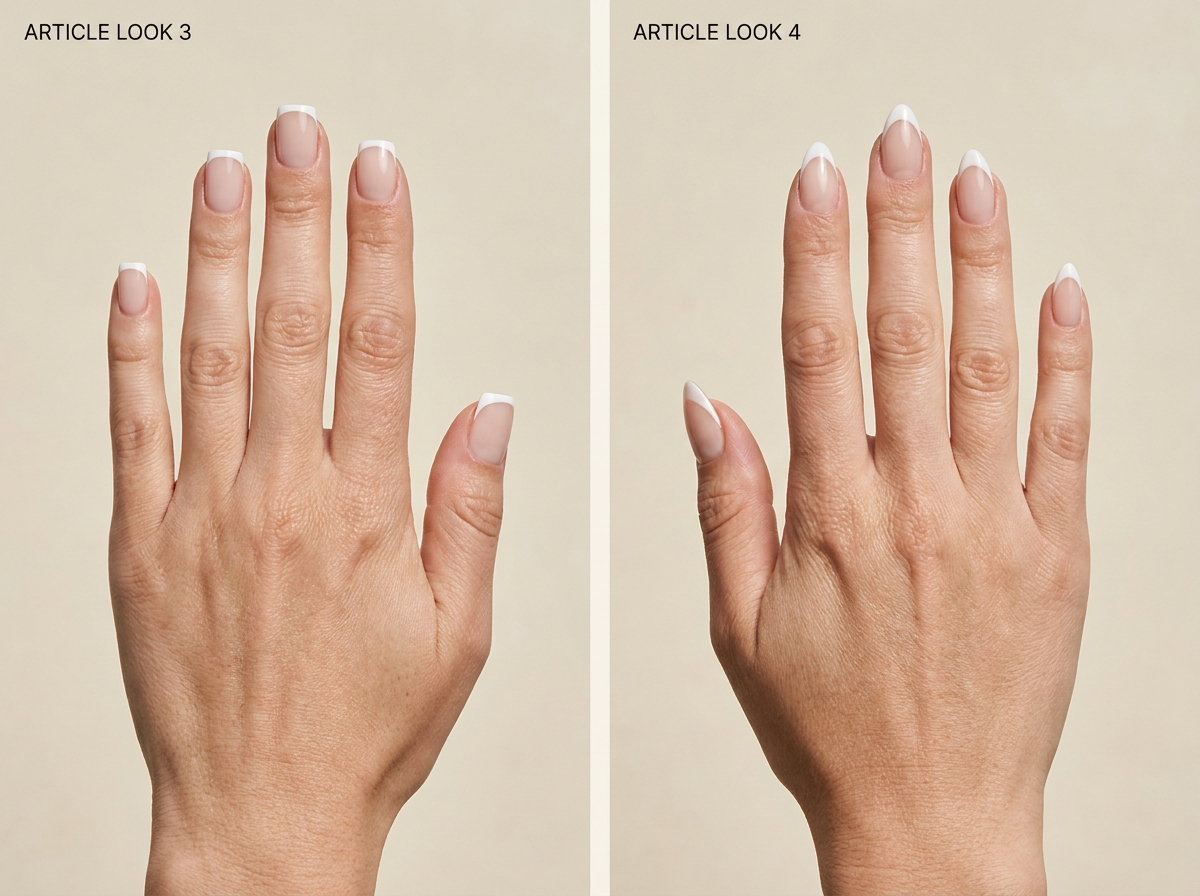
3. Soft square French with a straight tip
A soft square nail can carry a straighter tip line than a rounded almond. Keep the corners gently softened and the white band narrow; this makes the design feel modern instead of boxy. The milky pink-white base reduces the contrast between the painted edge and the nail bed. It is a useful reference if you like the neat shape of square nails but find a classic bright French too stark.
Placement note: The line should follow the actual shape of the free edge, including the softened corners. A perfectly straight stripe pasted across a curved nail may make the tip appear uneven when your hand moves.
4. Almond French with a gentle smile line
On an almond nail, let the white line rise slightly toward the sides so it follows the taper. A milky nude base keeps the center light and gives the curved tip room to stand out. This version looks more elongated than the soft square design beside it, even if both use the same base and white polish.
What to avoid: Bringing the white too far down each side can make the tip look much deeper than intended. Start with the shape you want and decide the tip proportion before painting. If your nails are very short, use the micro options below instead of forcing a long almond reference onto them.
Micro French for short nails
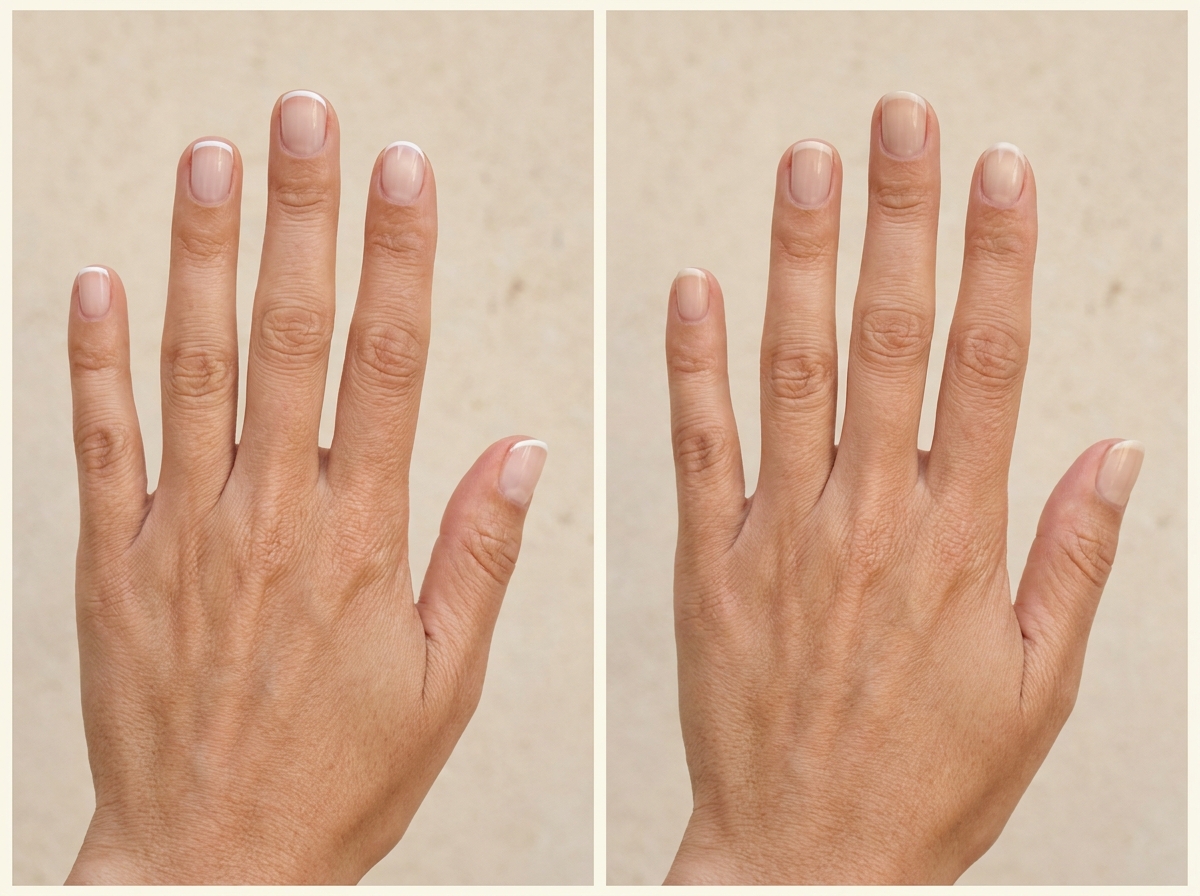
5. One-millimeter white micro tip
A fine white outline can make very short nails look finished without covering the small amount of free edge. Use a translucent milky nude underneath, then keep the tip close to the natural edge. The result is more about definition than color. Nail artist Betina Goldstein describes the micro French as particularly suited to short nails in Allure’s French manicure feature.
At-home adjustment: If a one-millimeter painted line proves difficult, use the smallest brush you can control and aim for a clean, consistently slim stripe. The exact measurement matters less than maintaining the same visual weight from nail to nail.
6. Off-white micro tip on oat milk
This is the lower-contrast cousin of the white micro tip. A sheer oat-beige base looks natural, while the off-white line catches the eye only at close range. It works well when you want a French manicure for daily wear without a strong white border. Choose the base first: if the oat shade is too opaque, the result may look like beige polish with a line on top rather than a milky manicure.
Compare the pair: Idea 5 has a brighter, cleaner edge. Idea 6 is warmer and quieter. Neither requires long nails, and both allow you to keep a practical rounded or squoval shape.
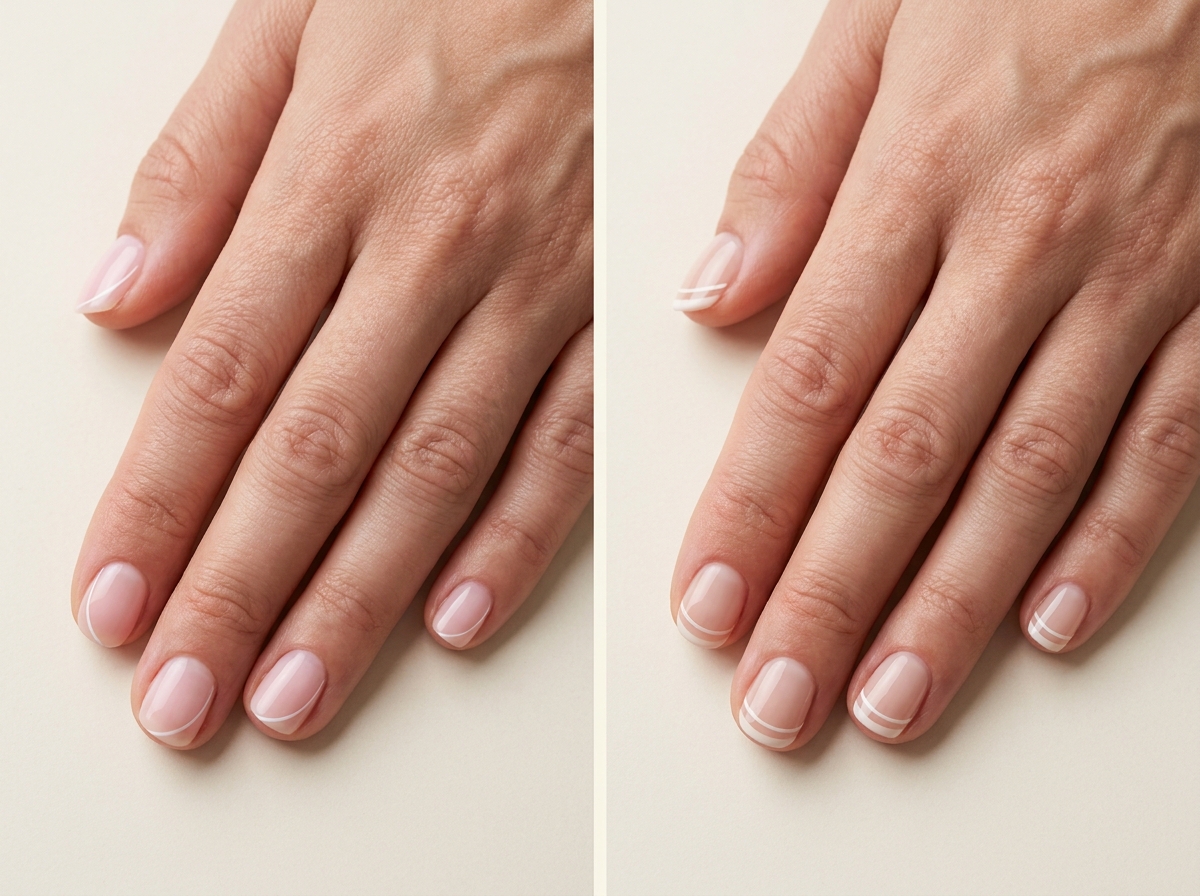
7. Side-swept micro French
Instead of running a fine line across the whole edge, begin at one side and sweep it partway around the tip. Leave the opposite side more open. This works when the nails are too short for a deep French but you still want a designed shape. Use milky pink as a quiet background and repeat the sweep in the same direction on each nail for a deliberate set.
Keep it wearable: Make the line slightly curved rather than sharply diagonal. If you prefer to paint at home, one accent nail on each hand is a reasonable first attempt; you can leave the others plain milky pink.
8. Double-line micro French
Two very fine white lines near the free edge create more detail without filling the nail with white. The lower line should sit close to the tip, with a narrow band of milky base between them. This design needs a little more room than the single micro tip, so it tends to read best on short nails that have a visible free edge rather than nails cut completely flush.
Salon note: Ask for both lines to stay fine and close together. If the lines grow too far apart, they can divide a short nail into horizontal sections and make it look shorter.
Blurred and blended tips
9. Blurred white French
The edge is still brighter than the nail bed, but there is no hard border. White diffuses inward from the free edge and fades into a milky nude base. This is the design to save if you keep seeing French nails you like but wish the line were less obvious. A photograph should show the gradient clearly enough that the artist knows how much white you want at the tip.
Choose your length: A short oval can support a very compact fade; a medium almond gives it more distance to move from white to nude. On a very short nail, keep the white close to the edge so the gradient does not cover most of the nail bed.
10. Pink-to-white baby boomer fade
Start with a translucent rosy pink near the cuticle and blend into a softened white tip. This has more pink-to-white contrast than idea 9, but the boundary remains seamless. It is useful for someone who wants a recognizable French color story without a sharp smile line. Ask for the pink to stay sheer; a solid bubblegum base changes the delicate mood of the design.
Compare the pair: Idea 9 is almost tonal and tends to look quieter. Idea 10 puts more warmth in the nail bed and often photographs with a clearer gradient, especially on medium-length nails.
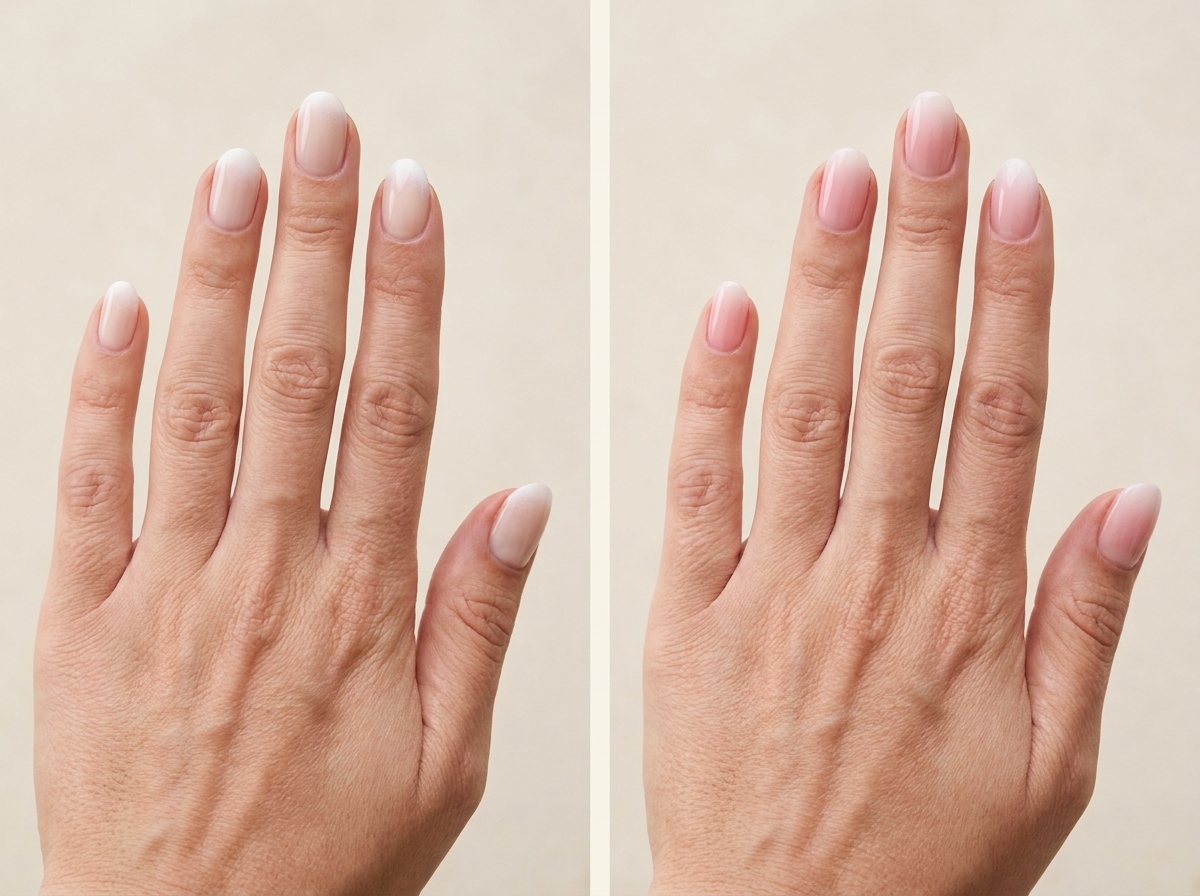
11. Vanilla fade on warm nude
A warm beige base melting into vanilla white is softer than the pink-and-white gradient. It suits a wardrobe of creams and browns and provides a useful alternative if rosy bases never look quite right on your hand. Keep both colors translucent enough that the change looks like light moving across the nail rather than two opaque shades blended together.
Ask for: A warm nude at the base and a creamy, softly diffused free edge. Compare a sample in daylight, because salon lighting can make beige look cooler or paler than it does outside.
12. Sheer tip fade on short squovals
This is the most discreet gradient in the group. The base is nearly clear with a touch of milk, while a small amount of white sits just at the tip. You should still sense the natural nail beneath. On a short squoval shape, the design looks especially neat because the visible fade follows the compact free edge.
Useful distinction: If you cannot tell where the gradient starts in a photograph, that may be exactly the look you want. If you need the manicure to be legible from a distance or on a Pinterest pin, choose idea 9 or 10 for a stronger transition.
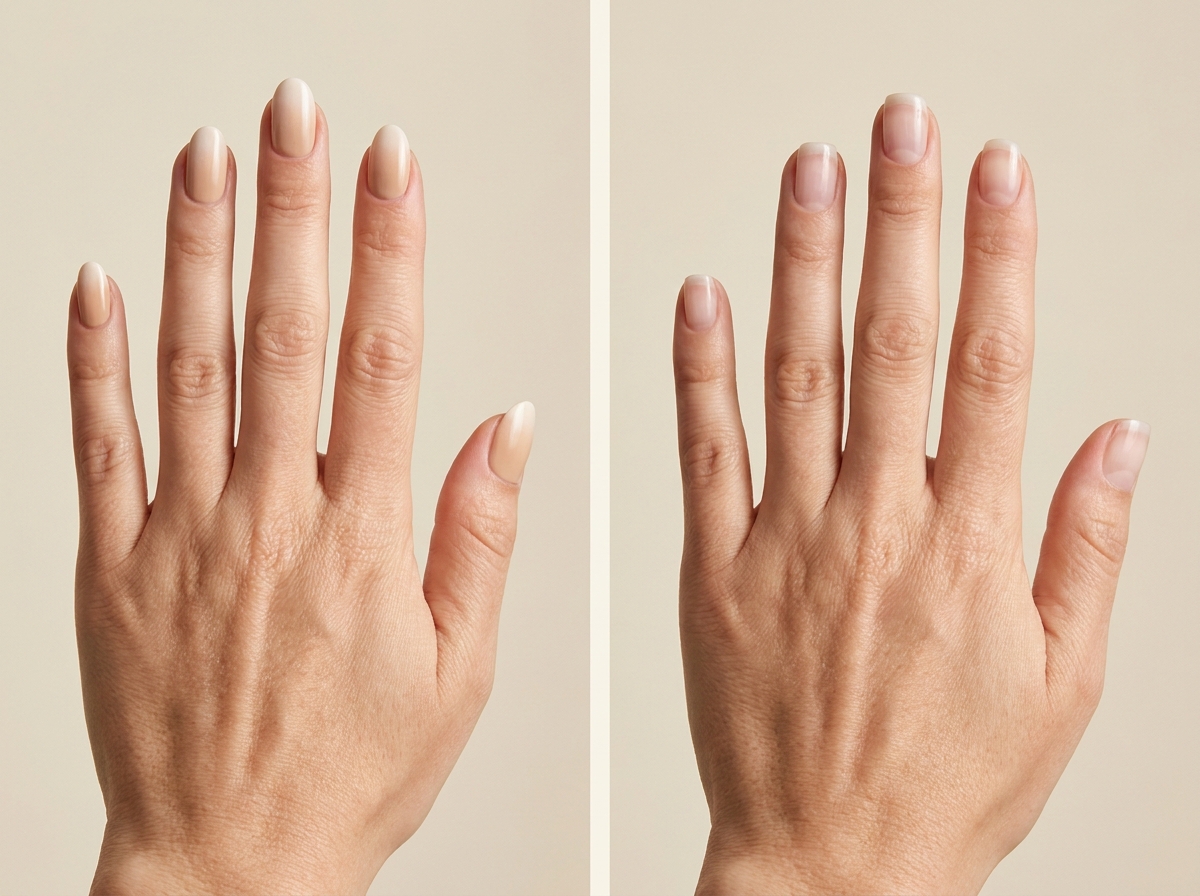
Tonal and tinted tips
13. Milky pink base with rosewater tips
Use a translucent pink base and a muted rose tip only a little deeper in color. It is French by placement rather than by traditional white-and-pink contrast. This is a good option if you prefer pink nails but want a design visible at close range. The tip should look like a veil of rose, not a solid red band, so compare swatches for both hue and opacity.
Shape choice: A rounded tip line works with oval nails; a straighter, finer band looks tidy on short squovals. Keep the rest of the nail undecorated so the tonal difference remains the focal point.
14. Strawberry milk with pale pink micro tips
This is the sweeter, lighter counterpart to rosewater. The base looks like translucent strawberry milk; the tip is a slightly more opaque pastel pink. On a short rounded nail, the result is delicate and clearly different from a single-color manicure when seen up close. It also leaves room for a tiny fruit accent later, though this version keeps the focus entirely on color.
Compare the pair: Rosewater feels muted and grown-up, while strawberry milk has a fresher pastel cast. Choose one rather than mixing both across the same hand if you want the tonal French effect to remain clear.

15. Blueberry milk with a cloud-white tip
A barely blue, translucent base changes the French without making the whole set bright. A cloud-white tip looks crisp against the cool color but still soft enough to belong to the milky family. Keep the blue pale; a saturated baby blue base with a solid white tip reads as a different, higher-contrast manicure.
For short nails: Use a narrow white tip so the blue remains visible. For medium almonds, a rounded smile line can be a little deeper. Compare a pale blue swatch beside a lavender one before committing; their undertones change the final impression substantially.
16. Lavender milk with a lilac edge
Here the tip is a slightly deeper lilac than the translucent lavender base. It is a low-contrast, colored French that rewards a close look. A cool violet edge can feel airy; a pinker lilac makes the set softer and more romantic. Ask to see both swatches beside each other so the tip does not disappear into the base or jump out too strongly.
Small adjustment: Keep the tip consistent and resist adding a second accent color. The subtle difference between lavender and lilac is enough to make the design feel intentional.

Small details and special finishes
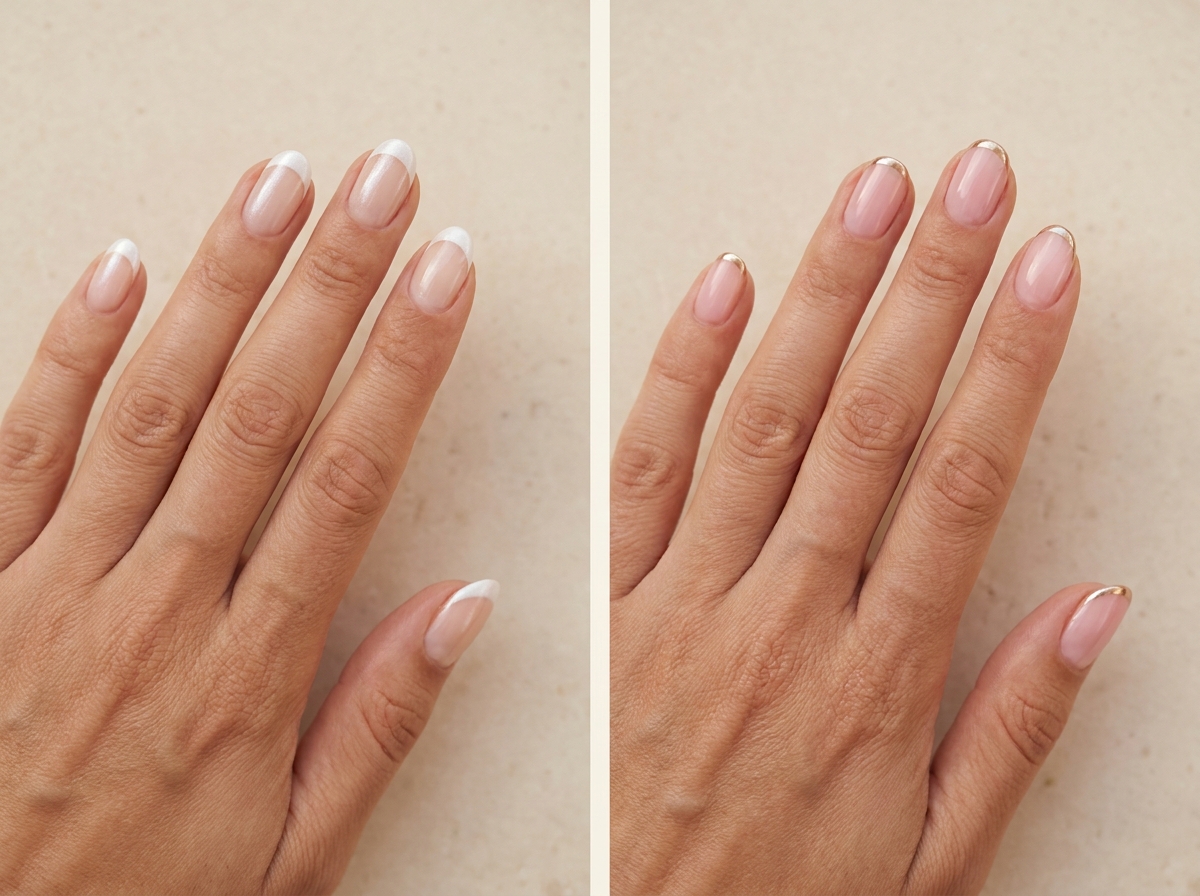
17. Pearly white French tips
Keep the base plain milky nude and place fine pearl shimmer only on the white tips. This adds light without coating the entire nail in shine. The separation of finishes makes the French line visible even when both colors are pale. Ask for a fine pearl rather than coarse glitter; individual glitter pieces can make a very narrow tip look uneven.
Occasion: This suits a wedding, dinner or everyday manicure if you want a little more movement in photographs. Check the tip under normal lighting before adding extra shimmer, because studio lights can make it look quieter than it will outside.
18. Champagne chrome micro French
A fine champagne line gives a milky pink base a warm metallic edge. It is more reflective than pearl and still restrained because the chrome stays at the tip. Keep the line narrow on short nails; a wide metal band quickly becomes the primary color. If you have seen both “glazed” and “chrome” in reference captions, point to the visible reflectivity you want rather than relying on the label alone.
Compare the pair: Pearl is diffused and luminous. Champagne chrome has a clearer metallic reflection. Both use the milky base as breathing room, but they change the finish in different ways.
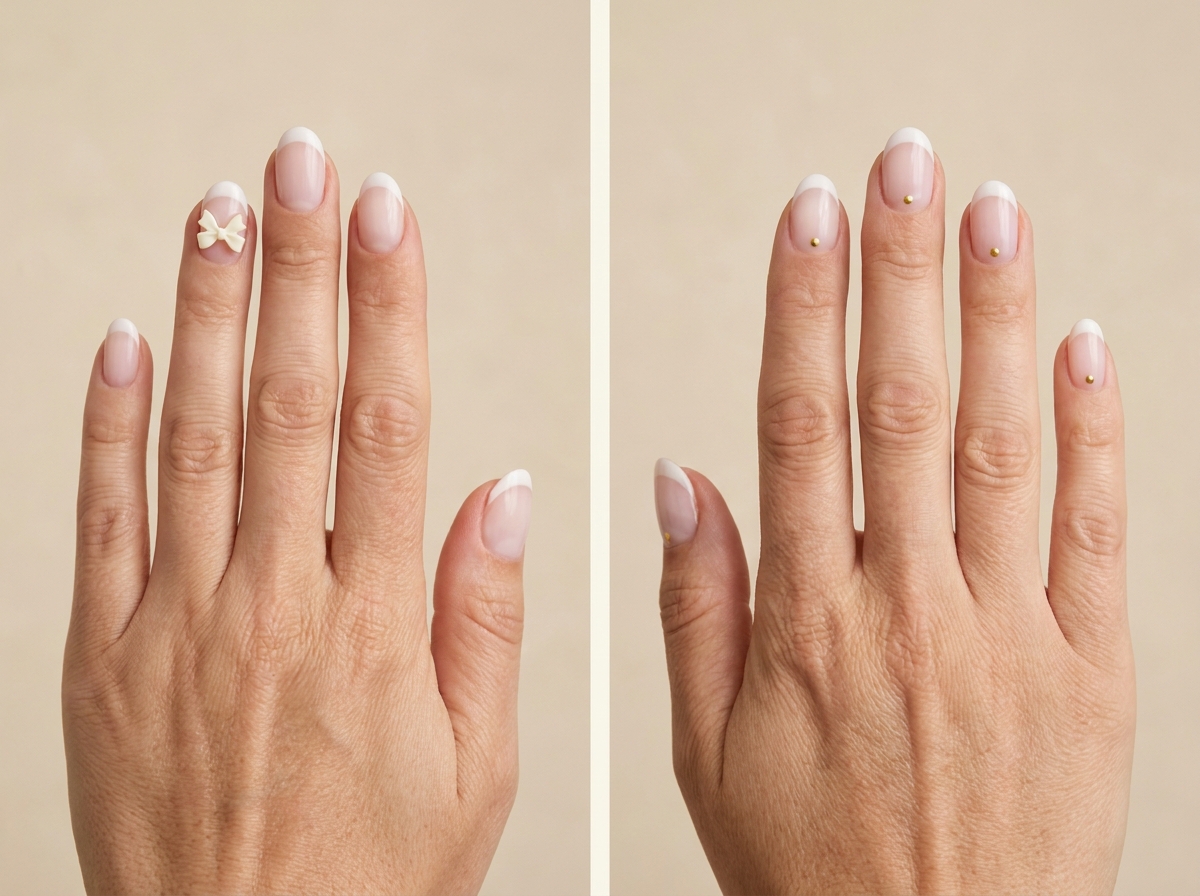
19. One tiny bow beside the tip
Keep most nails in a plain milky French, then add one miniature flat bow just below the tip of a ring fingernail. A tiny motif gives the set a playful point of interest without covering the airy base. Choose a soft white or pale pink bow for a tonal look, and keep its loops simple enough to read on the nail size you actually wear.
Practical choice: A painted or flat decal bow is easier to wear on short nails than a raised charm. If the reference shows a large 3D ornament, ask your artist to scale it down or keep it on one medium-length accent nail.
20. A single gold dot beneath each French tip
Place one very small gold dot at the center just below each soft white tip. The repeated placement ties the set together, and the dot adds warmth while leaving most of the milky nail visible. This is more precise than a scattered metallic design and easier to describe to an artist: one dot, same location, every nail.
Keep it balanced: On a short nail, reduce the dot size and leave a little space between it and the white line. When those two details touch, the accent can look like an accidental bump in the French tip.
What to tell your nail artist
Bring the paired image that shows your chosen look and its nearest alternative. State which side you prefer and why: “I want the warm ivory, not the bright white,” or “I want a visible line, not a blurred gradient.” Then point out the base color, tip width and finish. These three choices describe more of the result than saying “milky French” alone.
Ask how the design will be adapted to your actual nail length. A medium almond reference may need a shallower tip on a short squoval nail. A thin micro French can work beautifully on very short nails, while a baby boomer fade needs enough room to show its transition. The design should fit the nail you have, rather than borrowing the proportions of the photo unchanged.
For regular polish at home, start with clean, dry nails, use thin base layers and let them set according to the product directions before drawing the tip. A fine brush can help you control a micro line; a cleanup brush can refine the border. Finish with a compatible topcoat after the design is ready. For cured gel, builder or chrome systems, follow the product-specific application and removal directions with a trained nail technician. The image describes the look, not a one-size-fits-all product method.
If your first attempt is imperfect, simplify the design rather than adding more details to disguise it. A slightly wider clean line generally looks better than a very thin line repeatedly corrected while wet. One accurate accent nail can also feel more polished than ten inconsistent tips. Our beginner October manicure guide has other small-design approaches if you want to practice before trying a full French set.
Frequently asked questions
What makes a French manicure “milky”?
The base has a soft, somewhat translucent white, nude or pink appearance instead of a completely clear or opaque finish. The tip may be defined or blended. When you compare reference images, look at how much natural nail shows through the base and how sharply the tip is separated.
Which milky French designs work on very short nails?
Start with the white or oat micro tips in ideas 5 and 6. A short side-swept line in idea 7 can also fit a compact nail. Keep the artwork slim so the base remains visible and the free edge does not appear crowded.
Is milky French the same as a baby boomer manicure?
They overlap, but they are not identical. “Milky French” can have a crisp tip, a micro line or a gradient. A baby boomer look specifically blends a pink or nude base toward white at the free edge, without a sharp boundary. Ideas 9 through 12 show different ways to soften that transition.
Should I choose bright white or ivory tips?
Choose bright soft white if you want the French shape to read clearly, and ivory if you want a warmer, lower-contrast finish. Swatch the shade against the milky base and your hand. The tip needs enough contrast to show, but its exact warmth is a matter of preference.
Do I need gel for a milky French manicure?
No. The classic, micro and tonal versions can be painted with regular polish. Other finishes, such as certain chrome or sculpted looks, may use salon gel products. Decide on the appearance first, then choose the product system and removal method that suit you.
If you can save only three references, choose the classic white tip for a clean baseline, the oat micro French for short everyday nails and the blurred white French when you want the gentlest transition. Together, those images make the main choices easy to discuss at your next appointment.