
36 Thanksgiving Nail Ideas: Cozy Colors, Modern French Tips and Harvest Details
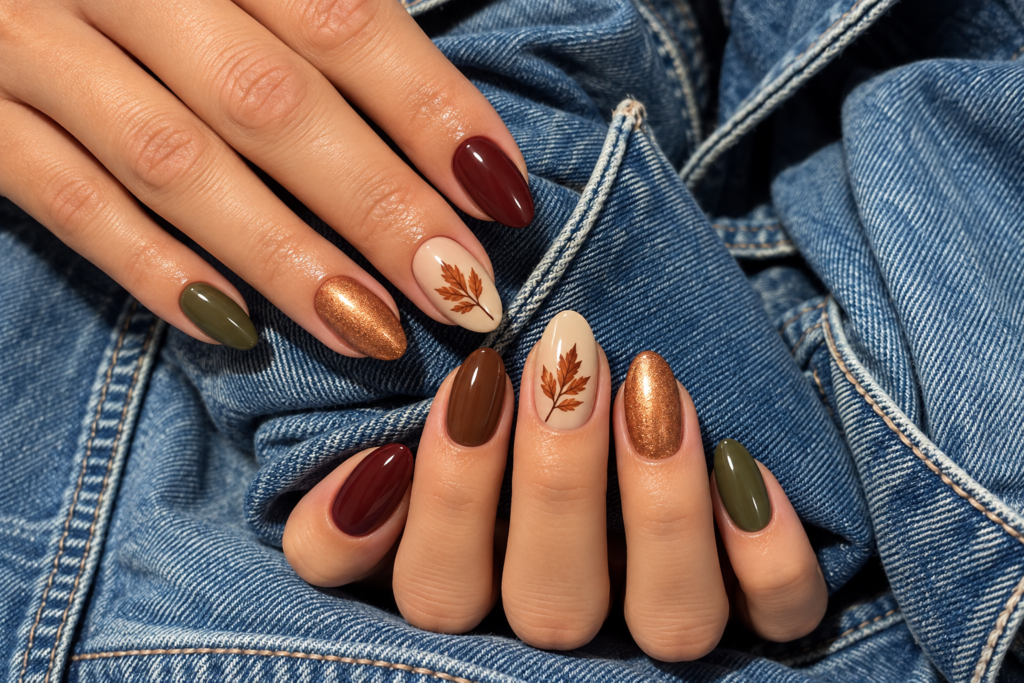
Thanksgiving nails can be a glossy cranberry manicure that goes with your favorite sweater, a fine chocolate French tip, or a little pumpkin tucked onto one otherwise simple nail. The holiday gives you a useful color palette, but it does not require a turkey on every finger. The best starting point is how you want your hands to look through dinner, the weekend and whatever comes afterward.
This collection brings together 36 designs, from short, solid-color manicures to metallic finishes and small harvest illustrations. Each idea has its own image and a specific combination of shape, color and decoration. You will also find ways to simplify the detailed looks, comparisons between similar finishes, and guidance on turning a saved photograph into a clear request for your nail appointment.
Start with the chooser below: pick a level of detail, then a color family. It will help you narrow down the options before your appointment.
Find your Thanksgiving manicure by mood and detail
A useful Thanksgiving palette has an anchor color, a lighter supporting shade and, if you want one, a small accent. Chestnut, oat and copper feel warm together. Cranberry, blush and muted gold create a richer contrast. Olive, cream and cocoa offer an earthy direction without relying on orange. You do not need all three colors on every nail; the palette can be as simple as a solid manicure worn beside your usual jewelry.
Think about your outfit in terms of contrast rather than exact matching. Dark burgundy will stand out against an ivory cuff. A champagne manicure looks quieter next to a beige sweater. If your clothes already have plaid, embroidery or a strong print, an unpatterned nail can give the eye somewhere to rest. With plain clothing, a small illustrated accent has more room to become the focal point.
Decide how literal you want the holiday reference to be. Color alone works beyond Thanksgiving; a leaf gives a seasonal cue; a turkey makes the holiday explicit. Each asks for a different amount of detail.
| Your preference | Ideas | Shape direction | What to prioritize |
|---|---|---|---|
| Simple color with no drawing | 1–6 | Short rounds, ovals or soft squares | Choose the undertone before the finish |
| A light base with colored tips | 7–12 | Short to medium, depending on the line | Keep enough nude visible |
| Shine without a painted motif | 13–18 | Short ovals through moderate almonds | Separate chrome, pearl and magnetic effects |
| Pattern without a holiday character | 19–24 | Allow room around the pattern | Use one accent rather than shrinking a busy design |
| A recognizable harvest detail | 25–30 | A clear accent nail helps | Choose one motif and a limited palette |
| Playful or coordinated statement nails | 31–36 | Adapt each accent to its nail | Plan the placement before the appointment |
Simple Thanksgiving nails that start with color
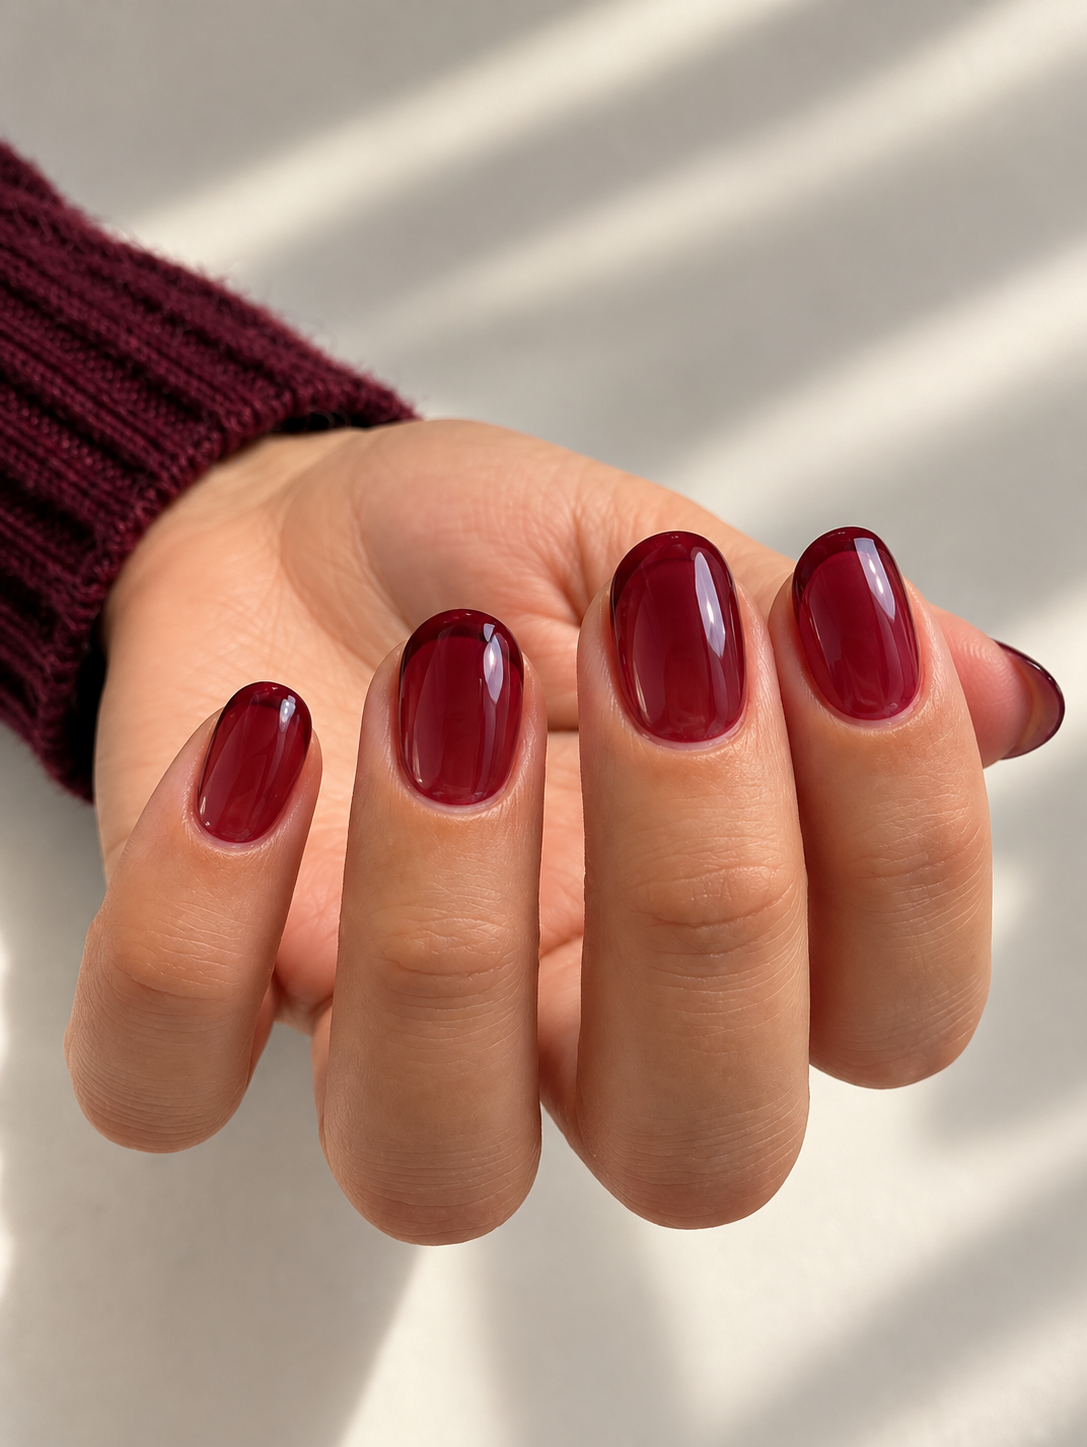
1. Cranberry jelly on short rounded nails
Cranberry jelly gives a short manicure depth without making the color completely opaque. Choose a red that stays visibly berry-toned in daylight, with translucent edges and a glossy surface. The rounded shape keeps the small patches of color soft. It is a useful option if you want a festive red but find a very dark, solid manicure heavier than you like.
Ask for translucency as well as the shade. A pale pink and a sheer cranberry are not interchangeable, even if both are described as light. Leave every nail undecorated so the finish remains the point. If visible natural nail lines bother you, choose a more covering cranberry instead of adding art to disguise them.
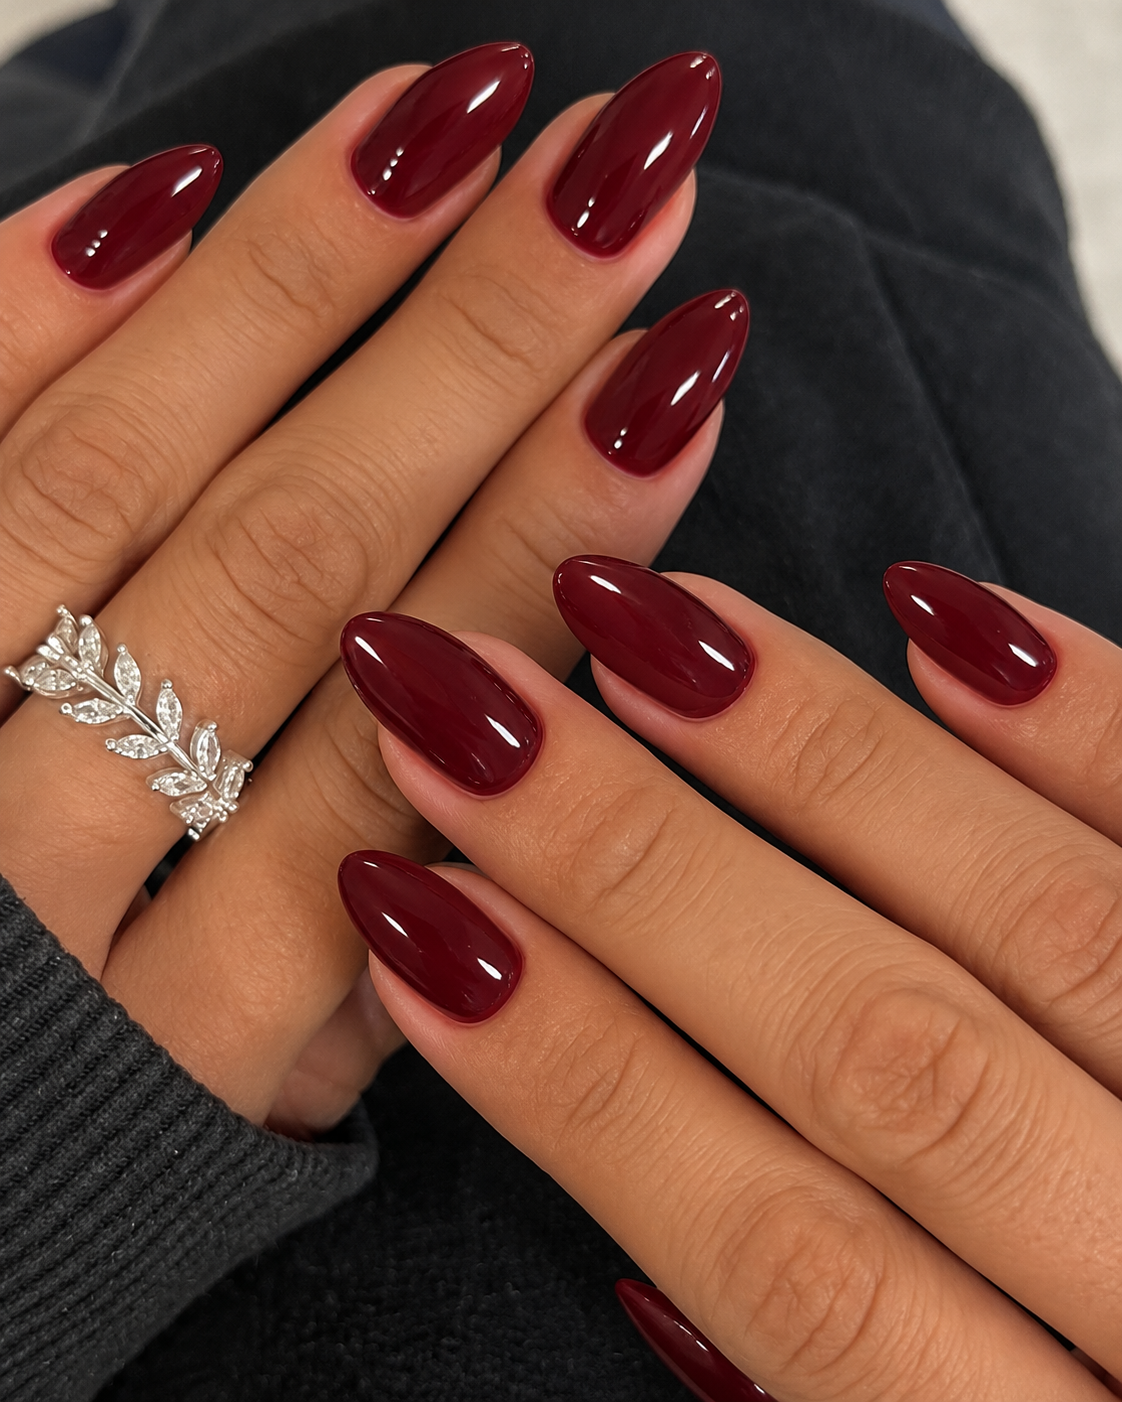
2. Deep oxblood on a neat oval
Oxblood is the more dramatic partner to cranberry jelly: deeper, more opaque and slightly brown rather than brightly berry-red. Keep it glossy on a short-to-medium oval, with a consistent outline across the hand. Against a cream or charcoal sleeve, the color creates enough contrast to feel dressed up without a single decorative element.
Check an oxblood sample away from the brightest lamp. Some shades read almost black in ordinary indoor light, which may or may not be what you want. For a softer version, stay in the same color family but choose a slightly lighter wine shade. There is no need to extend your nails just to make a dark color feel intentional.
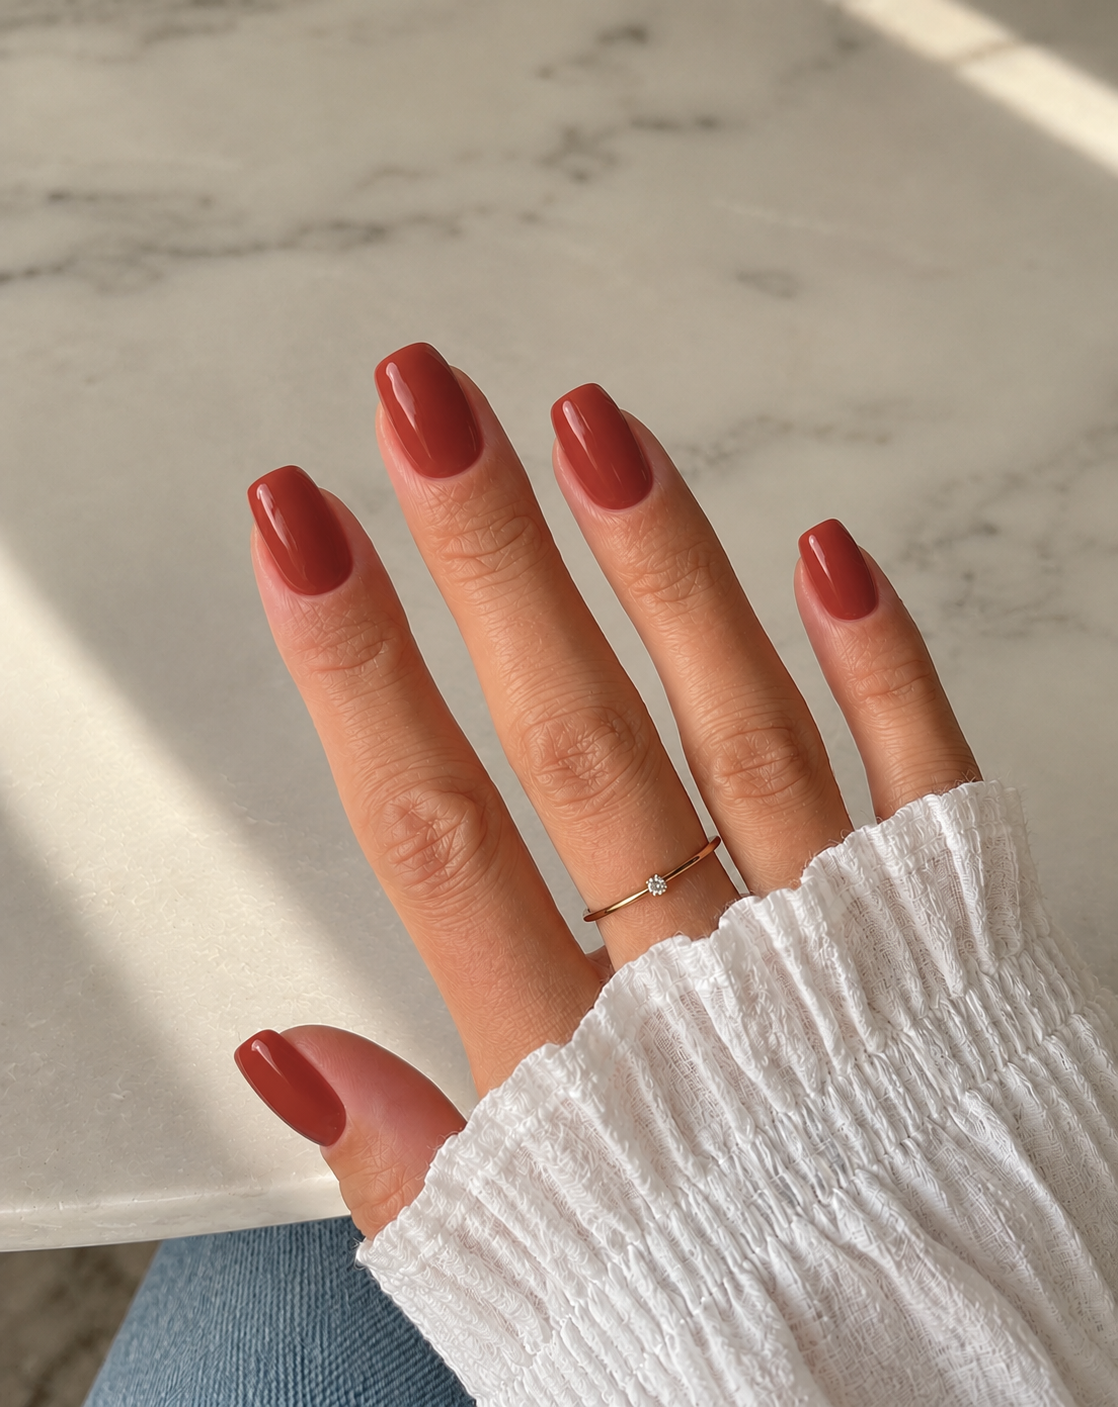
3. Maple brick on short soft squares
Maple brick sits between terracotta and a muted red. It has more red than pumpkin orange and less purple than burgundy, making it a useful middle ground for Thanksgiving. A short soft-square shape gives the warm color a clear edge, while rounded corners keep the result from looking severe.
This is an especially straightforward reference if you want one polish color and no design work. Compare the shade beside an orange and a red before choosing it; the undertone is the whole idea. Keep the surface glossy and the nails similar in length. If your preferred brick looks too intense, a slightly dustier version will change the mood more effectively than a glitter accent.
4. Oat milk nails with a soft, sheer finish
Oat milk nails offer a quieter alternative to the deeper colors in this gallery. The base is warm beige with a milky veil, not a fully opaque white. On short oval nails, it creates a light manicure that works with a busy Thanksgiving outfit or a stack of rings without adding another strong color.
Ask to compare a pink-beige and a yellow-beige version near your hand. There is no single nude that looks equally subtle on everyone. Keep the finish softly glossy, with no pearlescent layer for this particular look. If you want more decoration later, use the same base for the wheat accent in idea 26 rather than changing several elements at once.
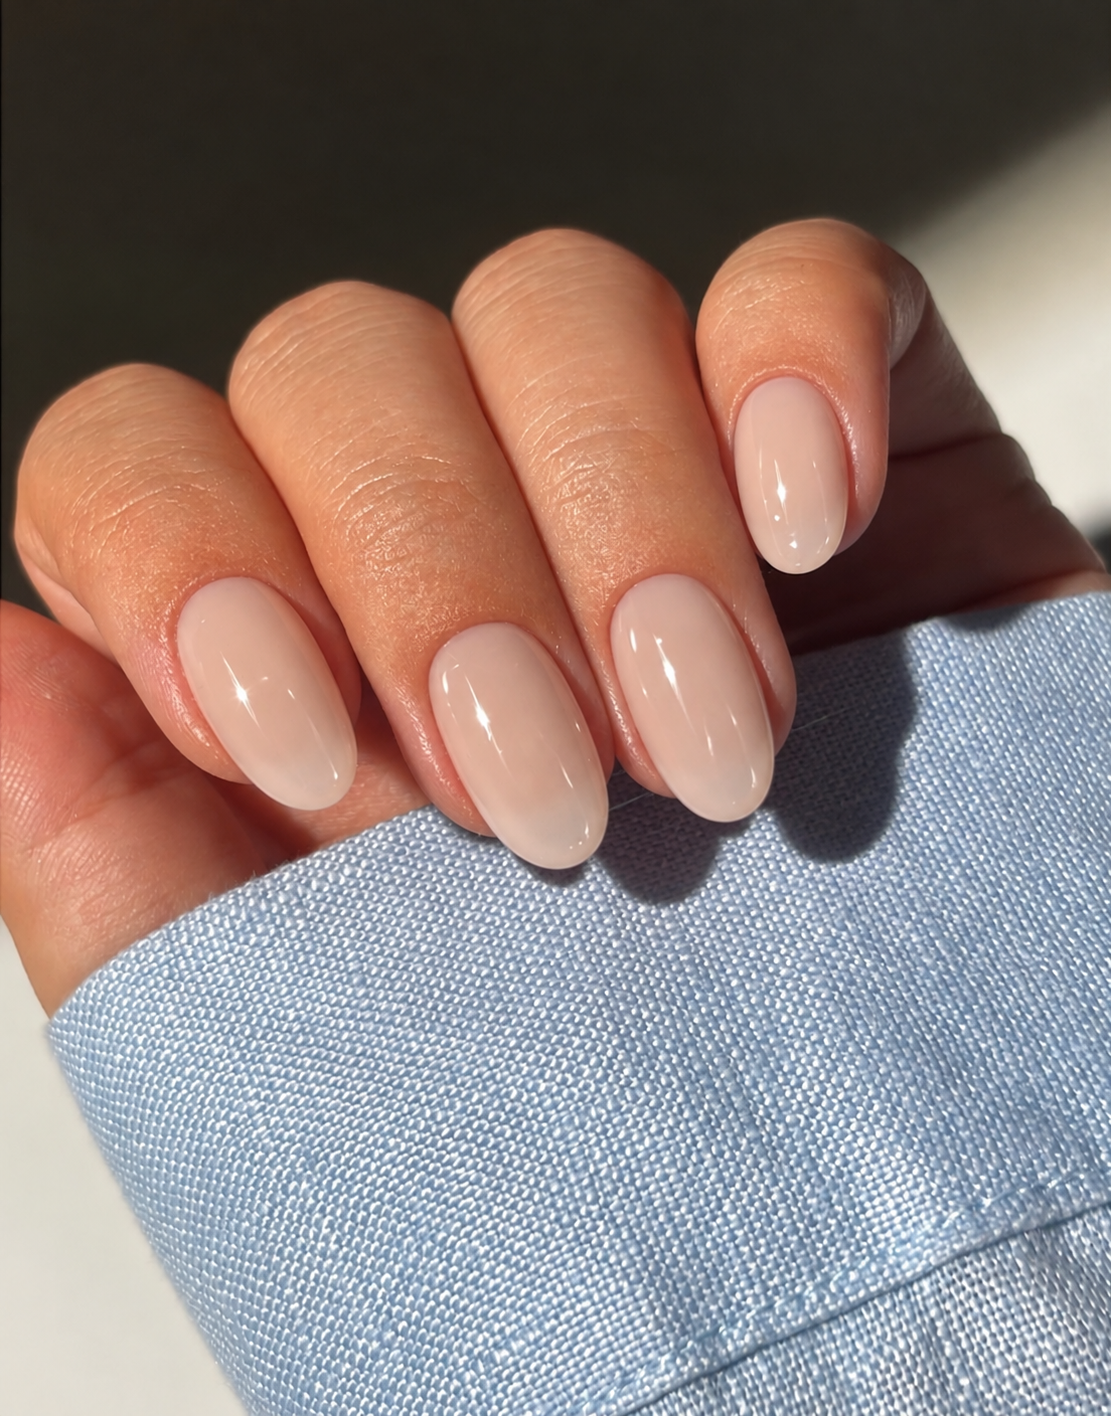
5. Roasted chestnut with a glossy finish
Chestnut has a reddish warmth that separates it from cooler espresso brown. On short rounded nails, that warmth gives an otherwise plain manicure character. It is a good direction if you like the richness of burgundy but prefer a color that reads brown first, especially beside denim, camel or an oatmeal knit.
The distinction is easiest to see in the middle of the nail, away from the white reflection. Choose a sample where the reddish brown remains visible rather than disappearing into black. Keep all five nails the same shade and finish. This look does not need an accent finger to feel complete; the point is a coherent, comfortable everyday manicure in a deeper seasonal color.
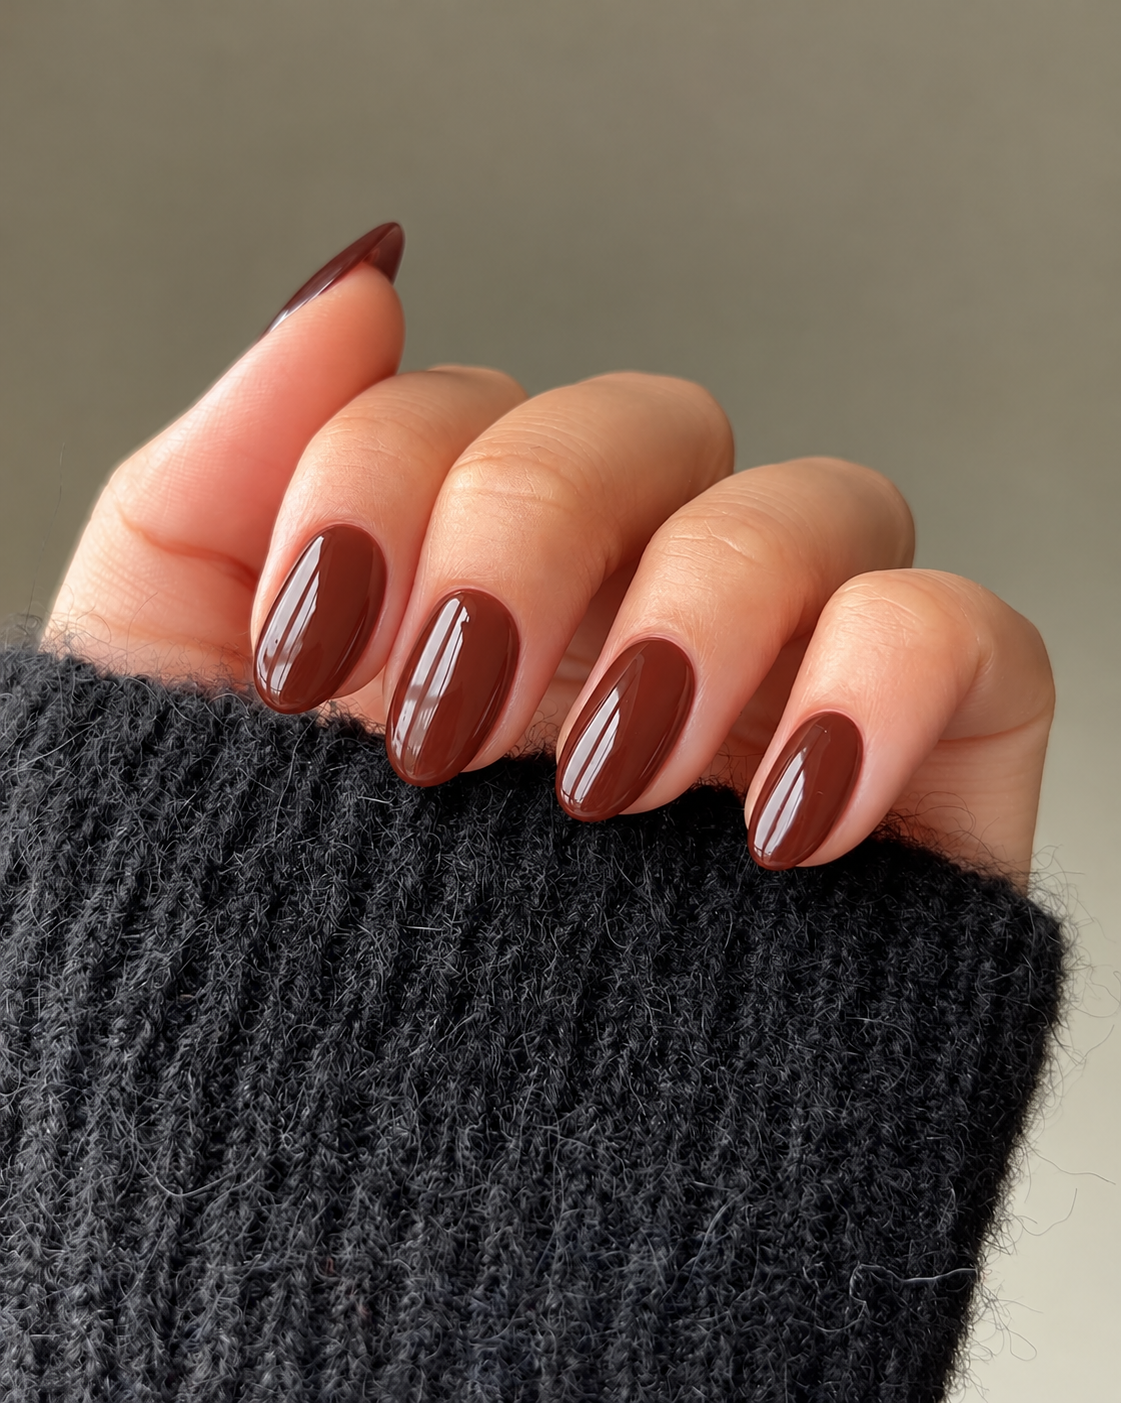
6. Dusty sage for a cooler autumn palette
Dusty sage offers a green option with more gray than yellow. A creamy, opaque finish on short soft squares keeps it calm and clear. This is the direction to consider when rust and copper feel too warm, or when you want your Thanksgiving manicure to sit comfortably beside silver jewelry and gray clothing.
Do not substitute bright mint if you want the same mood. Sage should look muted even in a well-lit photograph. An olive will be warmer and browner, while forest green will be substantially deeper. Keep the manicure unpatterned to appreciate the difference. If you later want a seasonal accent, a small cream leaf would be easier to integrate than several unrelated gold details.
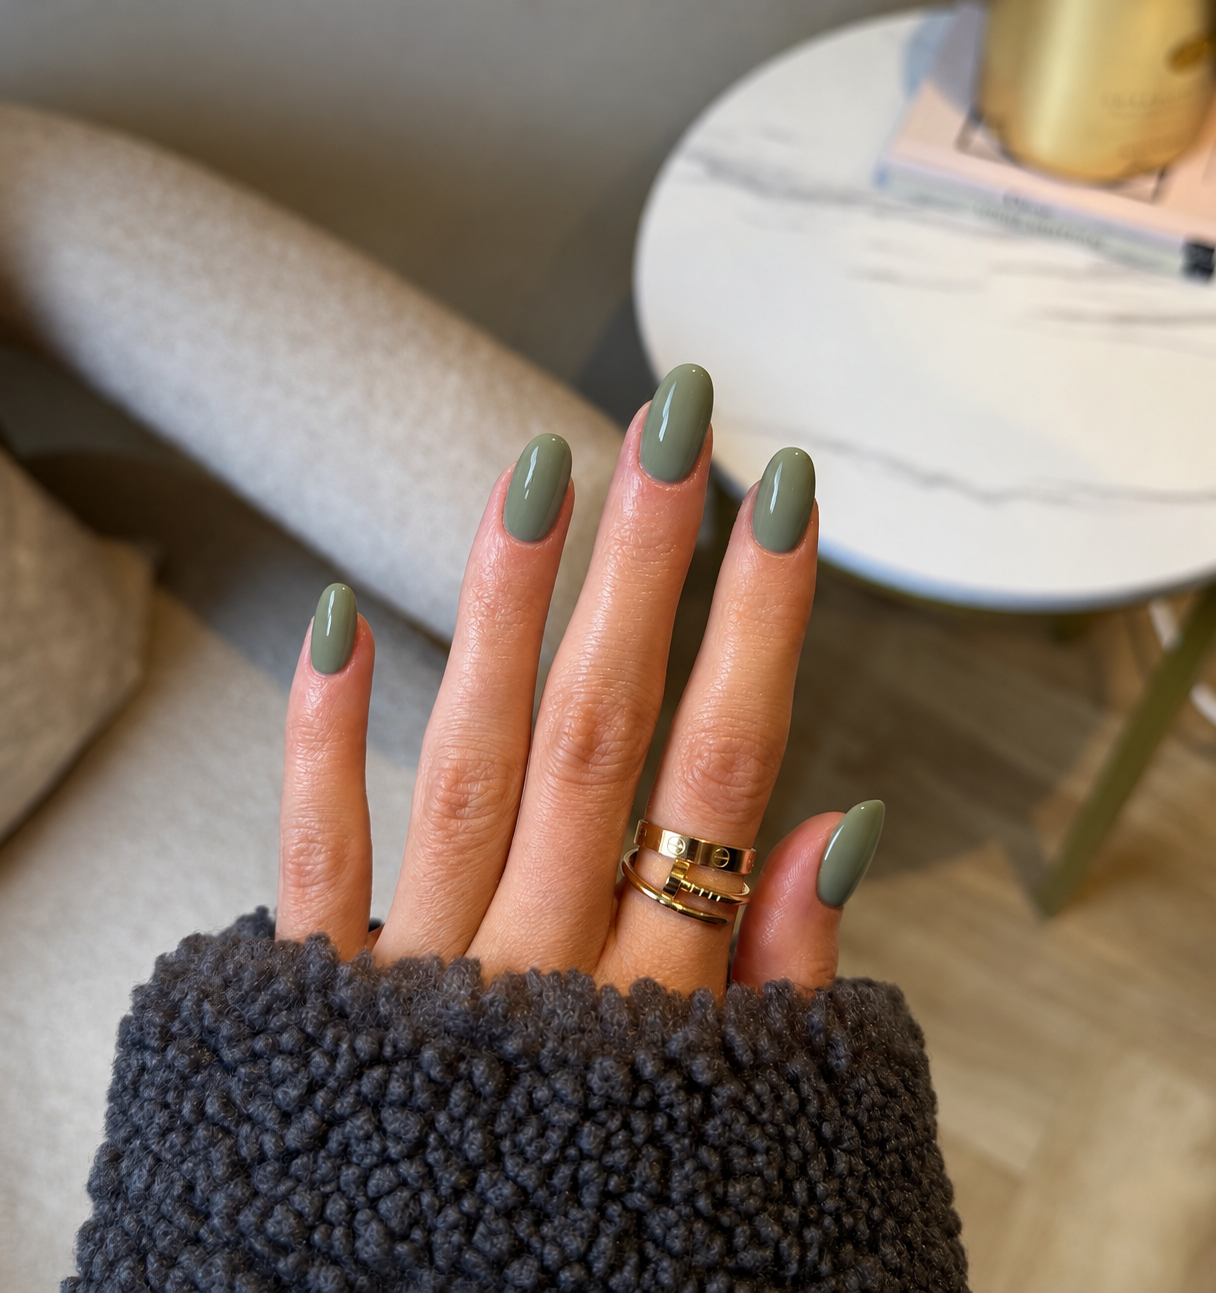
Thanksgiving French tips with room for a natural base
7. Chocolate micro French on a rosy base
A narrow chocolate line follows the free edge over a translucent rosy base. On short nails, the proportion matters more than making the line as tiny as possible: you want a visible border and plenty of base left underneath it. A rounded or soft-square shape works without needing a long extension.
Choose a chocolate that is clearly brown, not an almost-black espresso, if you want a gentler contrast. Ask for the same visual width across the hand, allowing for differences in nail size. The base should suit your preferred level of coverage. A milky rose creates a cleaner separation; a more transparent rose leaves the overall effect lighter and closer to the natural nail.
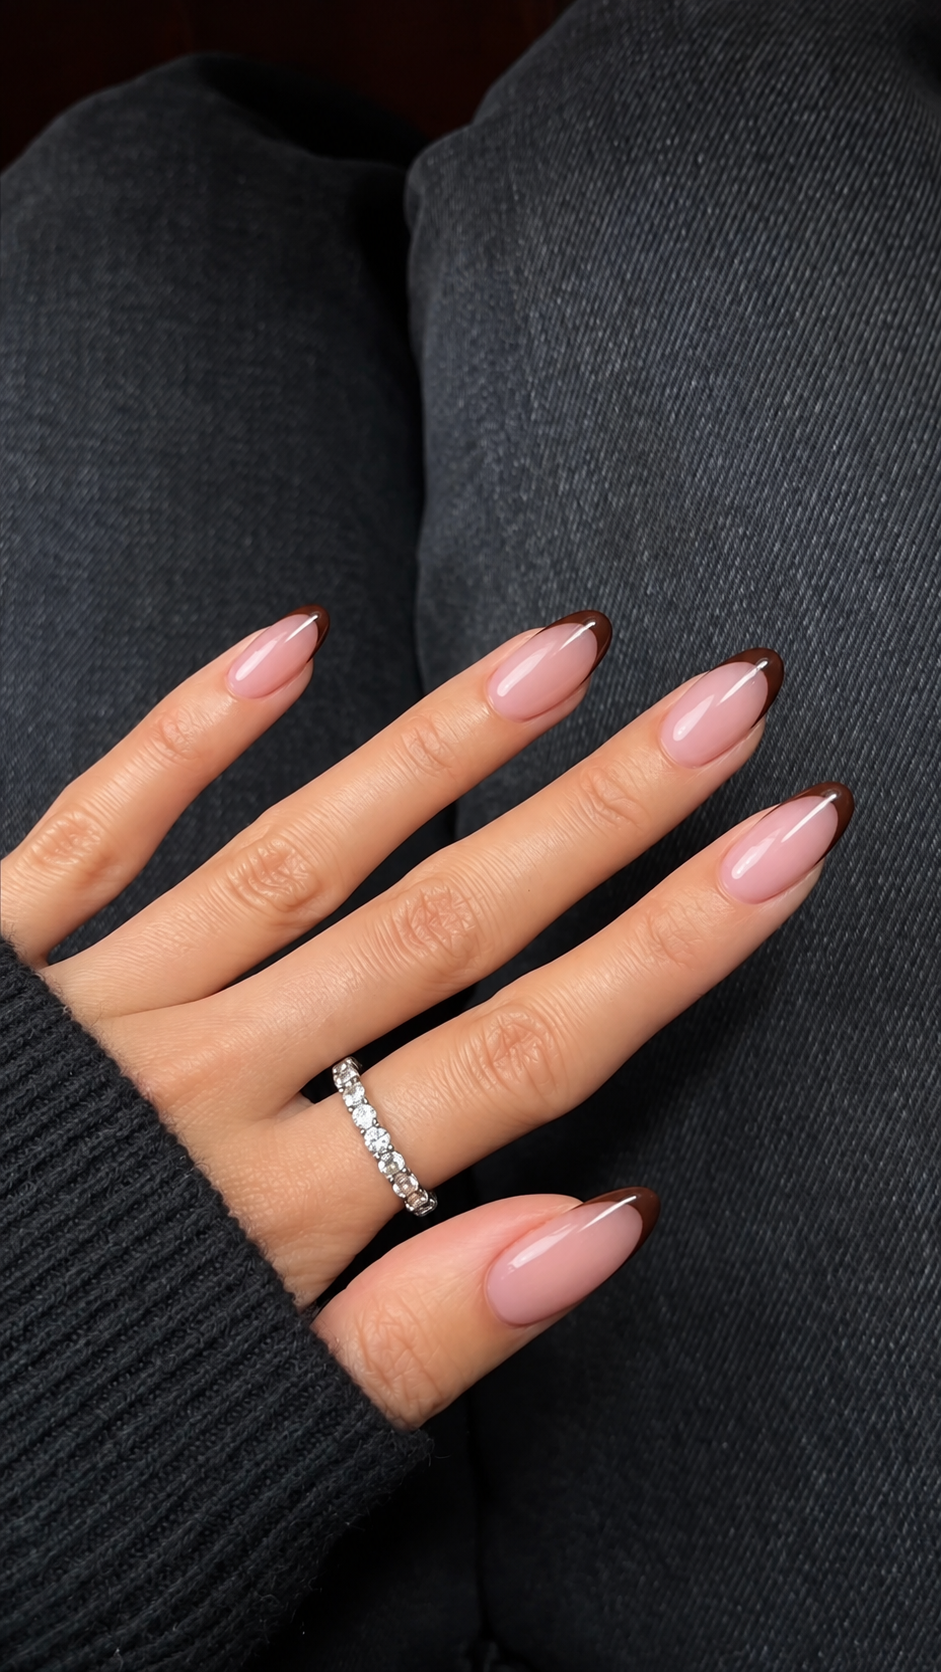
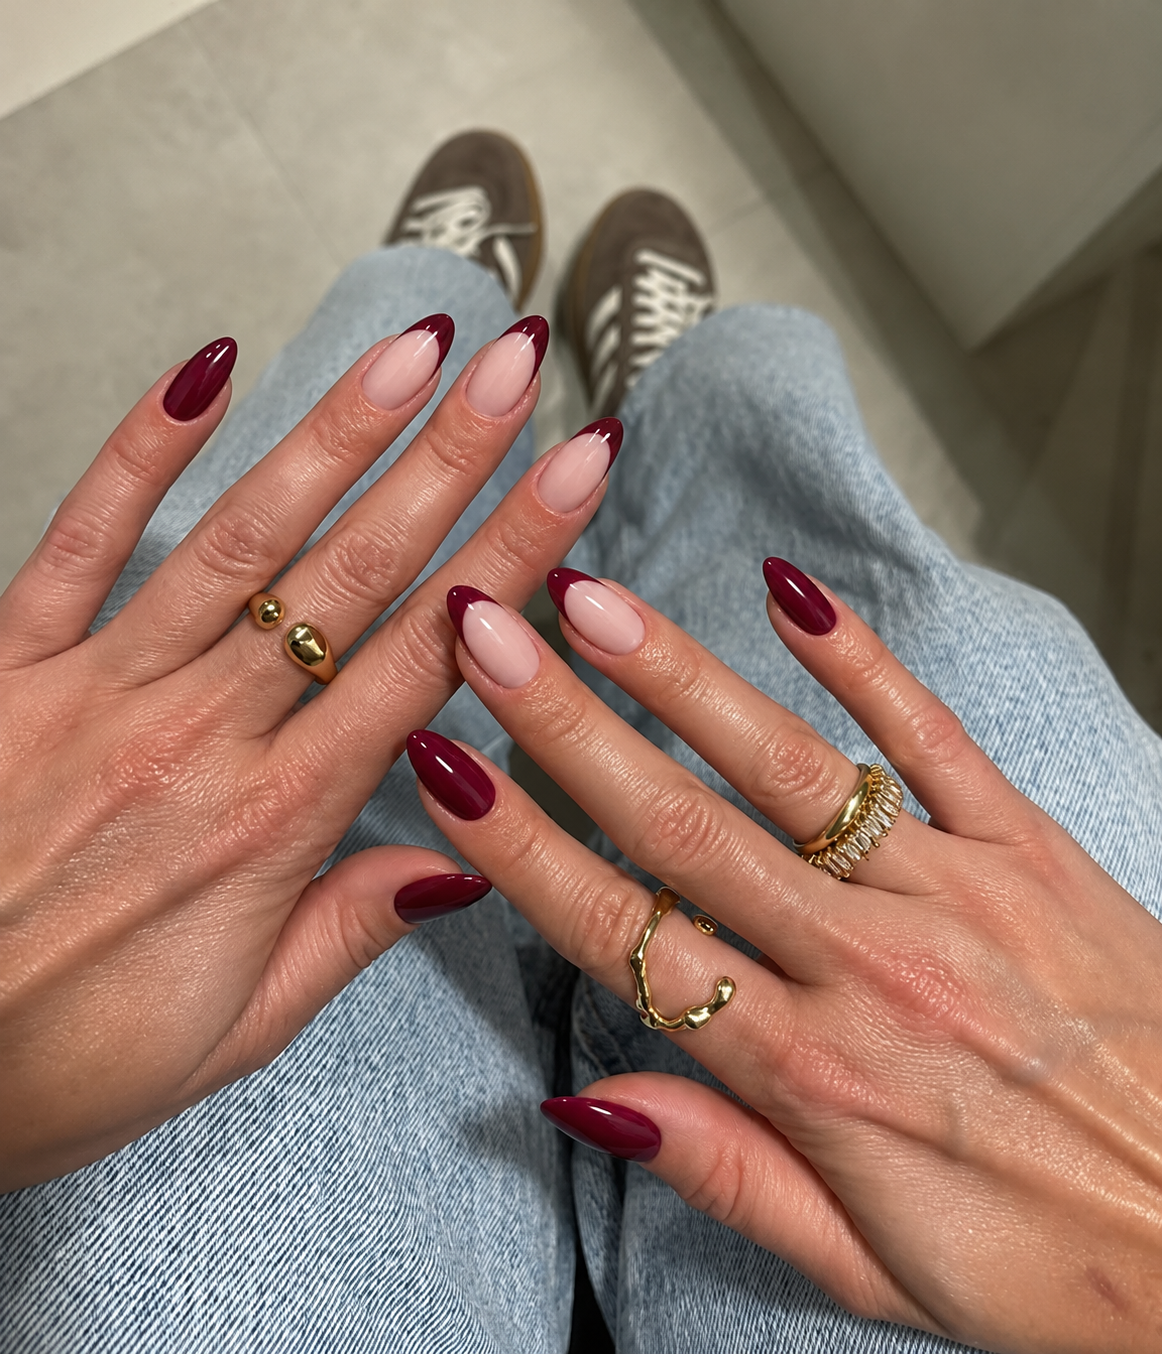
8. Cranberry French mixed with solid wine nails
On a moderate almond shape, combine cranberry French tips on the index and middle nails with solid cranberry on the thumb, ring and little finger. The pale pink base on the French nails breaks up the dark color, while the repeated cranberry shade keeps the hand cohesive. This gives you a more varied manicure without introducing a second decorative color.
Use the same wine tone for the tips and the solid nails. If one is red and the other noticeably purple, the effect becomes a different kind of mix-and-match. Keep the French curve rounded and balanced. For shorter nails, reduce the tip depth rather than squeezing a long almond-style smile line onto a small surface.
9. Olive side French with an open nude center
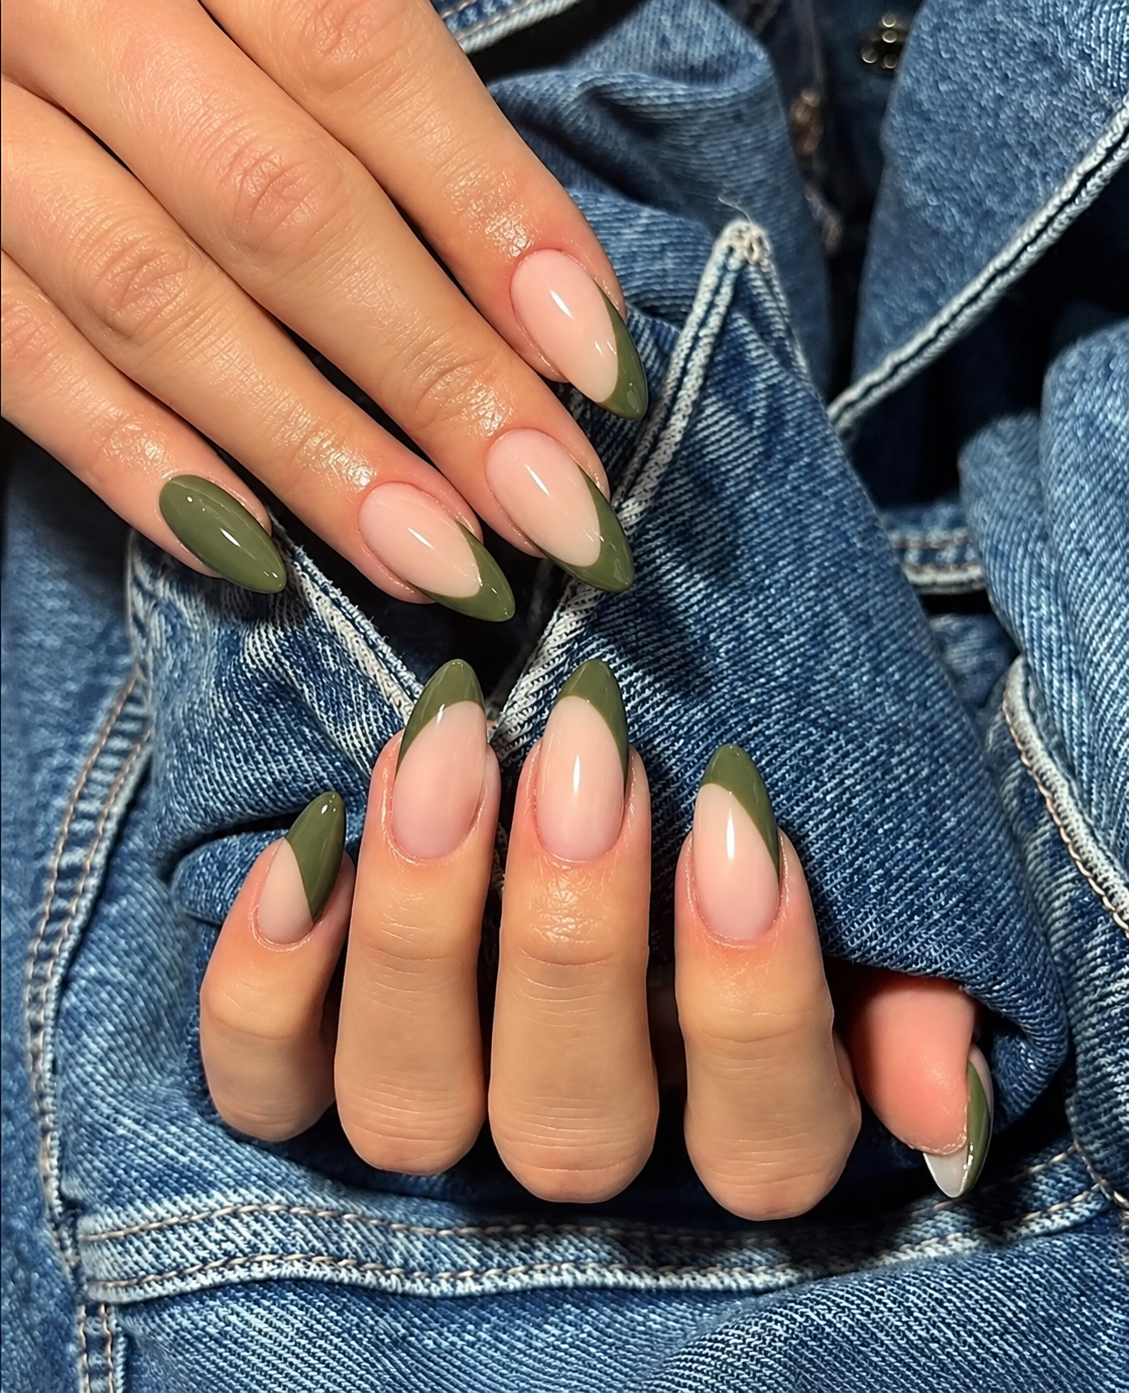
An olive curve wraps around one side of each tip, leaving more nude visible on the opposite side. The asymmetry makes this distinct from a standard green French, while the muted color keeps it restrained. Choose a short-to-medium oval so there is room for the curve without turning it into a wide green block.
Specify which side the color should follow and whether you want the two hands to mirror each other. That small decision creates a more deliberate result. Keep the base translucent beige and the olive glossy. Adding loops, gold outlines and a leaf at the same time would obscure the simple placement that makes this version interesting.
10. Pumpkin and rust double tips
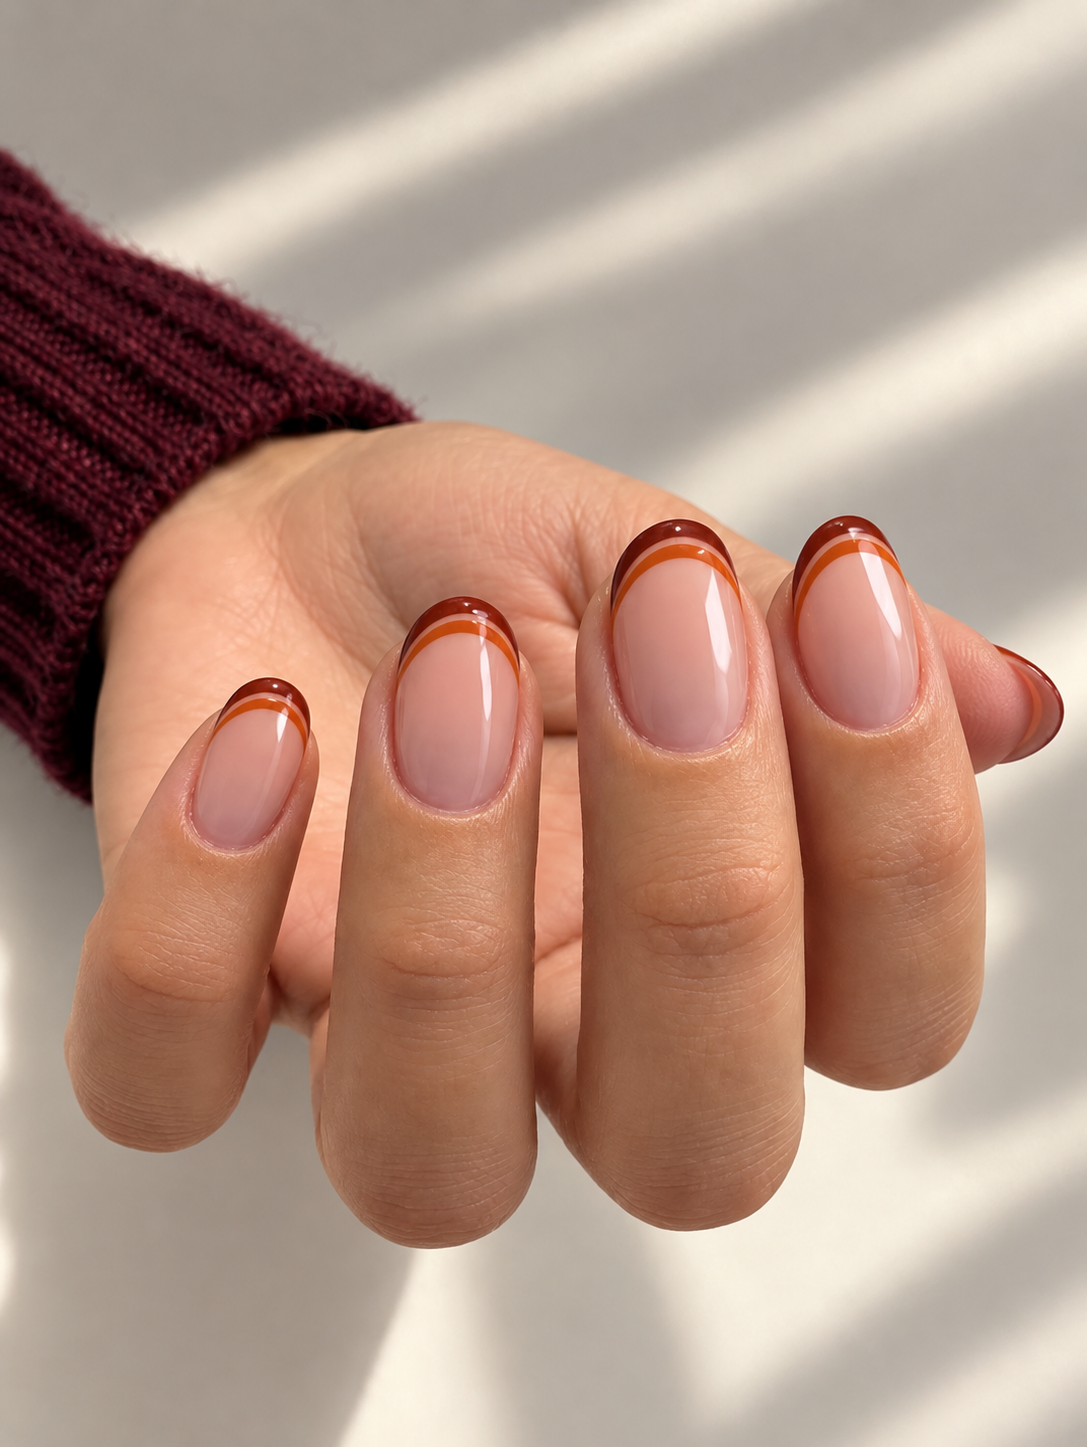
Two narrow curves bring pumpkin and deeper rust together at the tip of a nude nail. Leave a slim strip of the base visible between them so the colors read as separate lines. A medium oval offers enough space for the double detail while keeping the silhouette soft.
The pumpkin should be muted, with the rust providing the darker outline. On very short nails, choose just one of the curves rather than making both so small that they blur together. This design is about layering two related colors, not covering the whole tip in orange. Keep the rest of the hand free from motifs; the repeated double line supplies the decoration.
11. Honey-beige tips over creamy oat
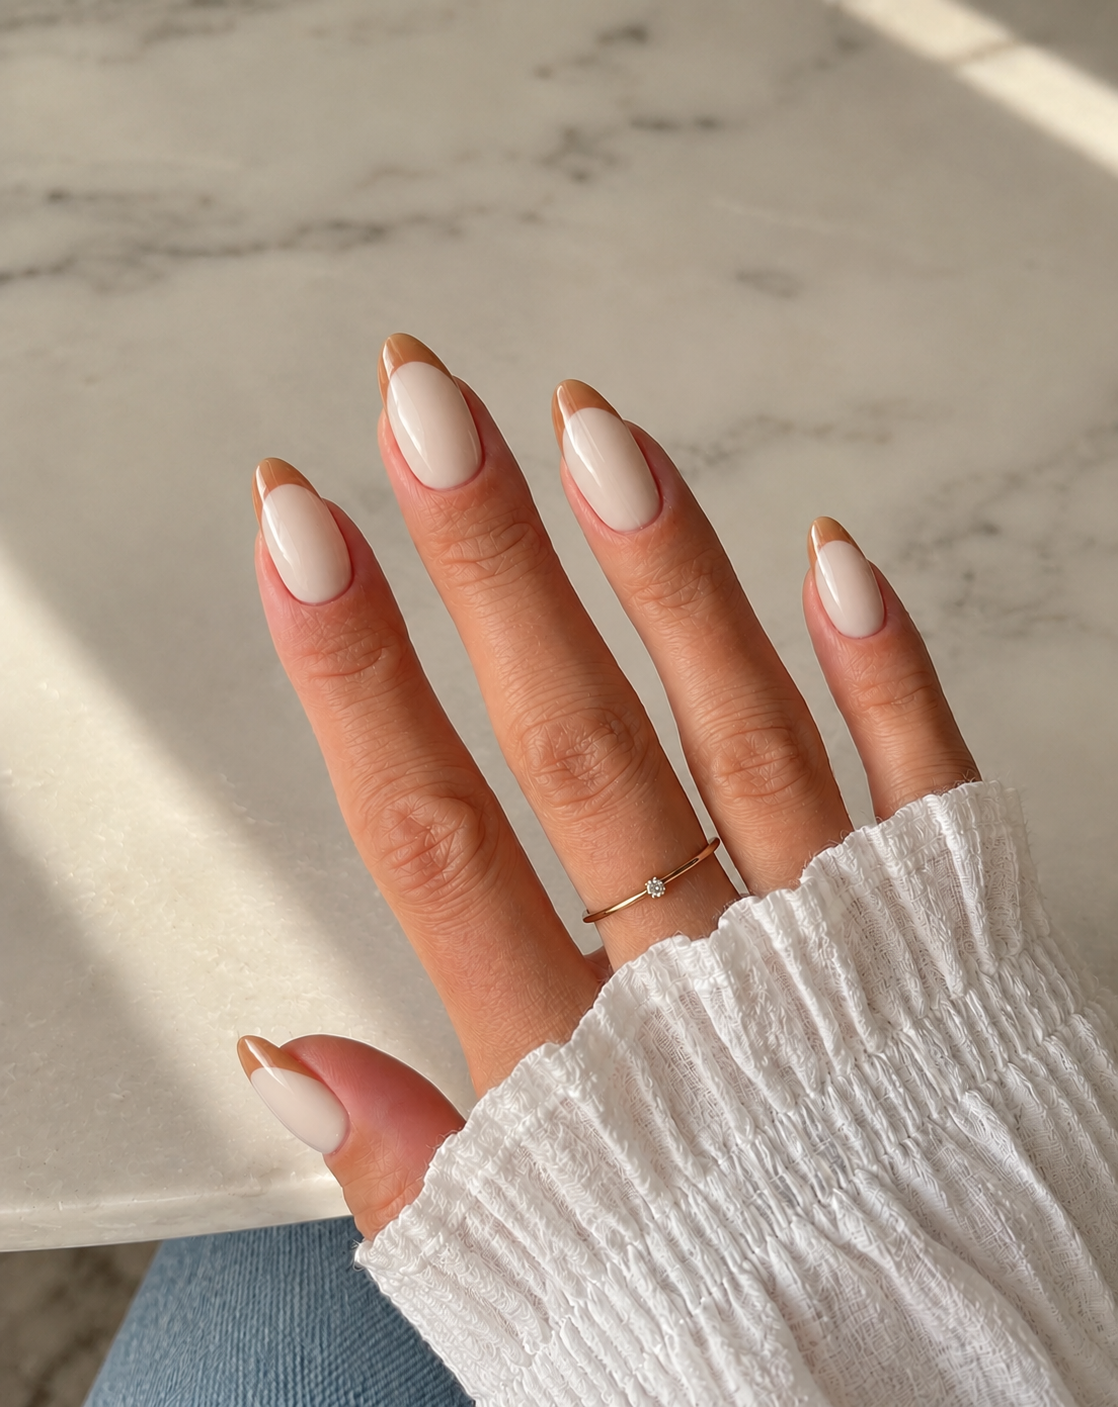
This French keeps the contrast low: honey-beige tips sit over a creamy oat base. The edge is warmer and slightly deeper than the center, with a conventional rounded smile line. It is a good option if you like a visible manicure but do not want your nails to be the darkest or brightest element in the room.
Choose two samples that remain distinguishable in ordinary daylight. If the colors are almost identical, the French may disappear except in close photographs. A short soft-square shape keeps the border neat, while a modest oval gives it a gentler curve. Use a regular glossy finish throughout; a chrome layer would change the restrained color comparison into a finish-led design.
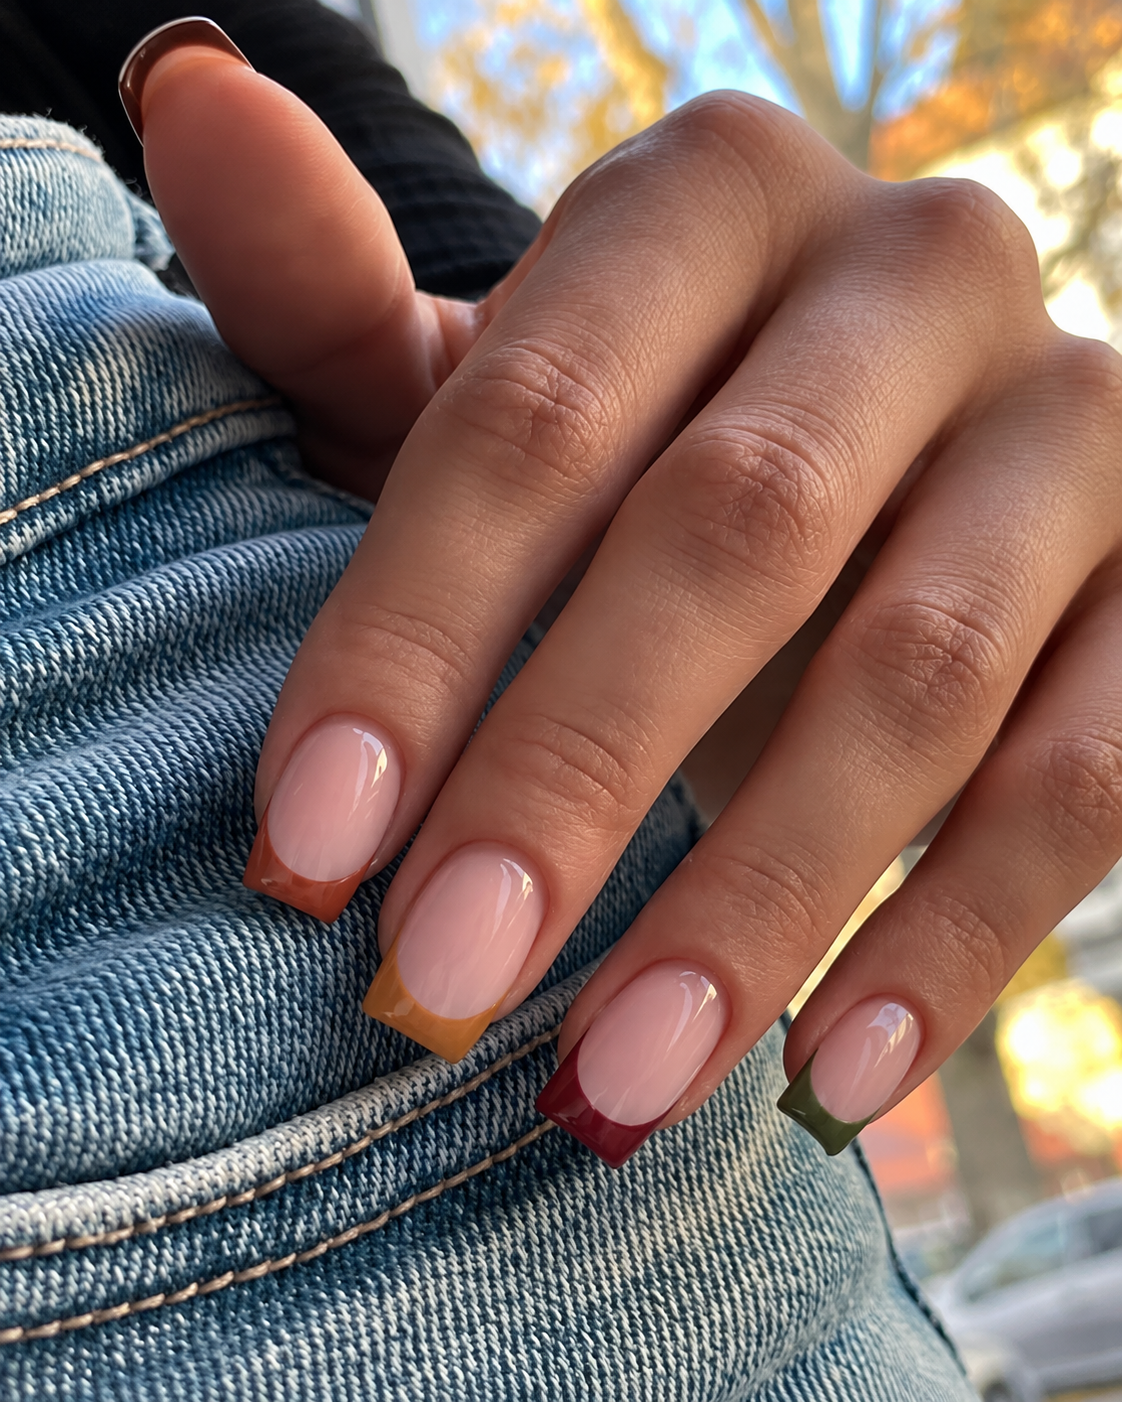
12. Five autumn colors, one French shape
Keep the base consistent and change only the tips: chestnut on the thumb, terracotta on the index, honey on the middle, cranberry on the ring and olive on the little finger. The repeated French shape gives this varied palette a structure. Choose muted versions of all five colors so one bright nail does not dominate the others.
This is a useful alternative to five full-color nails when you want the palette but less coverage. On a short oval, make the tips shallow. On a longer almond, keep their depth visually consistent. Photograph the selected swatches together before the appointment begins; it is easier to adjust one outlying shade then than after the full set is finished.
Chrome, pearl and cat-eye: choose the kind of light you want
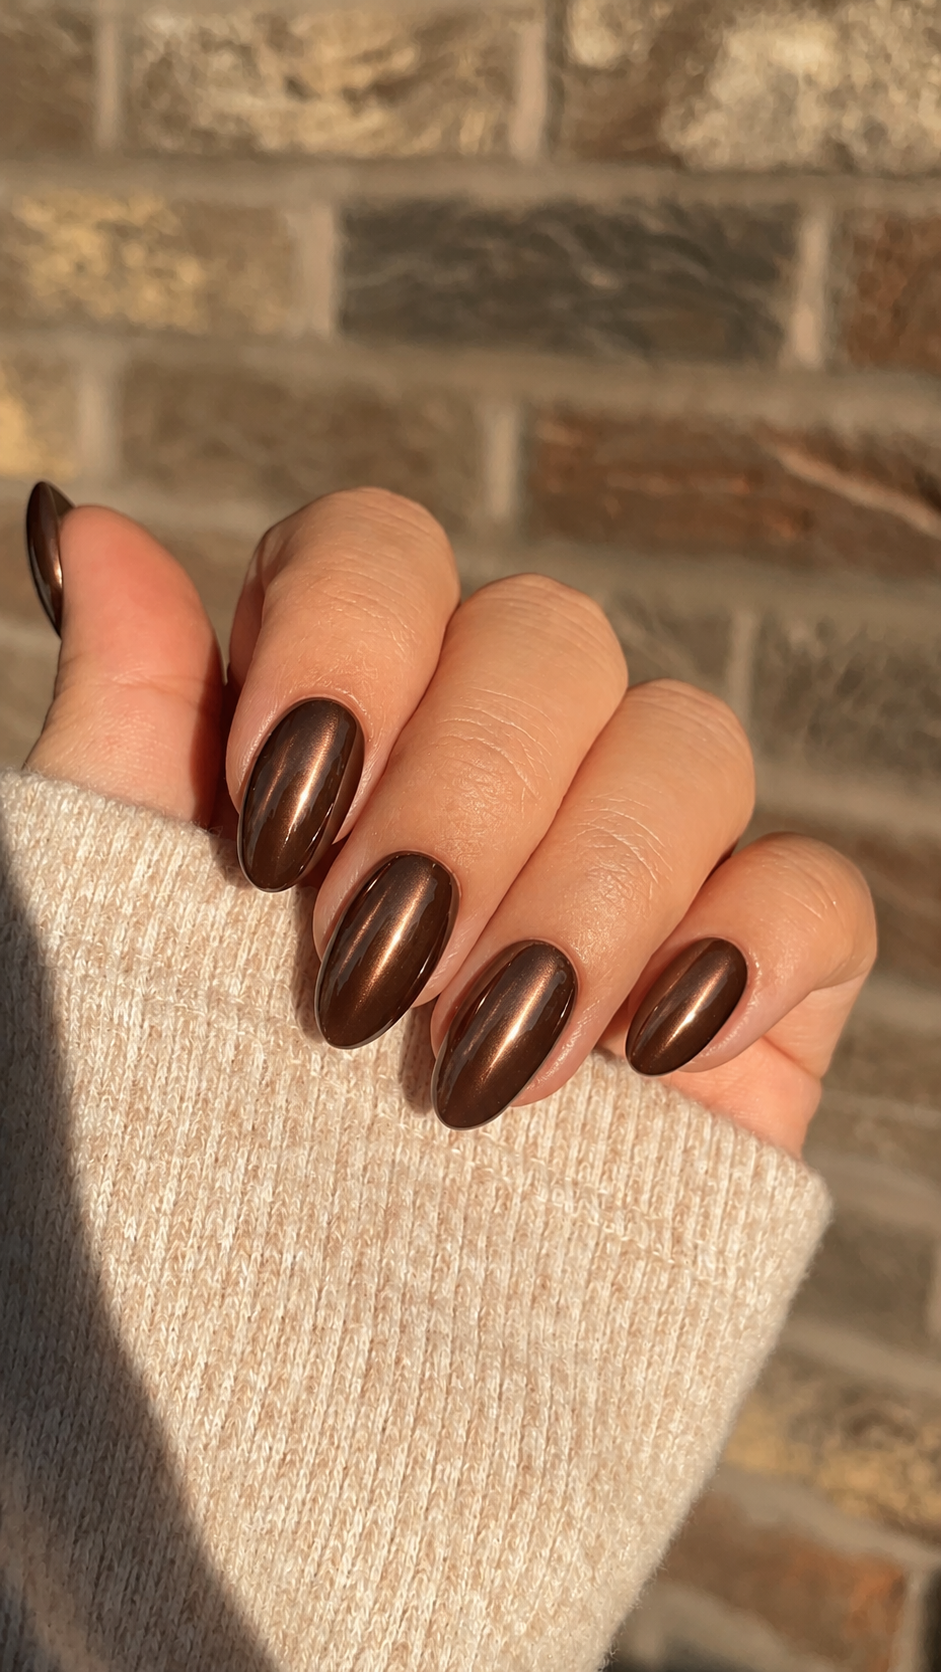
13. Chocolate chrome with a smooth brown reflection
Chocolate chrome creates a continuous metallic-looking surface rather than scattered points of glitter. Choose a medium brown on moderate oval nails, with enough visible color between the reflections to keep the result chocolate rather than silver. This is the stronger statement version of a glossy brown manicure.
When describing the finish, show a reference where both the base and the reflected light are visible. A photograph dominated by a white highlight can hide the actual tone. Keep the nails free of extra foil or rhinestones so the smooth surface stays readable. If an all-chrome set feels too strong, use the finish only on the ring nail and keep the others plain chocolate.
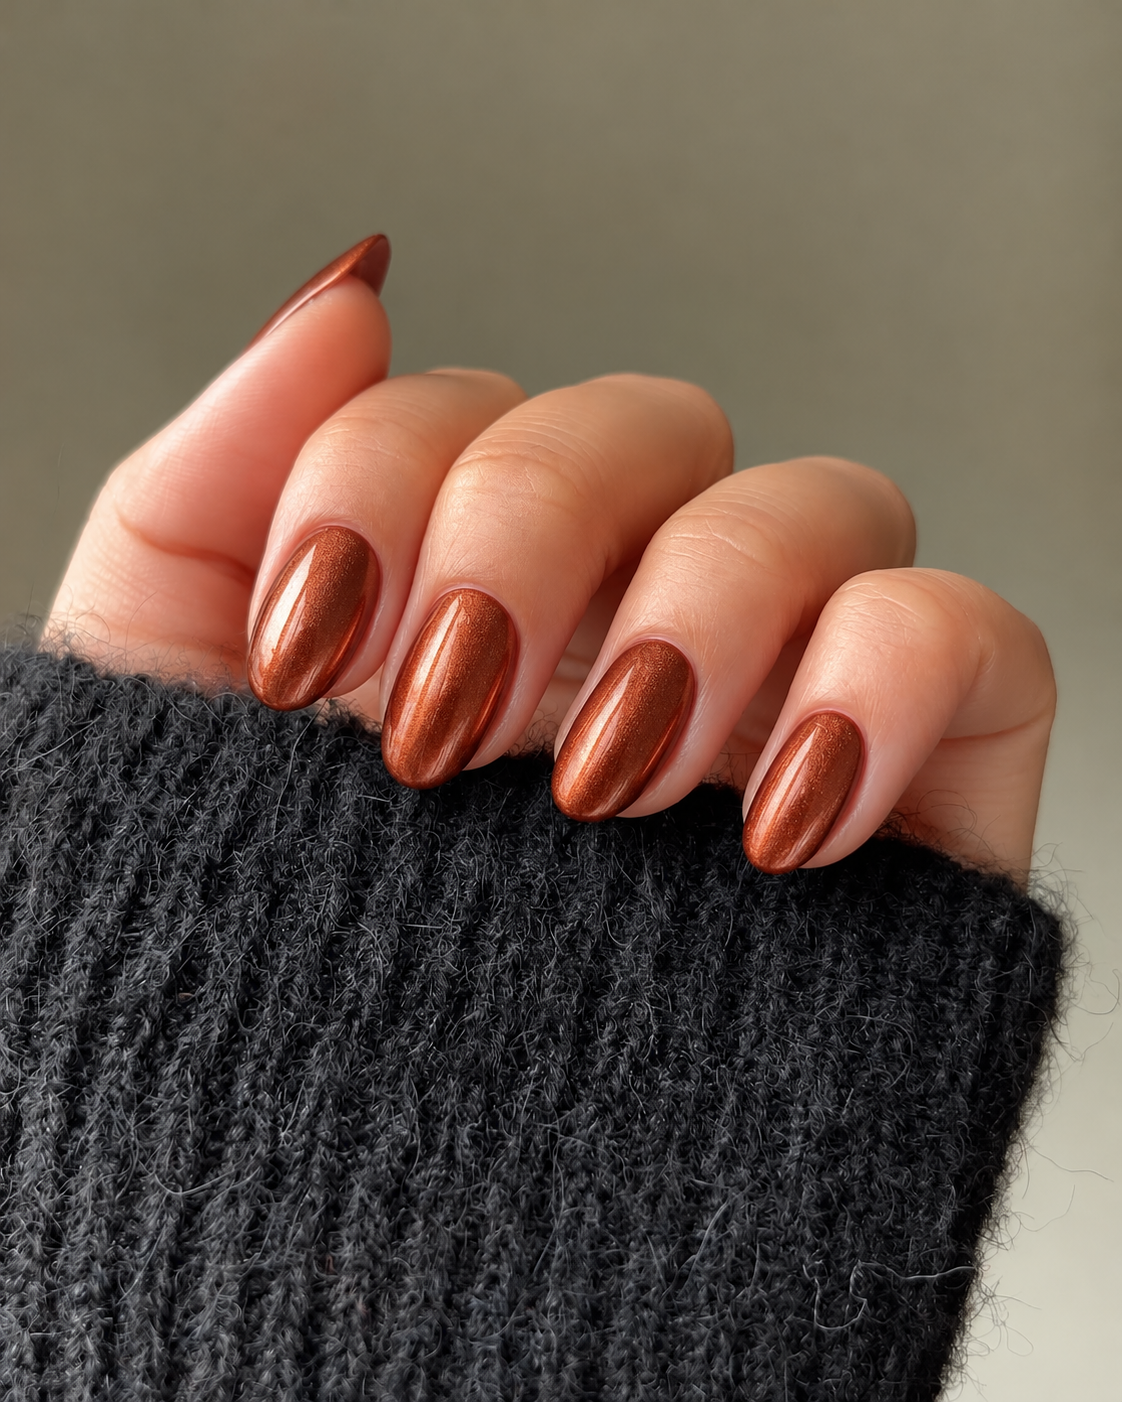
14. Copper satin-metal on short ovals
Copper brings a reddish metallic warmth, but this version uses a softer satin-like reflection instead of a sharp mirror. The nails are short and oval, with the color applied evenly across the whole hand. It feels brighter than chestnut while staying within the same warm family.
Ask for fine, continuous luminosity rather than large glitter particles. The difference matters: visible glitter creates a sparkling surface, while this look relies on a more uniform metallic sheen. Keep the copper slightly brown if you want it to remain subdued. A very orange copper is a valid alternative, but it will stand out more strongly against neutral clothing and should be chosen deliberately.
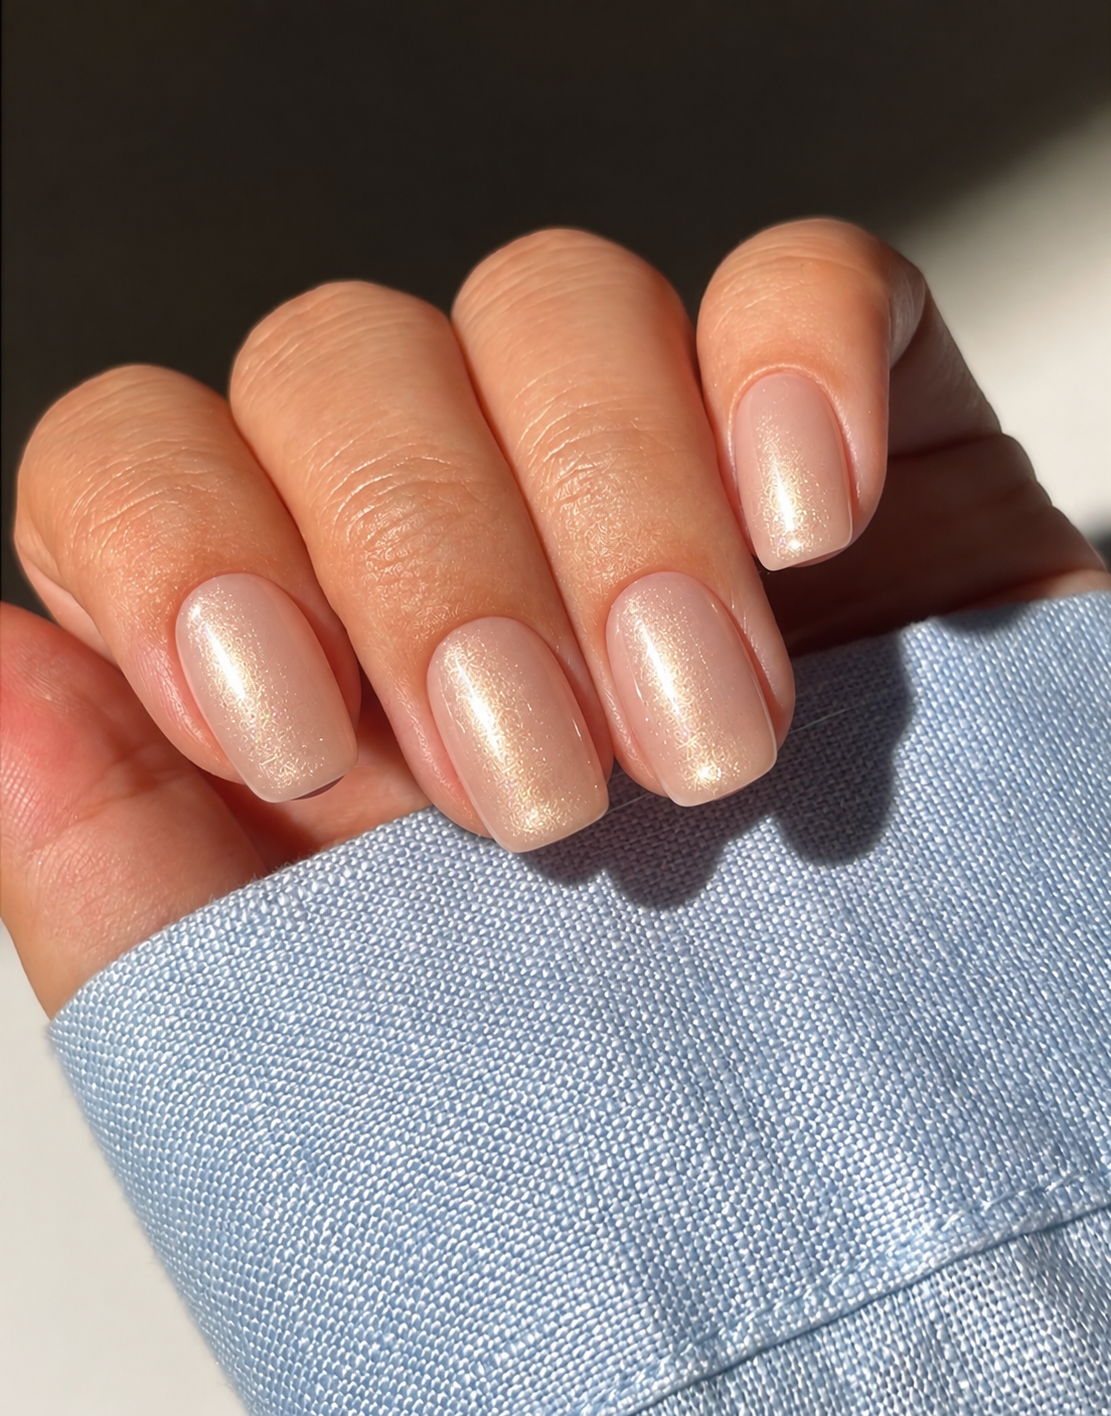
15. Champagne pearl on a creamy nude
A creamy nude base with a fine champagne pearl gives a lighter option for Thanksgiving dinner. The effect should be softly luminous, with the nude still visible beneath it. Short soft-square nails keep the result neat and prevent the pale reflection from becoming a large statement surface.
Champagne here means a warm beige-gold light, not a yellow gold foil finish. Compare it with a cool white pearl if you are unsure which direction you prefer. Ask for the subtle version first; an intense mirror layer would be a different design. This is an easy visual match for a textured outfit because the manicure adds light without another pattern or a dark outline.
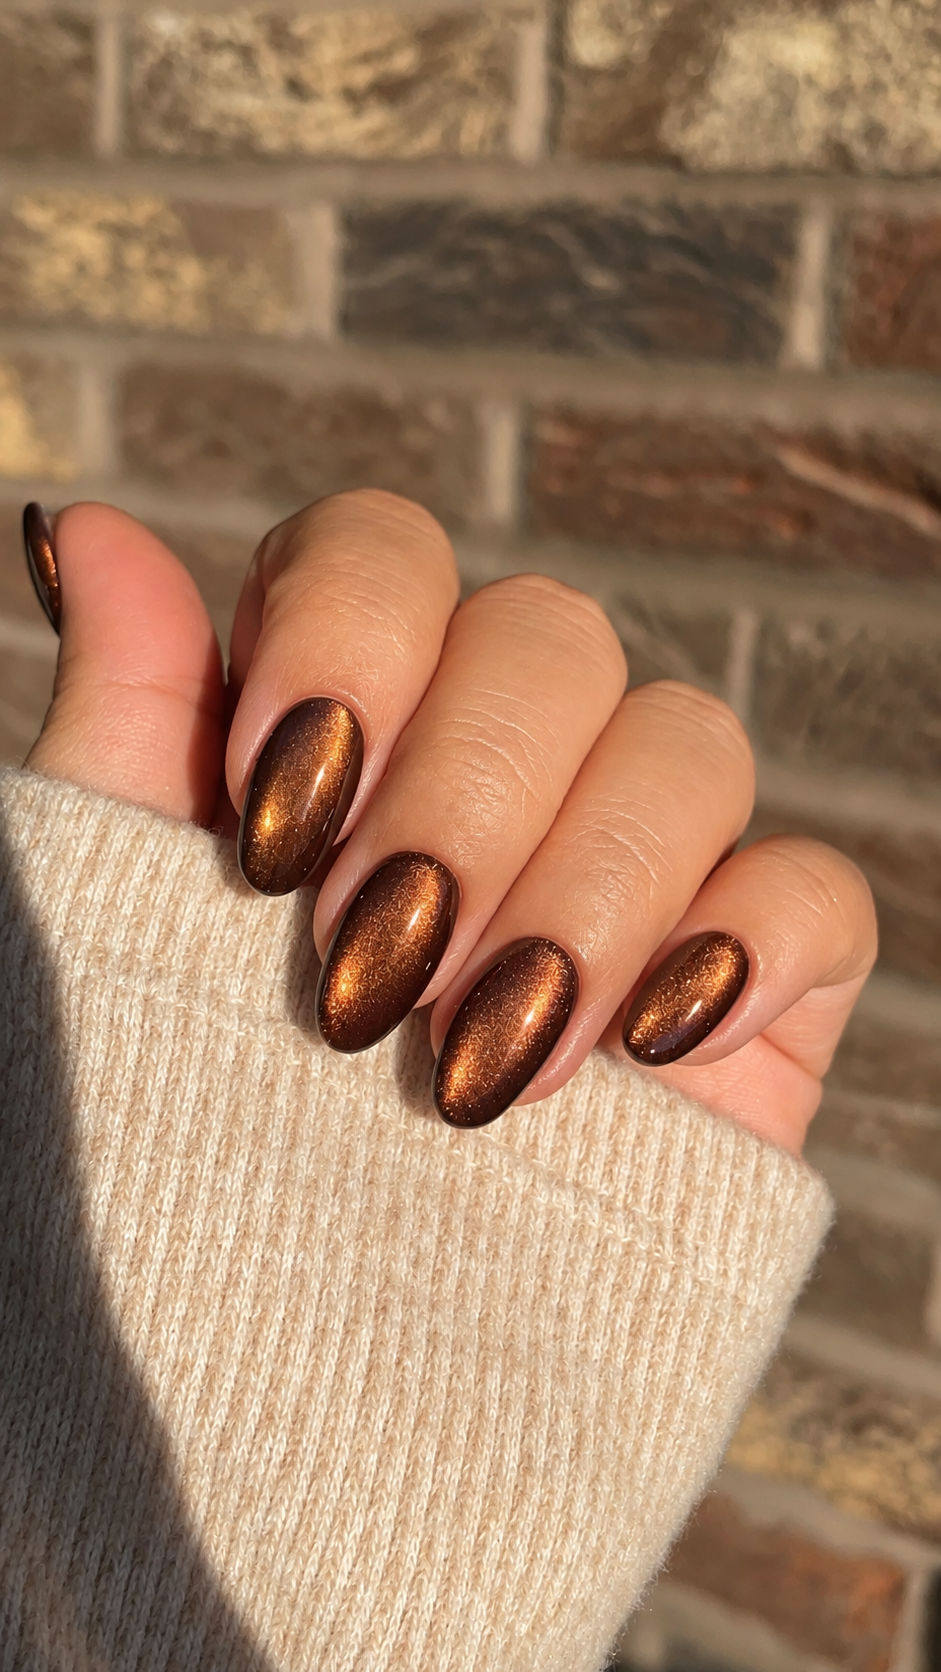
16. Bronze velvet with a broad magnetic glow
Bronze velvet has a broad, softly concentrated luminous area that appears to shift as the hand moves. The base stays brown-bronze, while the light creates a warmer center. On short oval nails, it can look richly dimensional without requiring any additional artwork.
Use a moving reference or ask to see a sample tilted under the light when possible. A still photograph can make magnetic shimmer look like ordinary glitter or a painted stripe. The request here is a broad velvet glow, not a sharply defined line. Keep all nails in the same finish so that movement, rather than a contrast between decorated and plain fingers, supplies the interest.
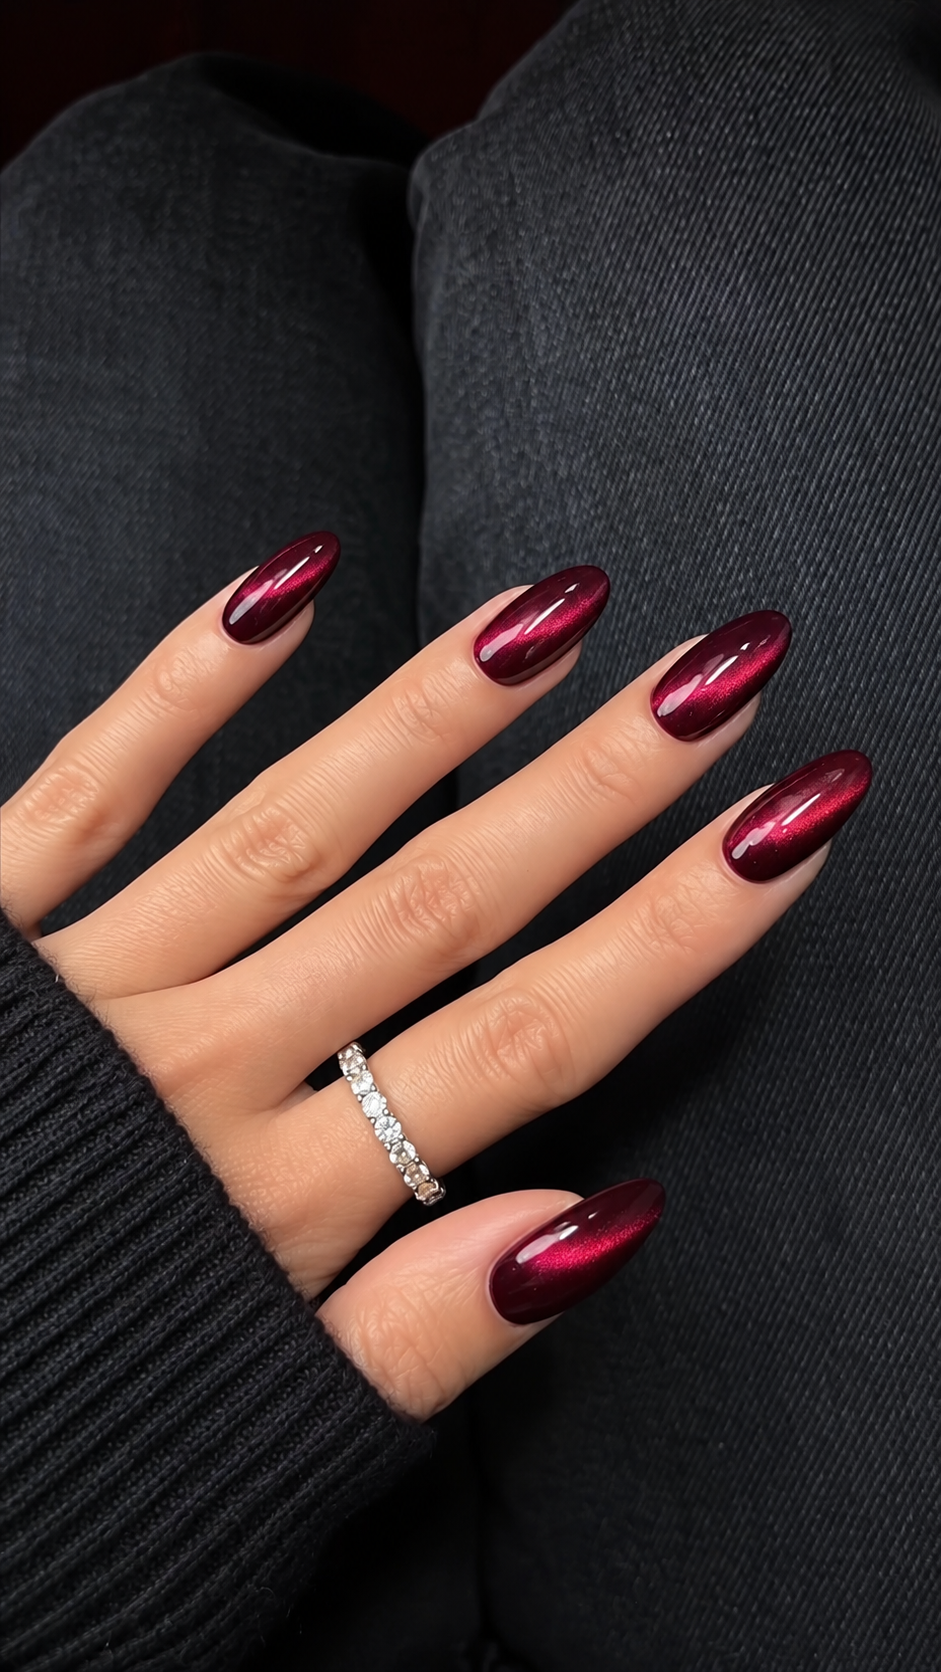
17. Cranberry cat-eye with a diagonal light band
This cranberry cat-eye uses a more defined diagonal luminous band than the bronze velvet design. A deep wine base surrounds a pink-red reflection, giving each nail a sense of depth. Short rounded squares make the band readable on a compact surface without needing long points.
Keep the light direction consistent across the nails, while allowing the reflection to change naturally with their angles. The bright white shine on top is separate from the colored magnetic effect underneath; a good reference shows both. If you want a softer result, widen the luminous band rather than lightening the whole base. Avoid adding gold art here, because the diagonal light is already the focal point.
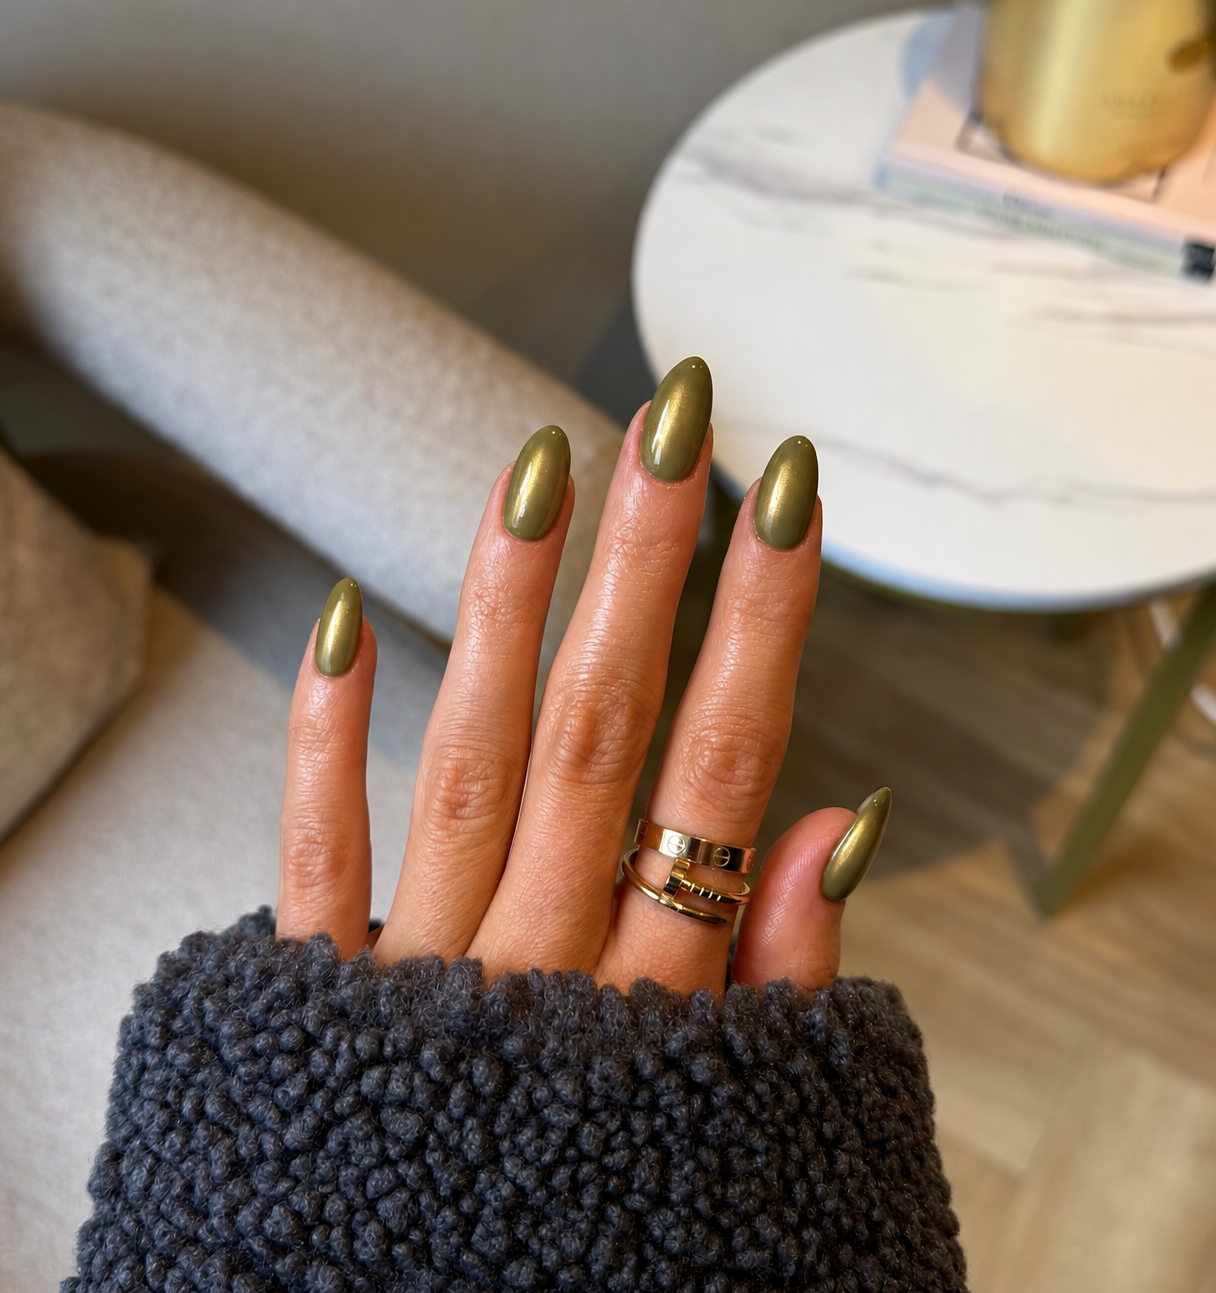
18. Olive pearl with a restrained golden cast
An opaque, muted olive base receives a fine golden pearl, leaving the green clearly visible. This differs from bronze velvet because the light is spread across the surface rather than concentrated into a magnetic zone. Choose a short-to-medium oval and keep the sheen smooth, without coarse sparkle.
The balance between green and gold is the important detail. Too much gold can make the manicure read as metallic yellow; too little may look like plain olive in a photograph. Ask for a sample if the finish is unfamiliar. This design provides a green alternative to champagne pearl while keeping the same idea of a colored base softened by a delicate layer of light.
Plaid, tortoiseshell and quiet patterns
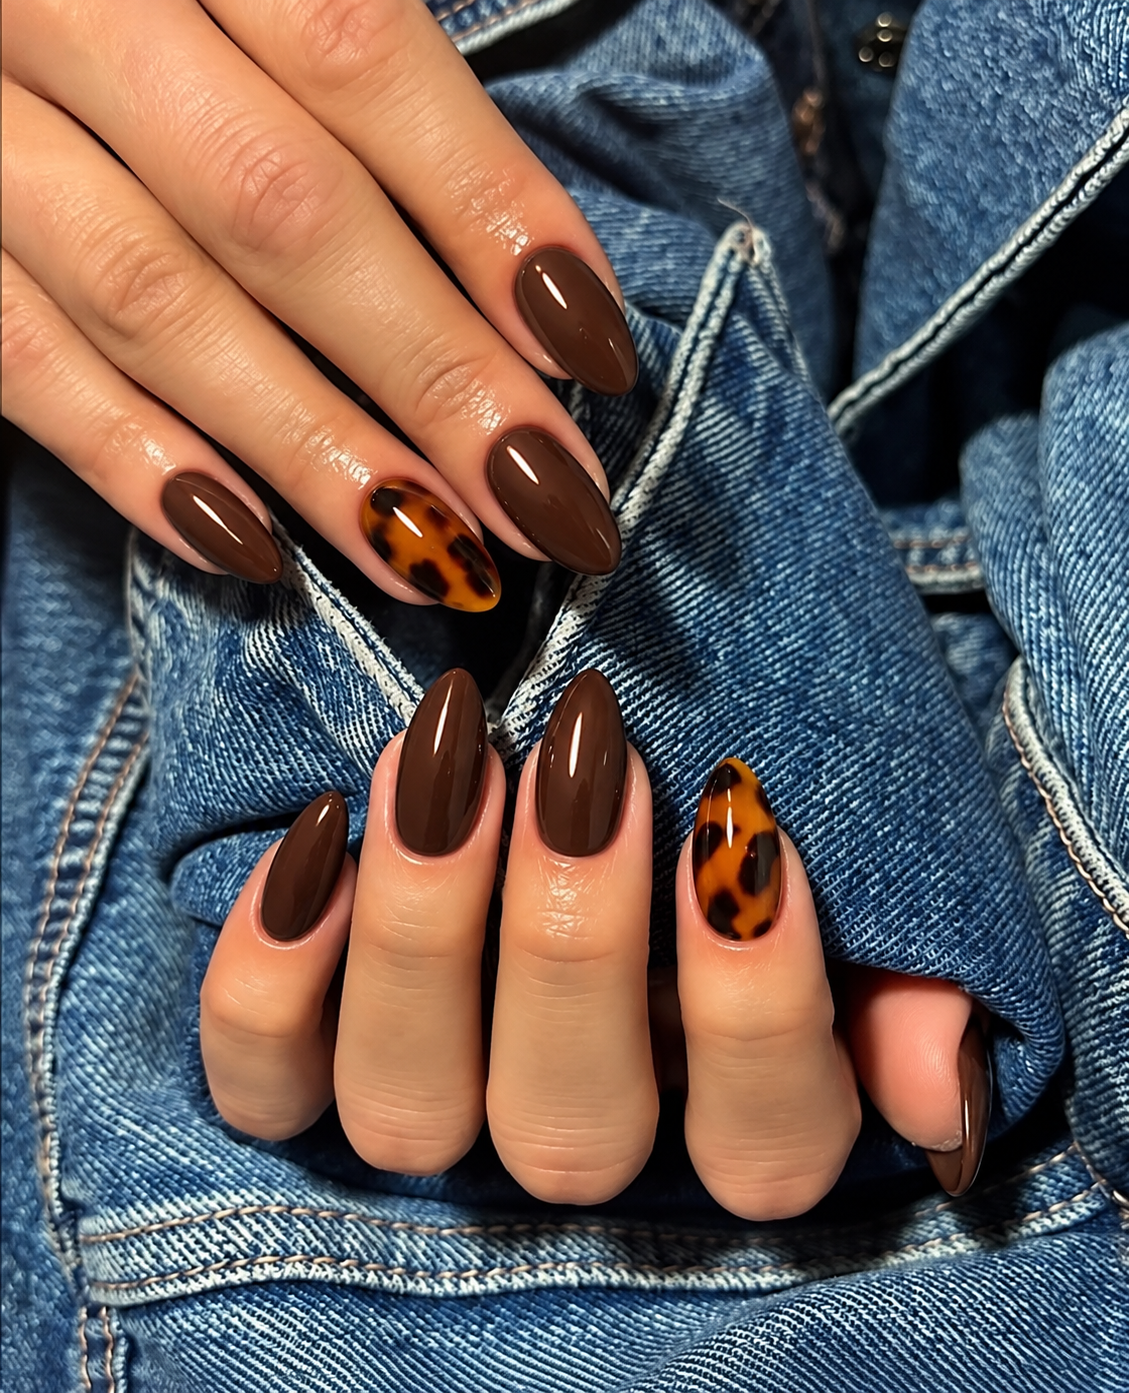
19. An amber tortoiseshell accent with cocoa nails
Keep the thumb, index, middle and little nail glossy cocoa, then give the ring nail a translucent amber base with irregular brown and near-black patches. The spaces between the darker marks matter: they allow the amber to show and keep the accent from becoming a flat dark nail.
On short ovals, one patterned nail is enough to communicate the effect. Ask for uneven patches with softened edges, not a regular leopard-print outline. The surrounding cocoa should relate to the brown inside the pattern. If you prefer a lighter manicure, switch those solid nails to caramel while keeping the same accent; you do not need to increase the amount of pattern.
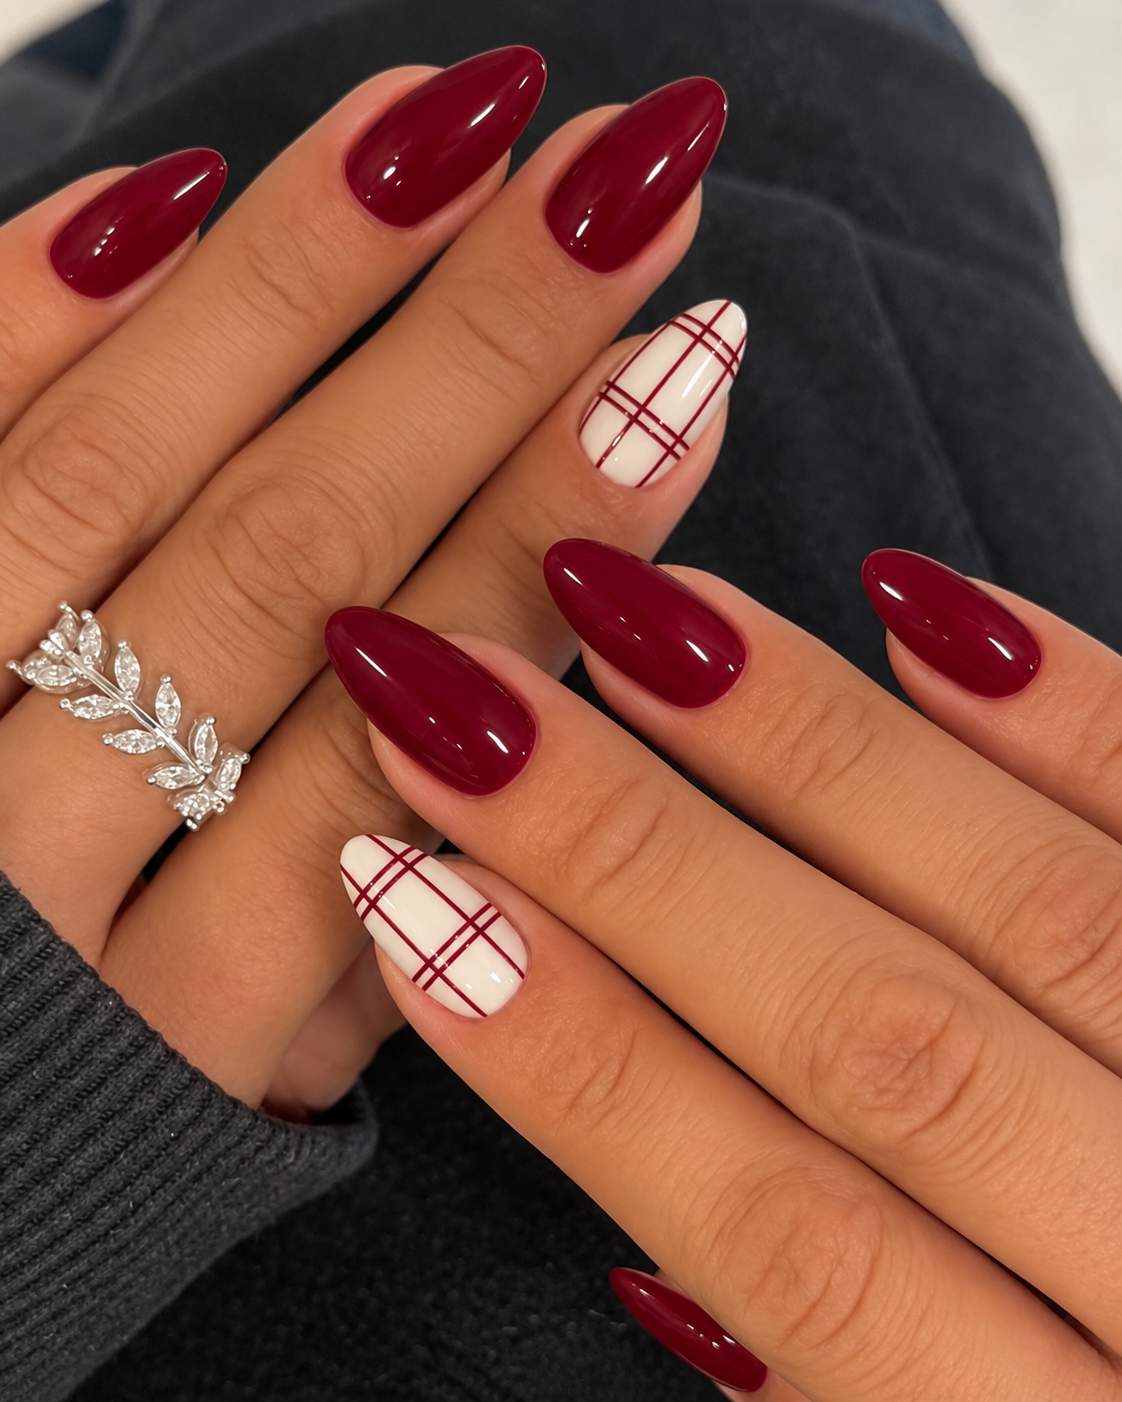
20. Cranberry windowpane on one cream nail
A cream ring nail carries two fine vertical cranberry lines crossed by two horizontal lines. The other nails are solid cranberry, creating a tidy windowpane accent instead of a full tartan set. A short soft-square shape gives the grid a clear, simple frame.
Keep the lines thin and the spaces generous. A dense network of stripes can become visually muddy on a small nail, especially when photographed from a normal distance. The cream should be warm but not yellow, and the grid should repeat the exact cranberry of the solid nails. This is a good patterned choice when you want the festive color to remain more noticeable than the artwork itself.
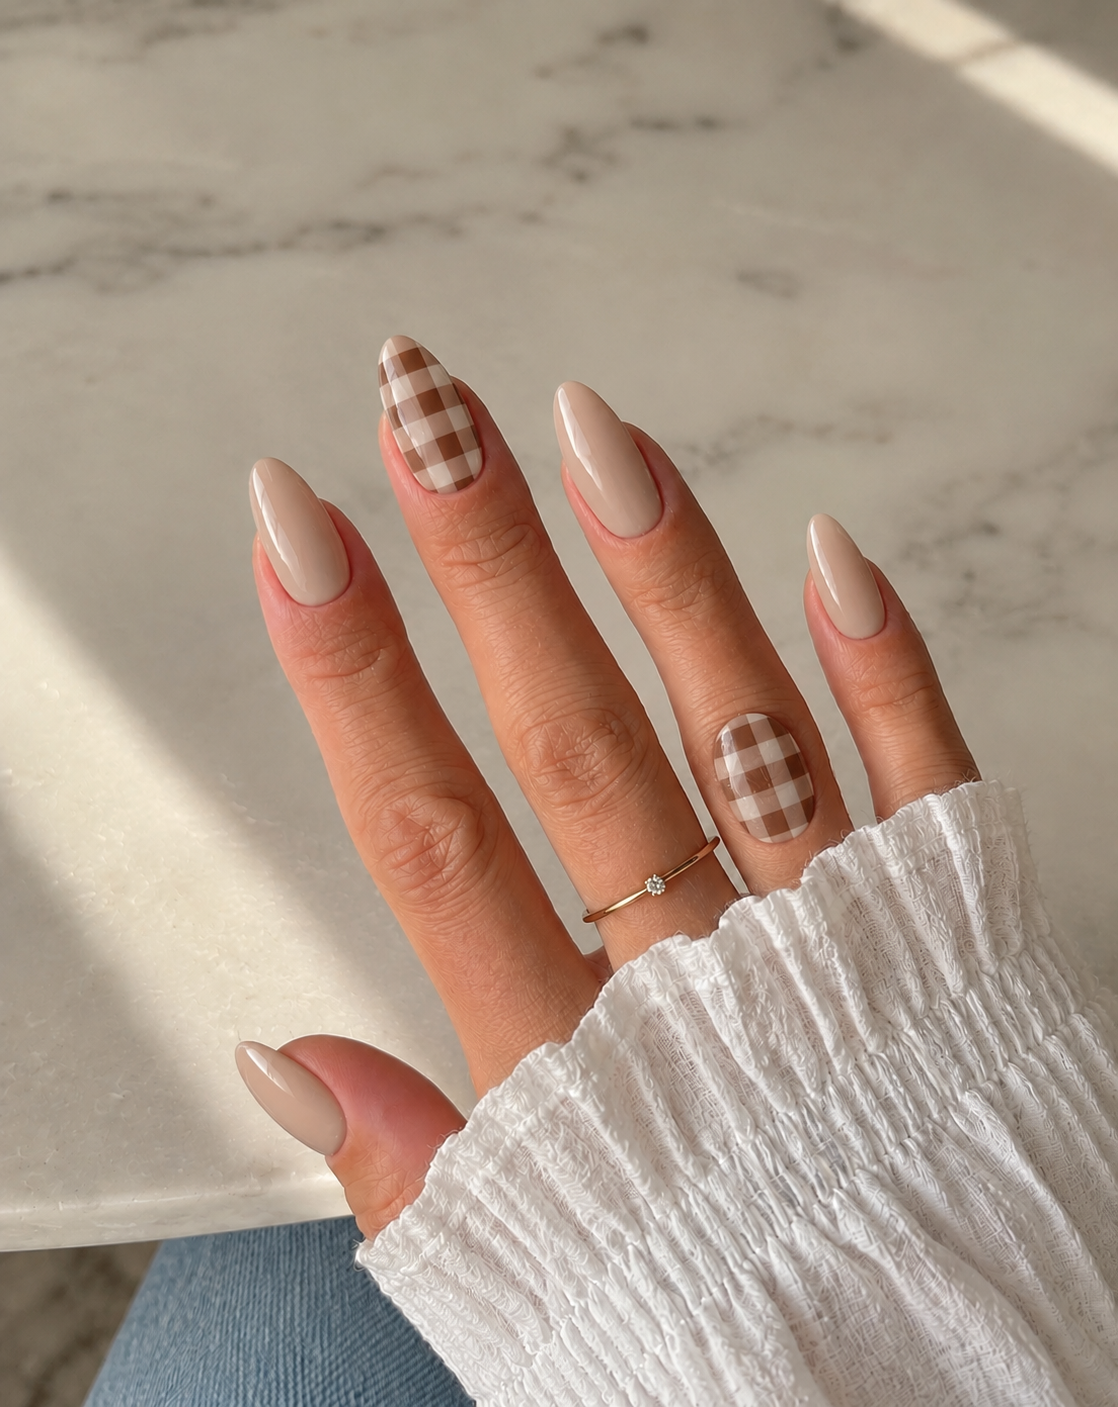
21. Cocoa gingham with a latte base
Gingham uses blocks rather than just intersecting lines. For this version, paint a small cocoa-and-latte check on the index and ring nails, leaving the other three glossy latte. The pattern should have a few clear squares across each nail, with lighter and darker intersections that suggest a woven check.
Choose medium soft squares if you want the block shapes especially readable. For short nails, reduce the number of checks instead of making them microscopic. Keep both colors muted so the pattern feels soft rather than high-contrast black and white. If two accent nails feel busy, keep only the ring accent and preserve the same palette; that is a simpler variation of the same idea.
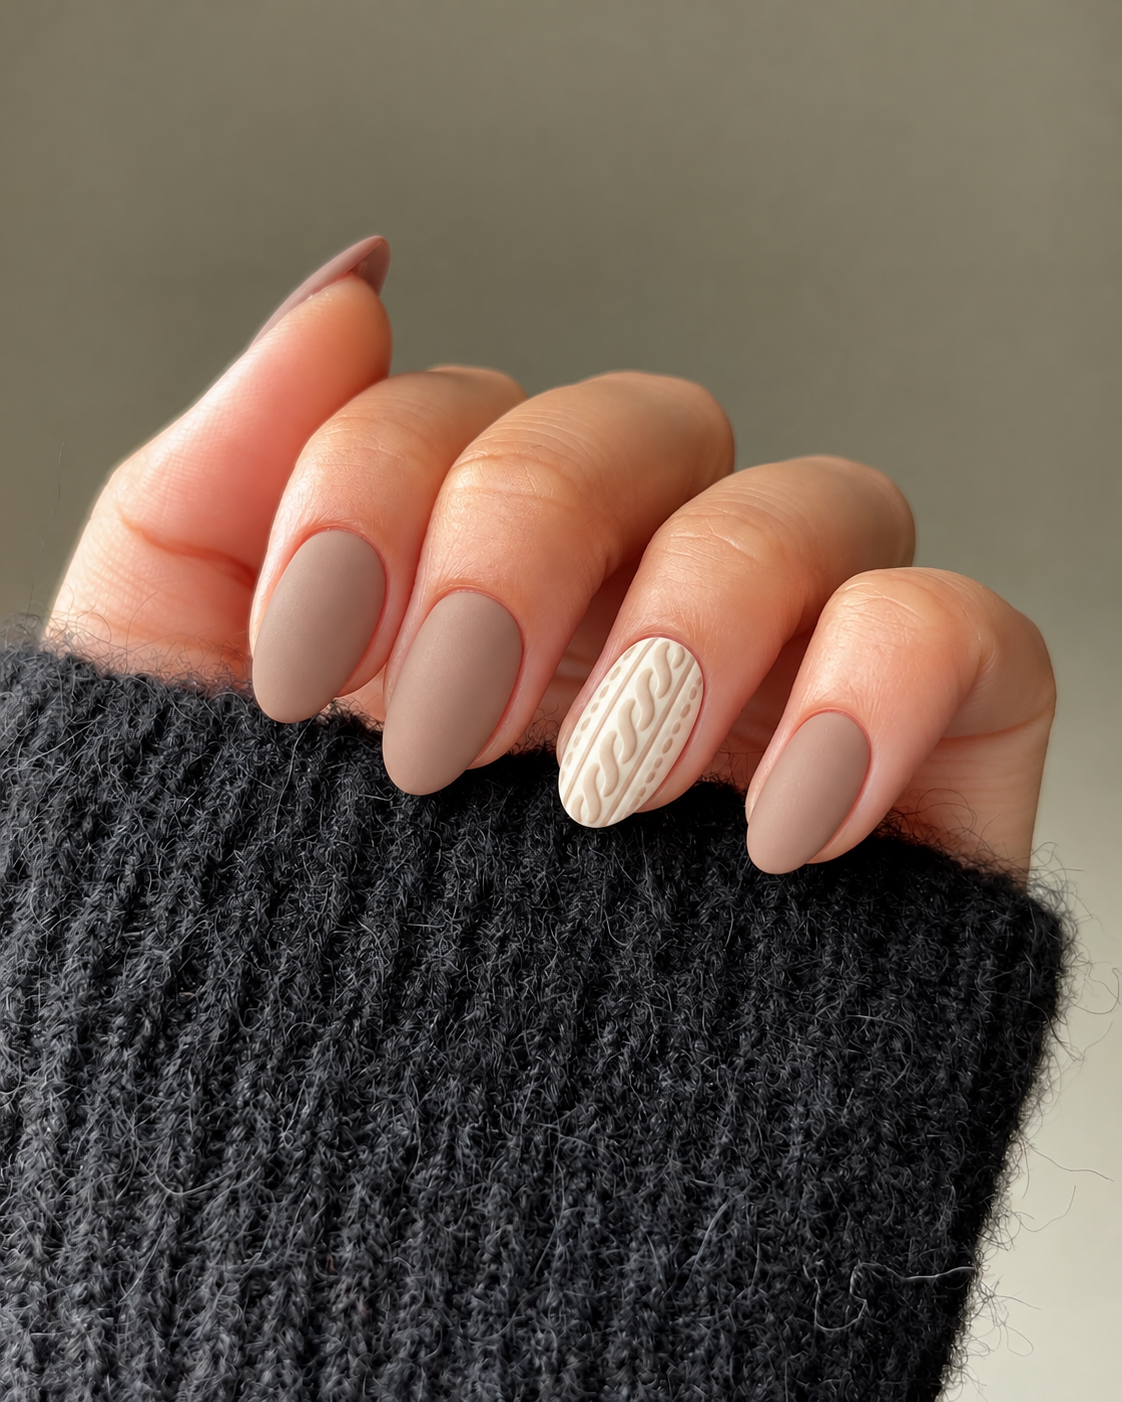
22. A painted cable-knit accent in warm cream
Four nails stay a soft matte mushroom beige, while the cream ring nail carries a flat painted cable-knit pattern in a slightly deeper beige. The detail suggests sweater texture through its lines and small repeated shapes. It does not require a thick raised surface to be recognizable.
Leave space along both sides of the central cable so the pattern has a clean silhouette. This is especially useful on short nails, where several columns of texture would crowd the design. Ask for a flat interpretation if that is what you want; a photograph of raised knit art can otherwise lead to a different result. The contrast should be subtle but still visible against the cream base.
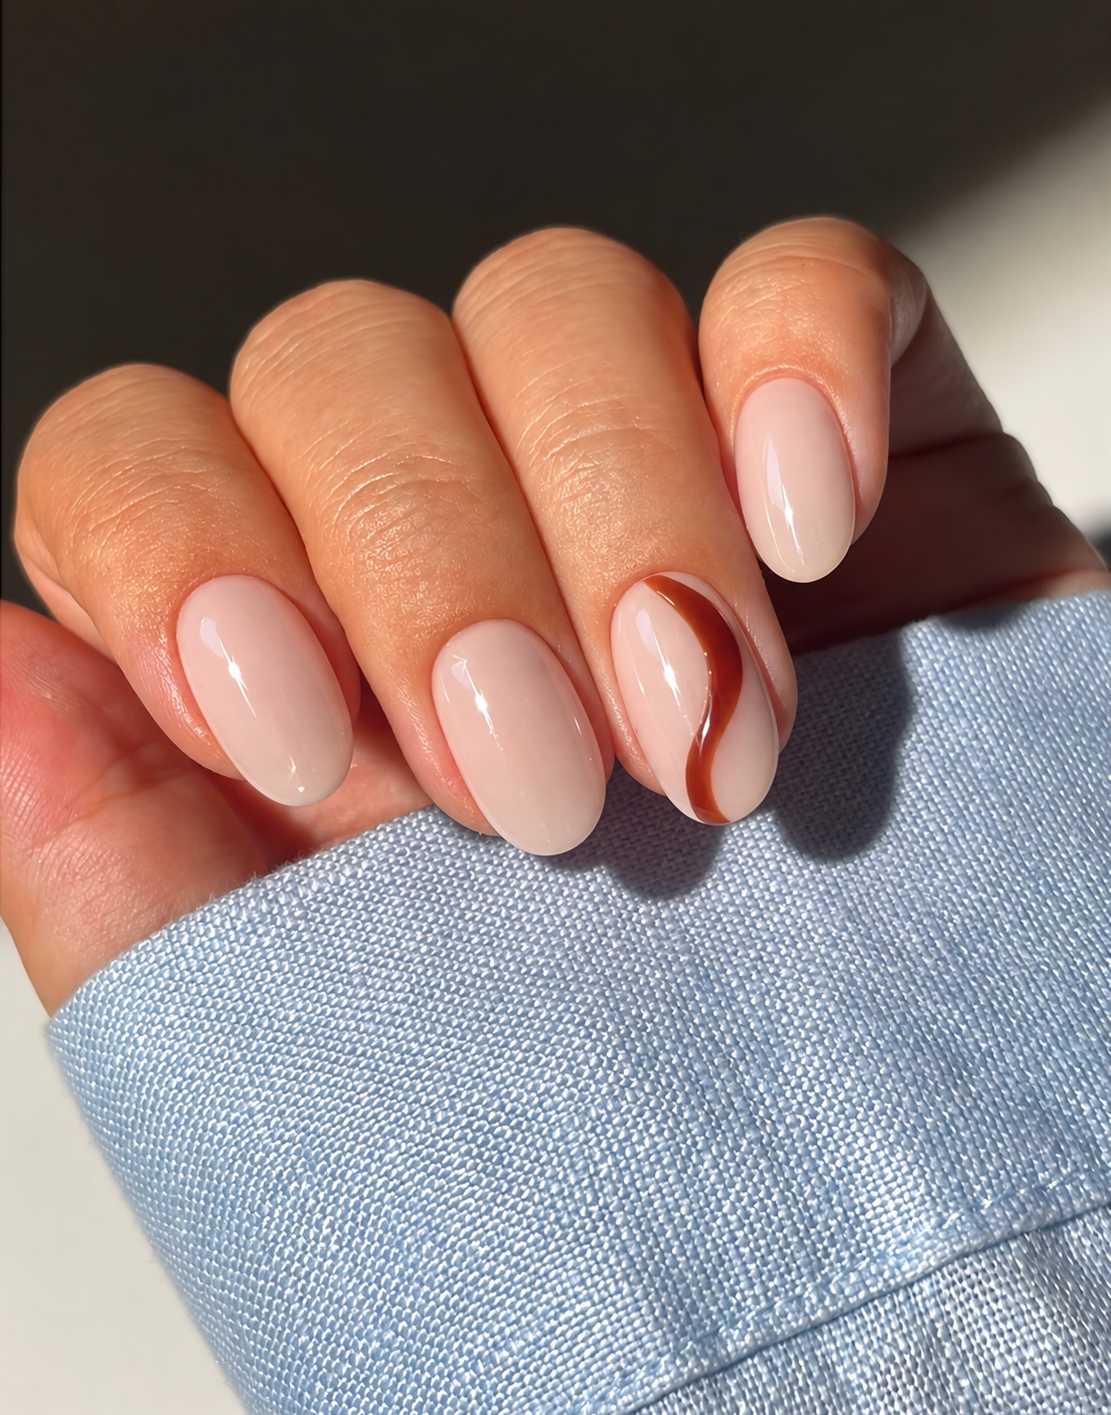
23. One russet curve over a milky base
A single russet curve travels up one side of the ring nail over a milky beige base. All the other nails remain plain milky beige. The curve is broad enough to be seen, but it leaves most of the nail empty. That makes the composition feel intentional without turning into a full swirl manicure.
Use a warm red-brown rather than orange if you want a quieter Thanksgiving reference. A medium oval gives the line space to bend; on a shorter nail, shorten the curve instead of forcing it around the whole outline. Skip additional dots or a second metallic line for this version. The empty area is part of the design, not a space that needs filling.
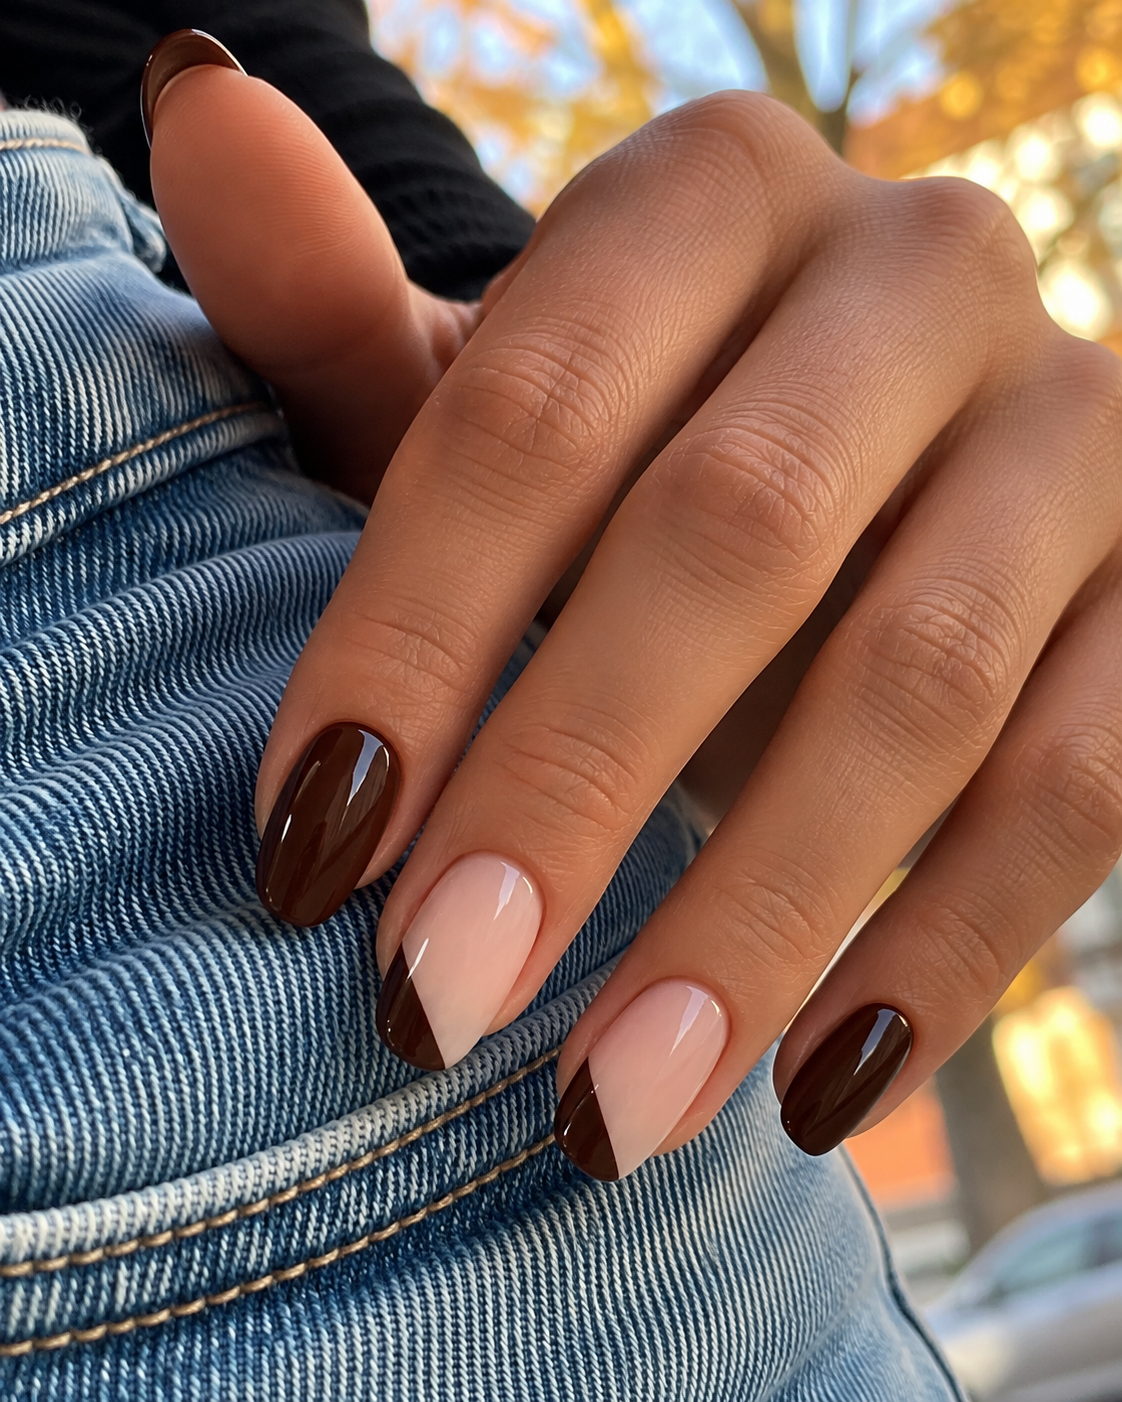
24. Espresso corner blocks with a clear diagonal
Two nails, the middle and ring, have a nude base with one espresso-colored corner at the free edge. The thumb, index and little nail are solid espresso. Each corner is a compact triangle, leaving a clear diagonal boundary and a large area of nude visible beneath it.
The geometric shape works especially well on a soft square, where the corner has a natural place to sit. Keep the triangles at matching corners for a controlled rhythm, or choose a mirrored arrangement deliberately. Compared with a French tip, this uses less of the edge and creates a stronger directional line. It is a good option if you want dark nails with a little graphic variation.
Small harvest details with enough space to read
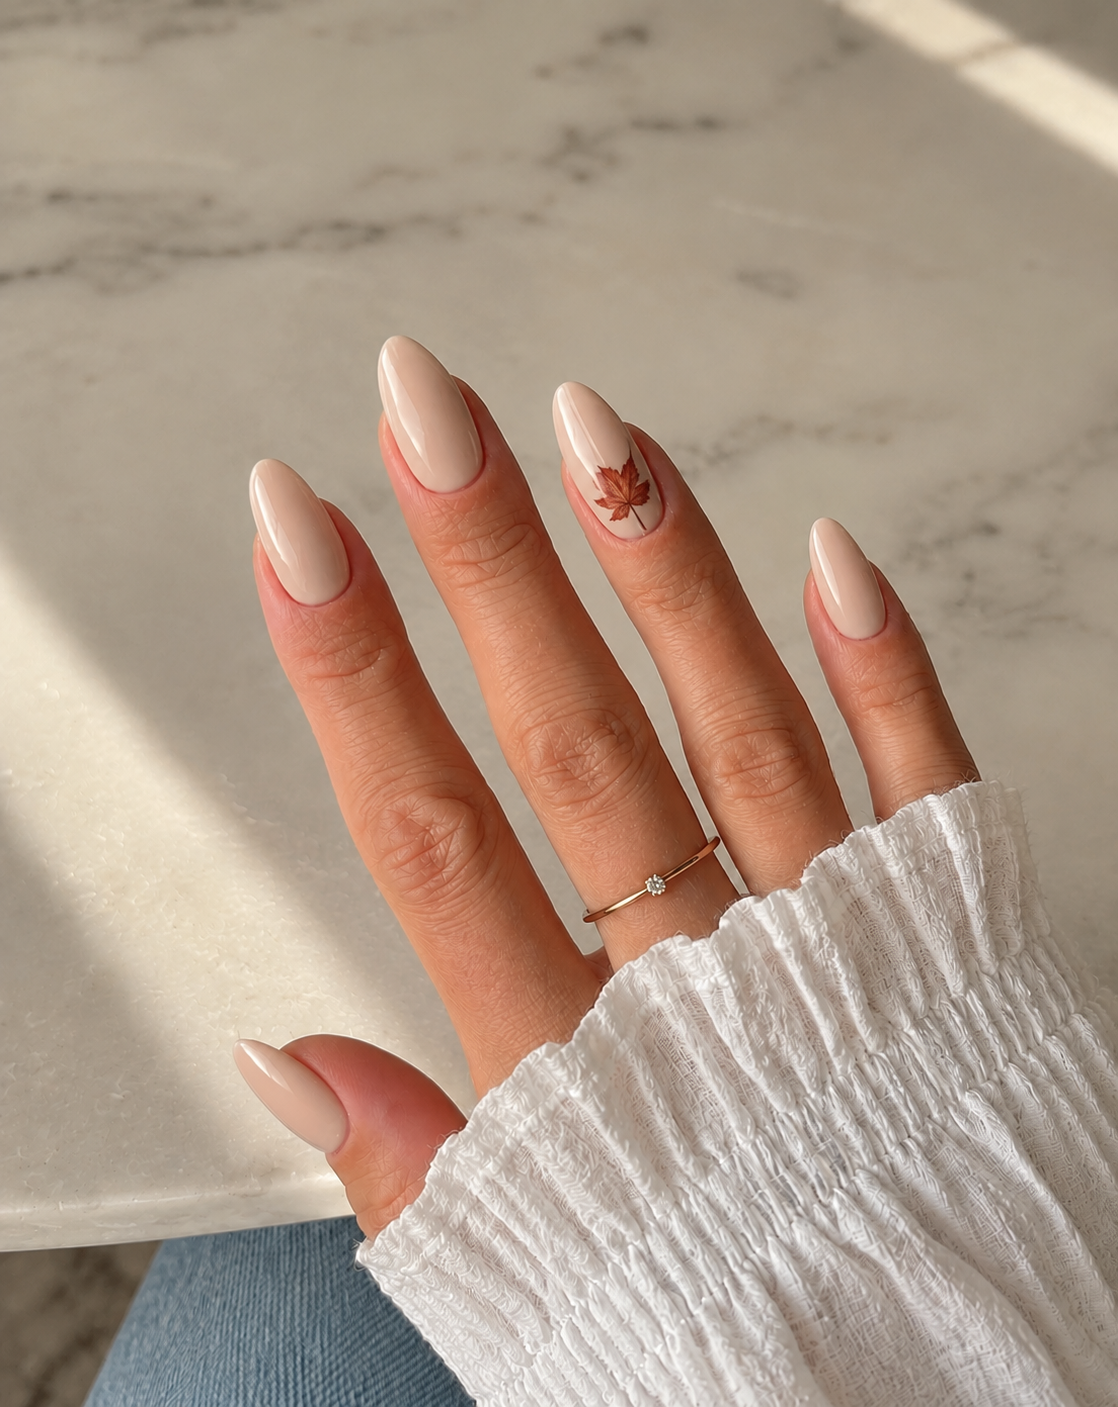
25. A single russet leaf on oat
Use glossy oat on every nail and place one small russet leaf on the ring nail, slightly off-center. Give the leaf a thin stem and a simple pointed silhouette, with one restrained central vein. The seasonal reference comes from that shape and color, so it does not need a scattering of extra leaves.
Keep the motif away from the edges of the nail. On short ovals, a smaller leaf with generous empty space reads more clearly than a complicated miniature branch. If you are choosing between a painted leaf and a decal, focus on the scale and appearance you want rather than assuming the photograph reveals the technique. Both can be discussed with the person doing your manicure.
26. A fine wheat stalk beside warm ivory
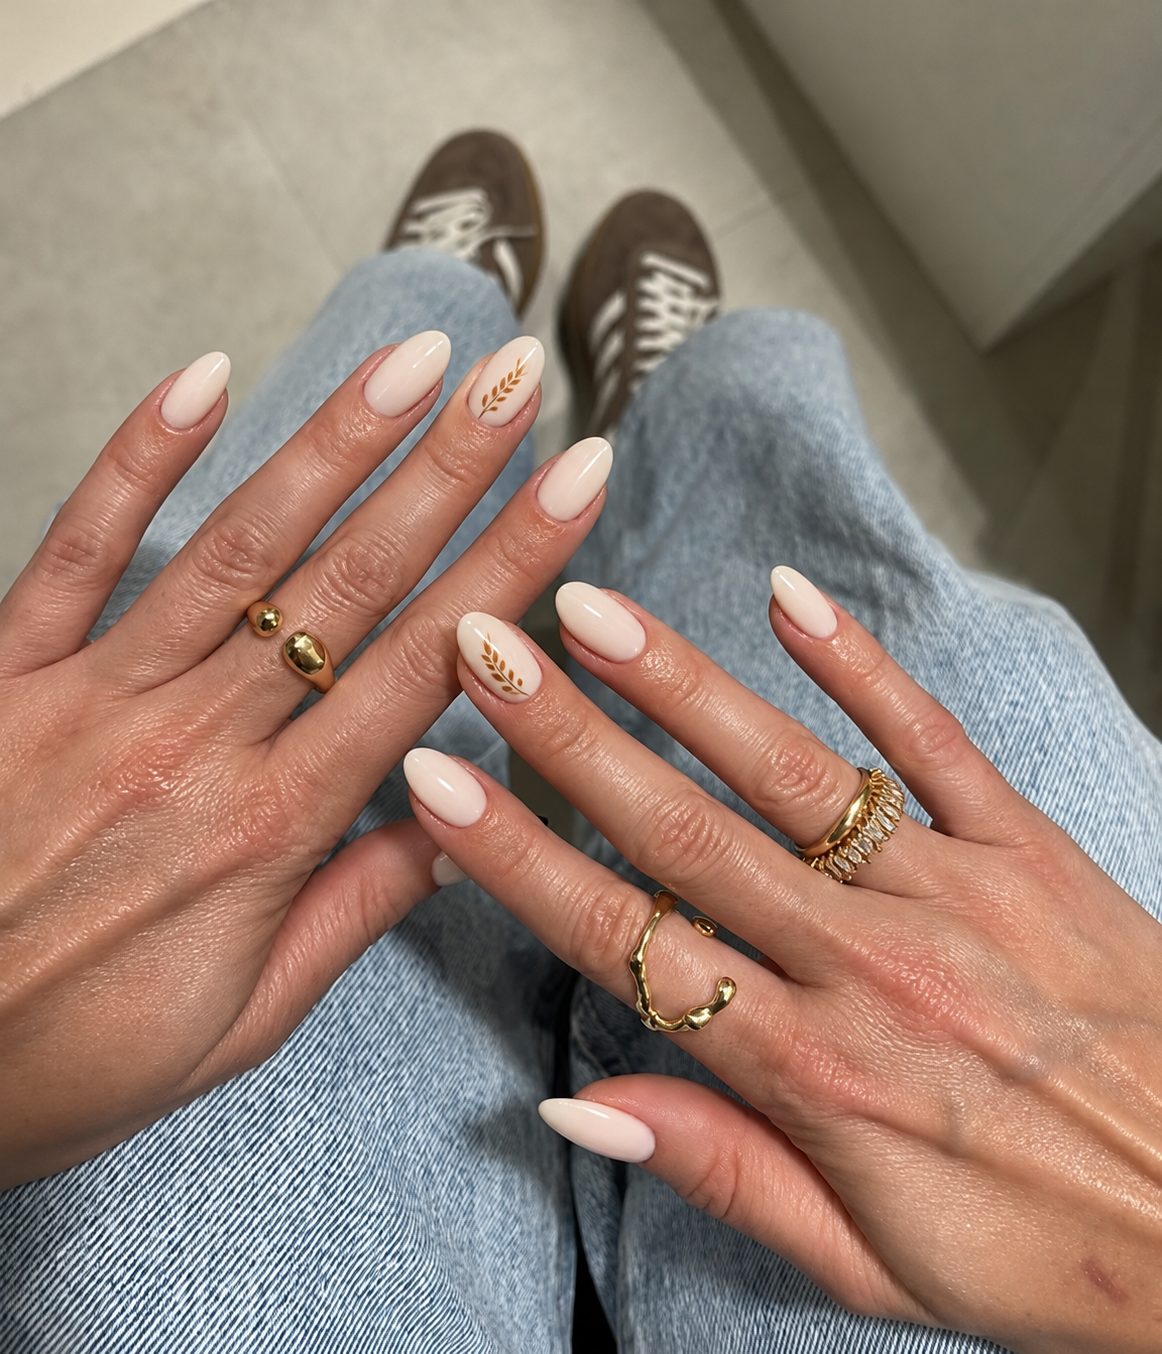
A warm ivory manicure gets one slender ochre wheat stalk on the ring nail. The stem rises along one side, with short paired grains and a little open space around the tip. Unlike a broad leaf, this motif has a narrow silhouette that can work on a relatively small nail.
Keep the ochre darker than the ivory so the detail survives ordinary lighting. Gold can be used for a more reflective variation, but the pictured concept is painted ochre with no metallic layer. A short oval or a moderate almond will both work if the stalk is adjusted to fit. Avoid adding several stems together; one legible stalk gives a clearer harvest reference than a tiny crowded bundle.
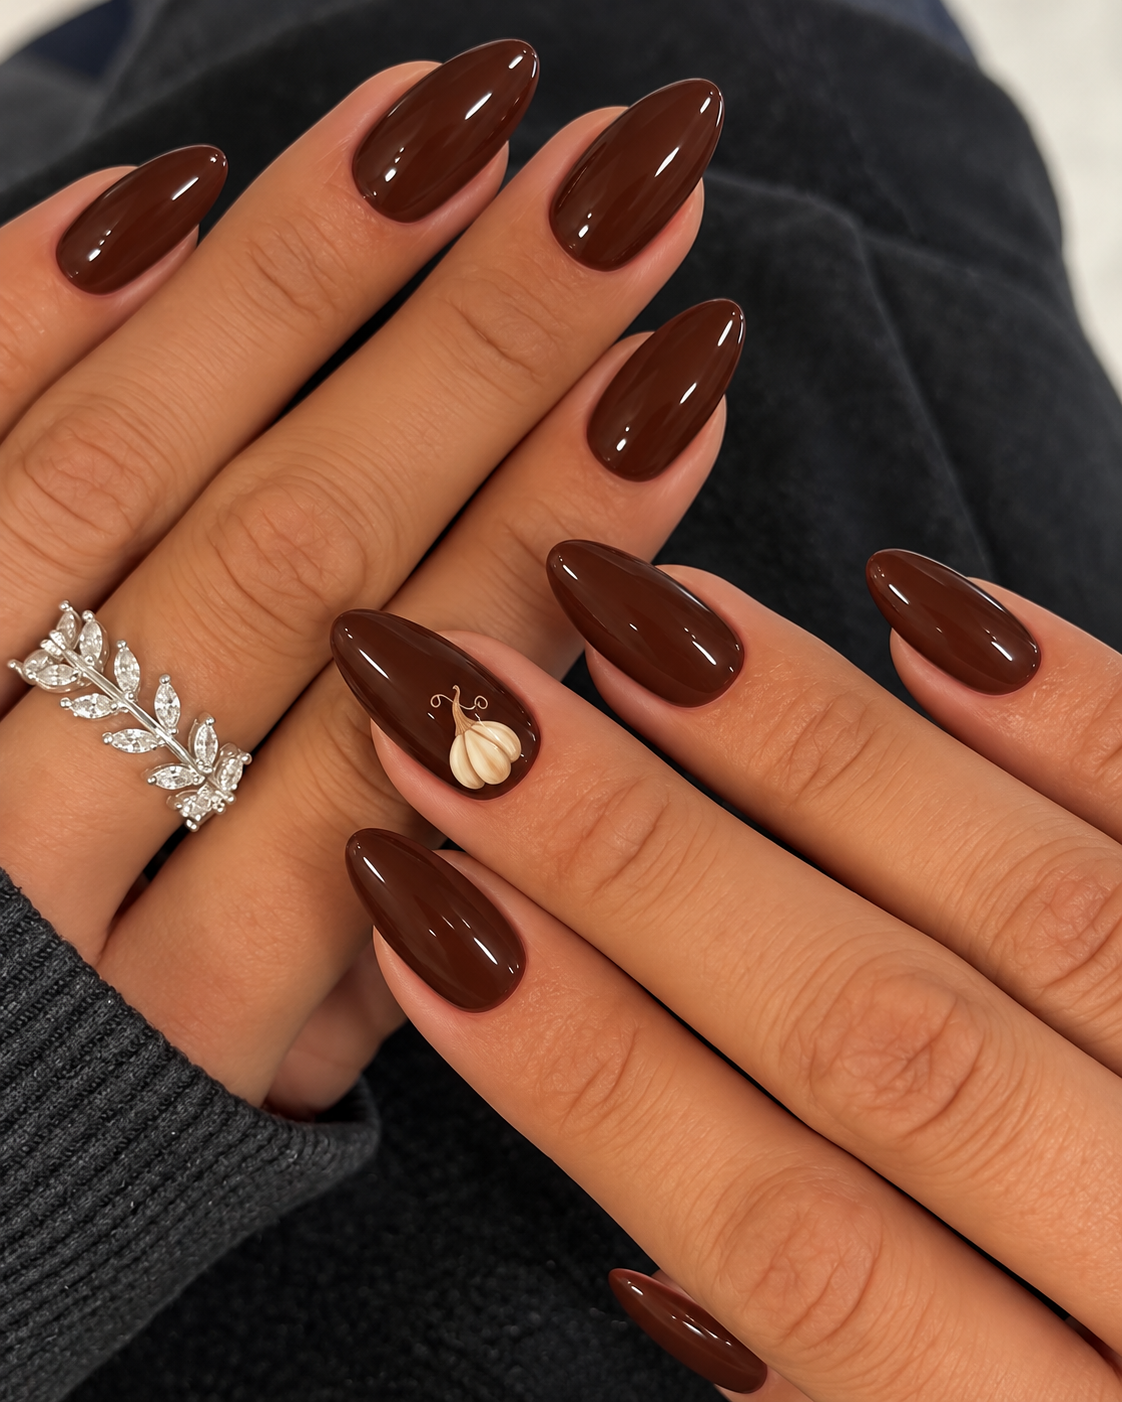
27. A terracotta pumpkin on a nude accent
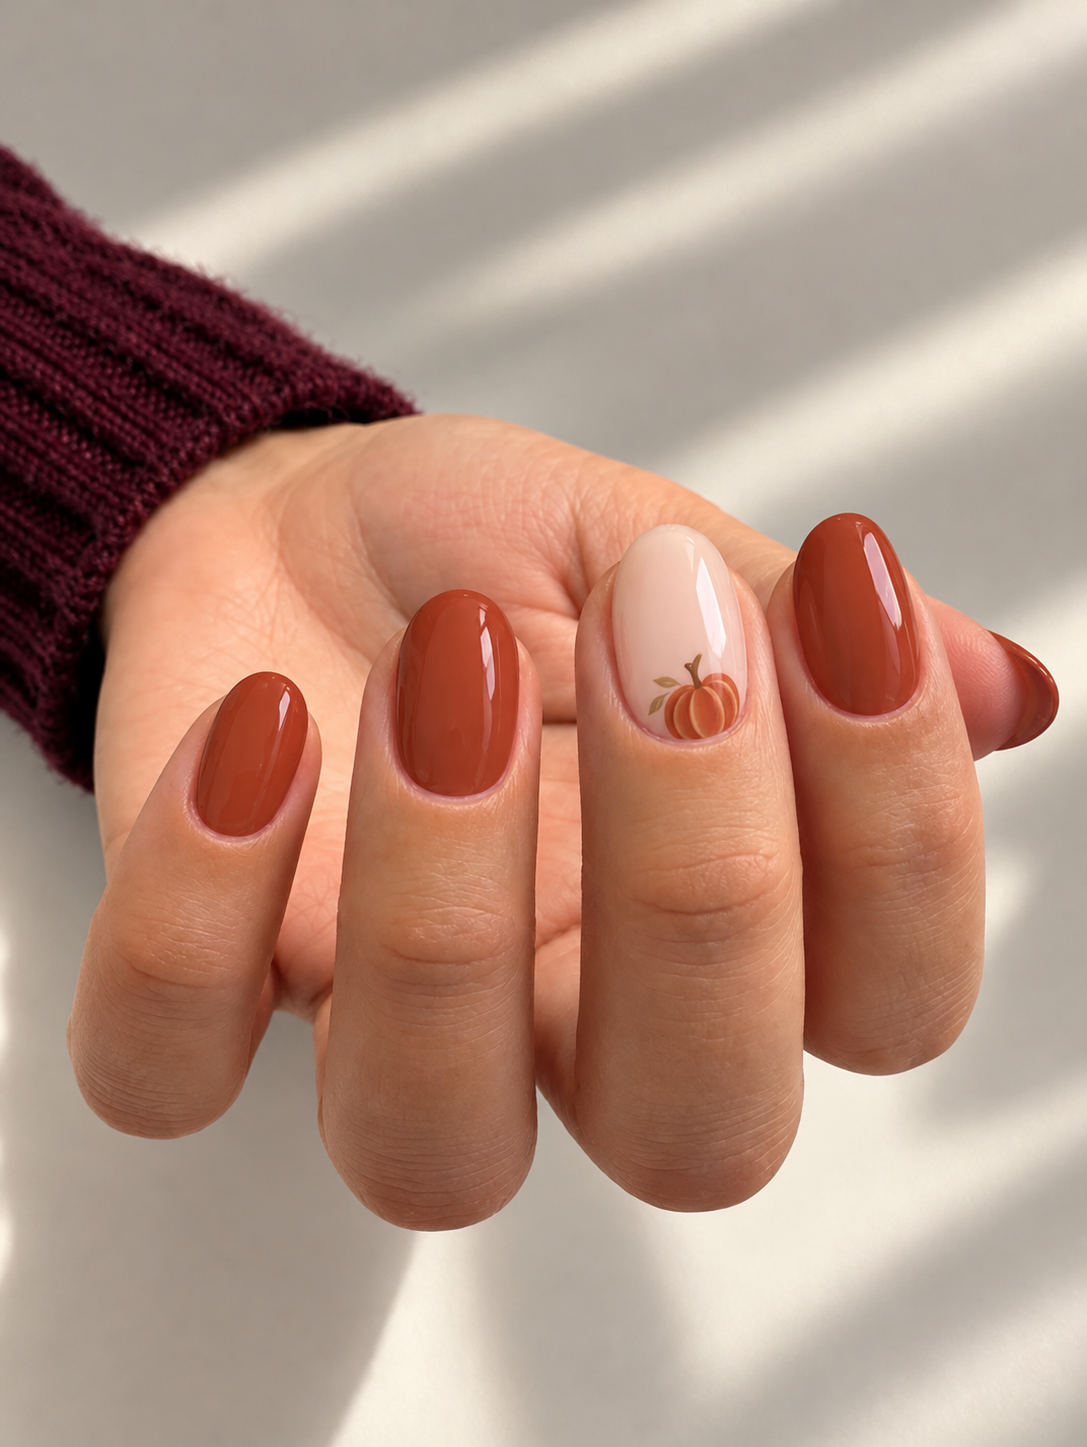
Paint four nails warm terracotta and leave the ring nail nude beige. On that accent, add one small terracotta pumpkin with three rounded lobes and a short brown stem. Place it near the lower side of the nail, leaving the center and tip mostly open.
The pumpkin should look like a small painted motif rather than a large raised decoration. Its shape is enough; a face would shift the mood toward Halloween. If you want a gentler palette, change the surrounding nails to creamy beige and keep the same pumpkin. For short nails, simplify the internal contour lines before reducing the entire motif to a dot that no longer reads as a pumpkin.
28. A cream gourd on chocolate brown
This version reverses the light-dark relationship of the previous design. All nails are glossy chocolate, and a single small cream gourd sits on the ring nail. Give it a rounded base, a gently narrower top and a short cocoa stem. The pale silhouette stands out clearly without introducing a bright orange.
Use a medium oval if you want room for the shape to remain recognizable. A thin tan line can suggest the gourd's curve, but heavy shading would make the tiny image fussy. Keep the rest of the manicure completely plain. This is a good compromise when you want a literal harvest detail while staying in the neutral palette you already wear throughout fall.
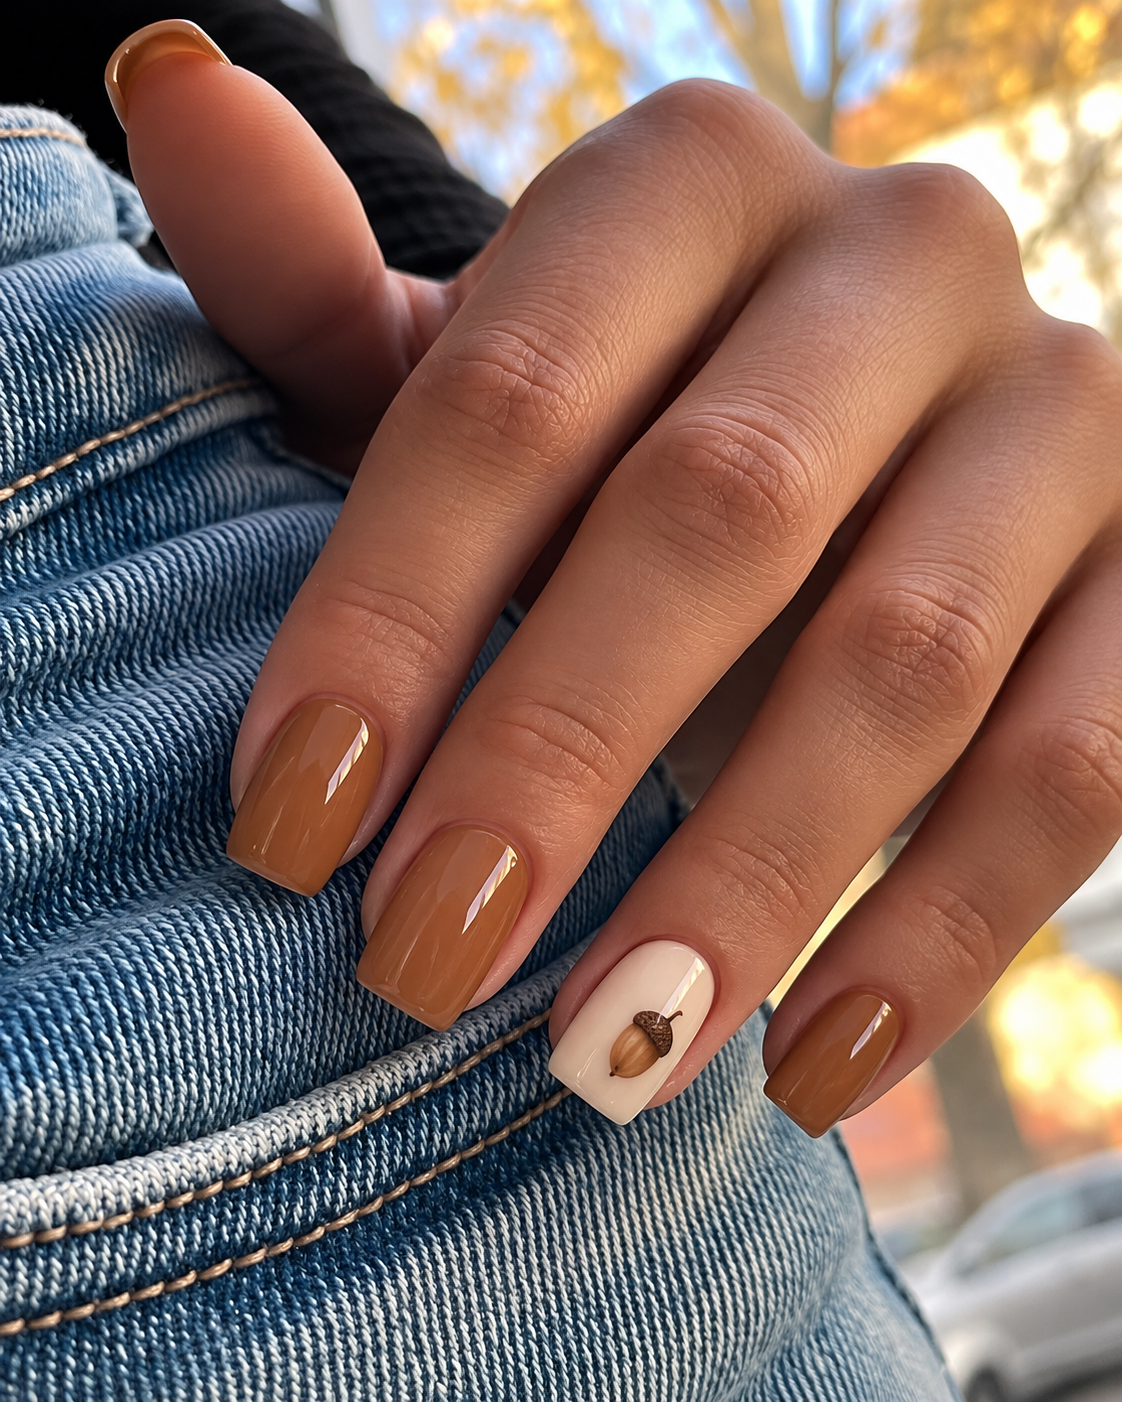
29. A tiny acorn with caramel nails
Four caramel nails surround an oat-colored ring accent with one small acorn. The acorn has a warm brown body, a darker cap and a very short stem. Place it slightly to one side so it feels like a detail on the nail rather than a centered badge.
The contrast between the cap and the body makes the motif readable. You do not need crosshatching, scattered leaves or a woodland scene around it. Short rounded nails suit the compact shape, especially when the accent remains the same length as its neighbors. If you prefer a more subtle version, use two closer brown tones while keeping the outline clear against the oat base.
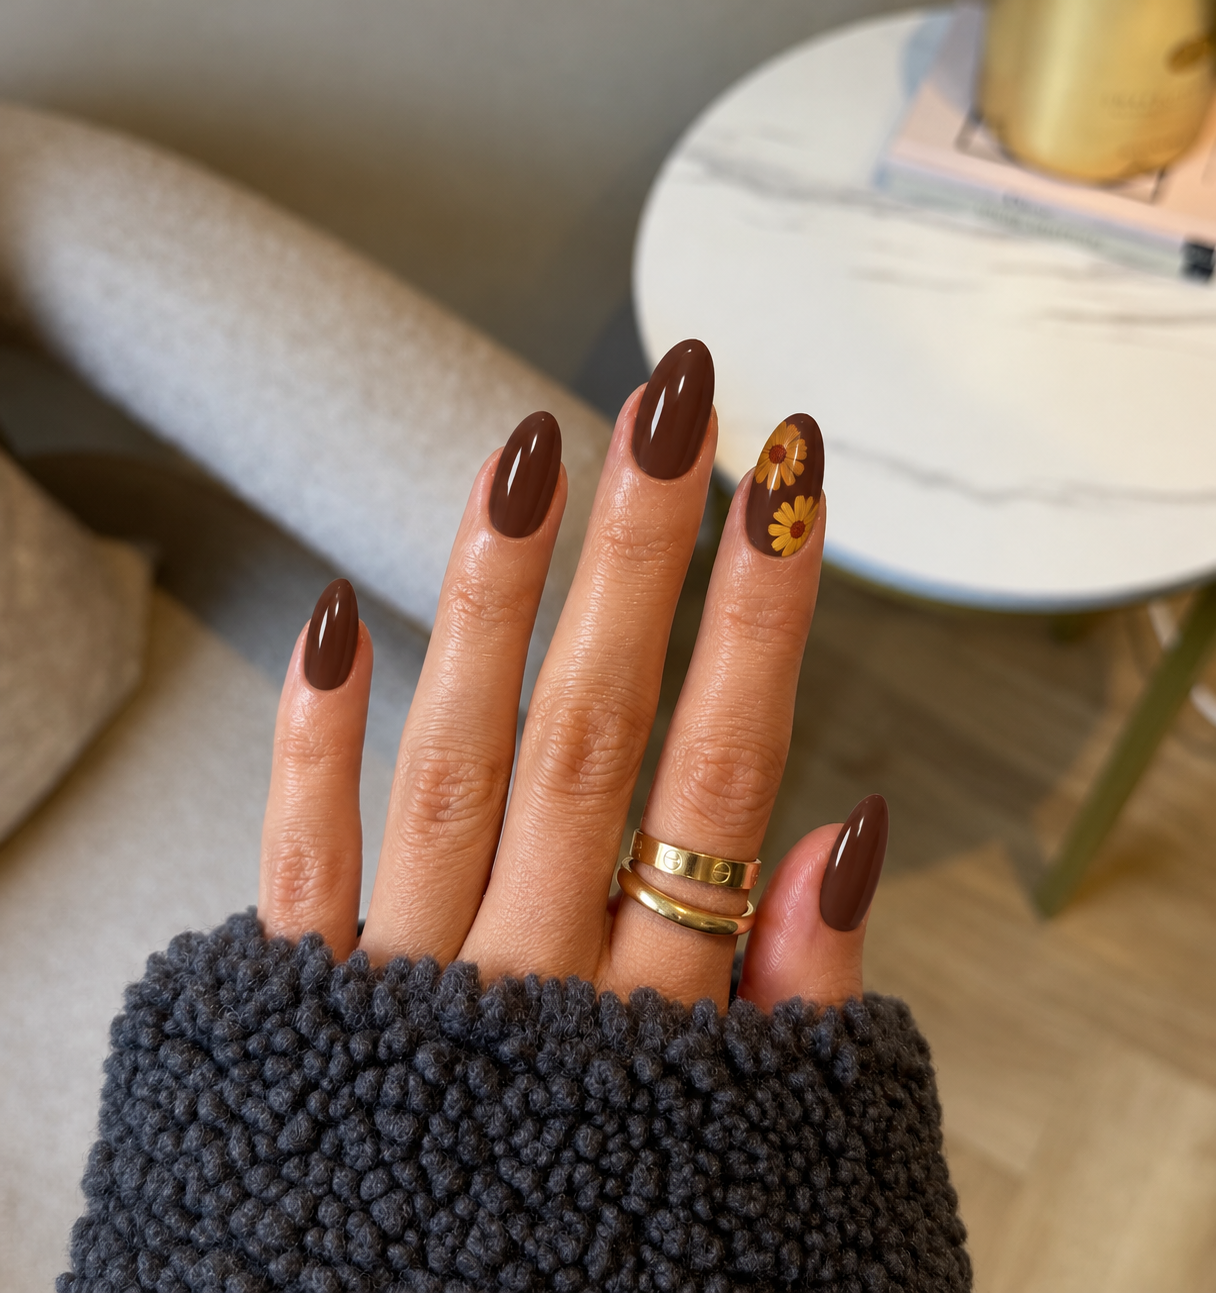
30. Muted marigold flowers on a cocoa accent
Keep most nails glossy cocoa and use the same cocoa as the background for two small marigold flowers on the ring nail. Their petals are muted golden yellow with tiny rust centers, leaving plenty of brown between them. The dark base makes the warm flowers visible without turning the manicure into a bright summer floral.
On short nails, choose one flower instead of shrinking two into unreadable dots. A medium oval allows the pair to sit diagonally with breathing room. The design works because its palette is limited: cocoa, muted yellow and a small amount of rust. Extra green foliage is optional in a different version, but it is not needed in this particular composition.
Playful Thanksgiving accents and coordinated statement sets
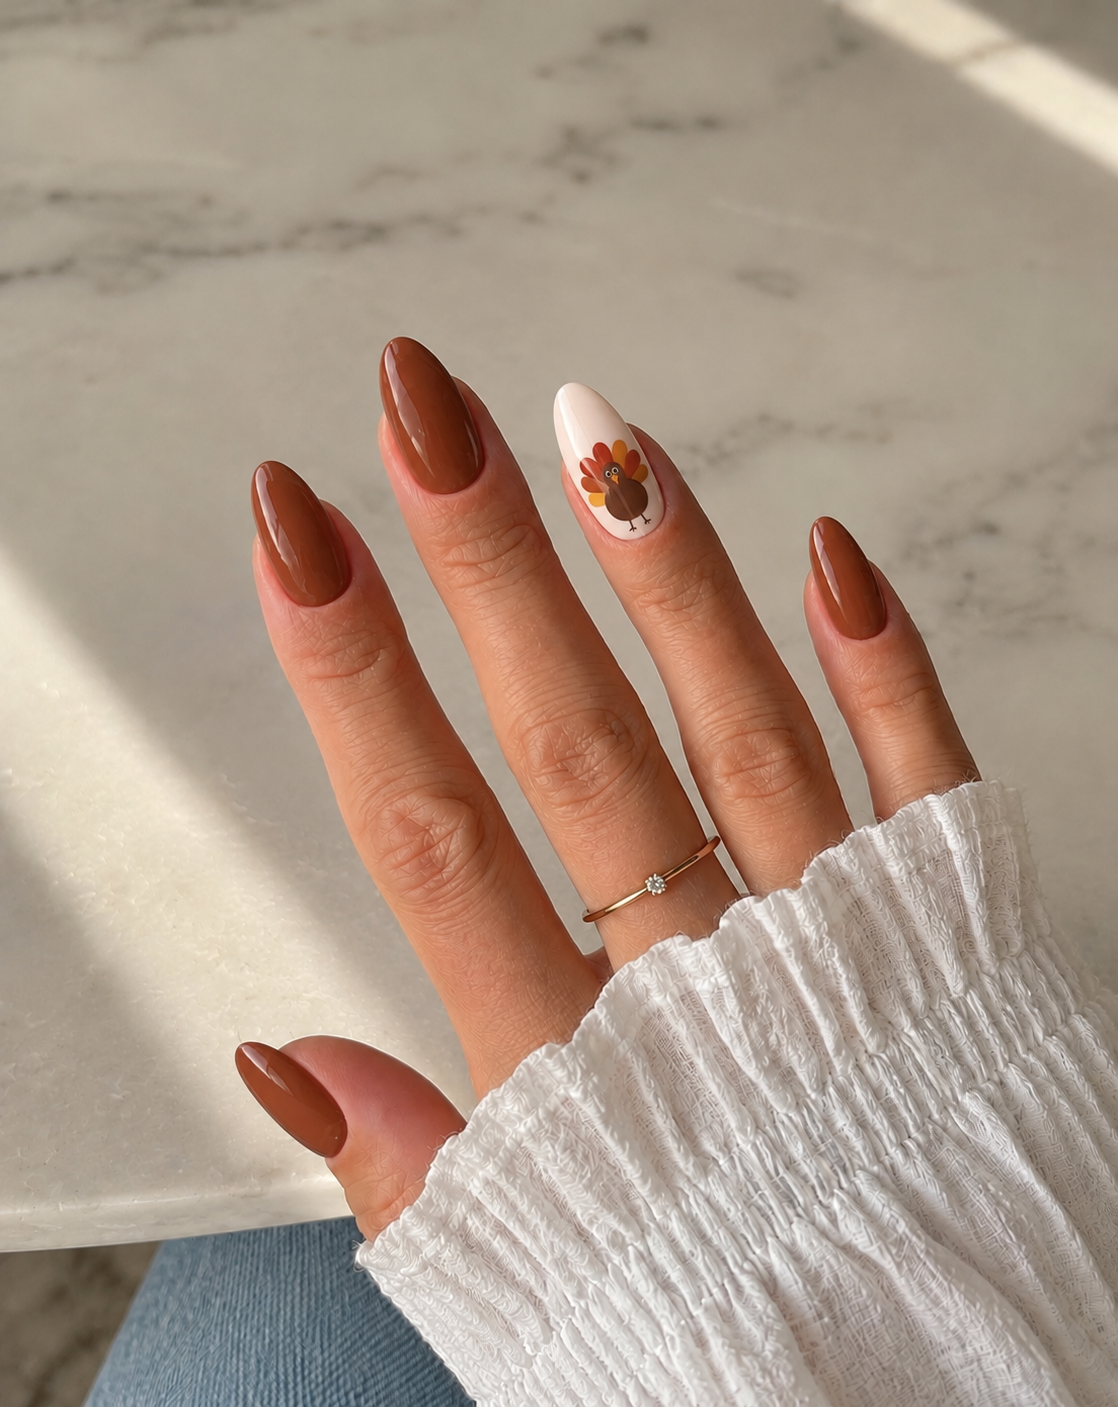
31. One small turkey on a creamy accent nail
For a clearly Thanksgiving-themed manicure, give one cream ring nail a tiny turkey and keep the other nails warm chestnut. Use a simple brown body with a small head and a fan of five rounded tail feathers in rust, ochre and cranberry. A small beak and two dark dots finish the face.
The surrounding plain nails are what keep this playful idea from becoming crowded. On a short nail, simplify the feather outlines and avoid lettering underneath the bird. A flat painted design or appropriately sized decal is easier to discuss than an elaborate three-dimensional character. Bring a close reference for the turkey and a separate view of the whole hand so the scale stays reasonable.
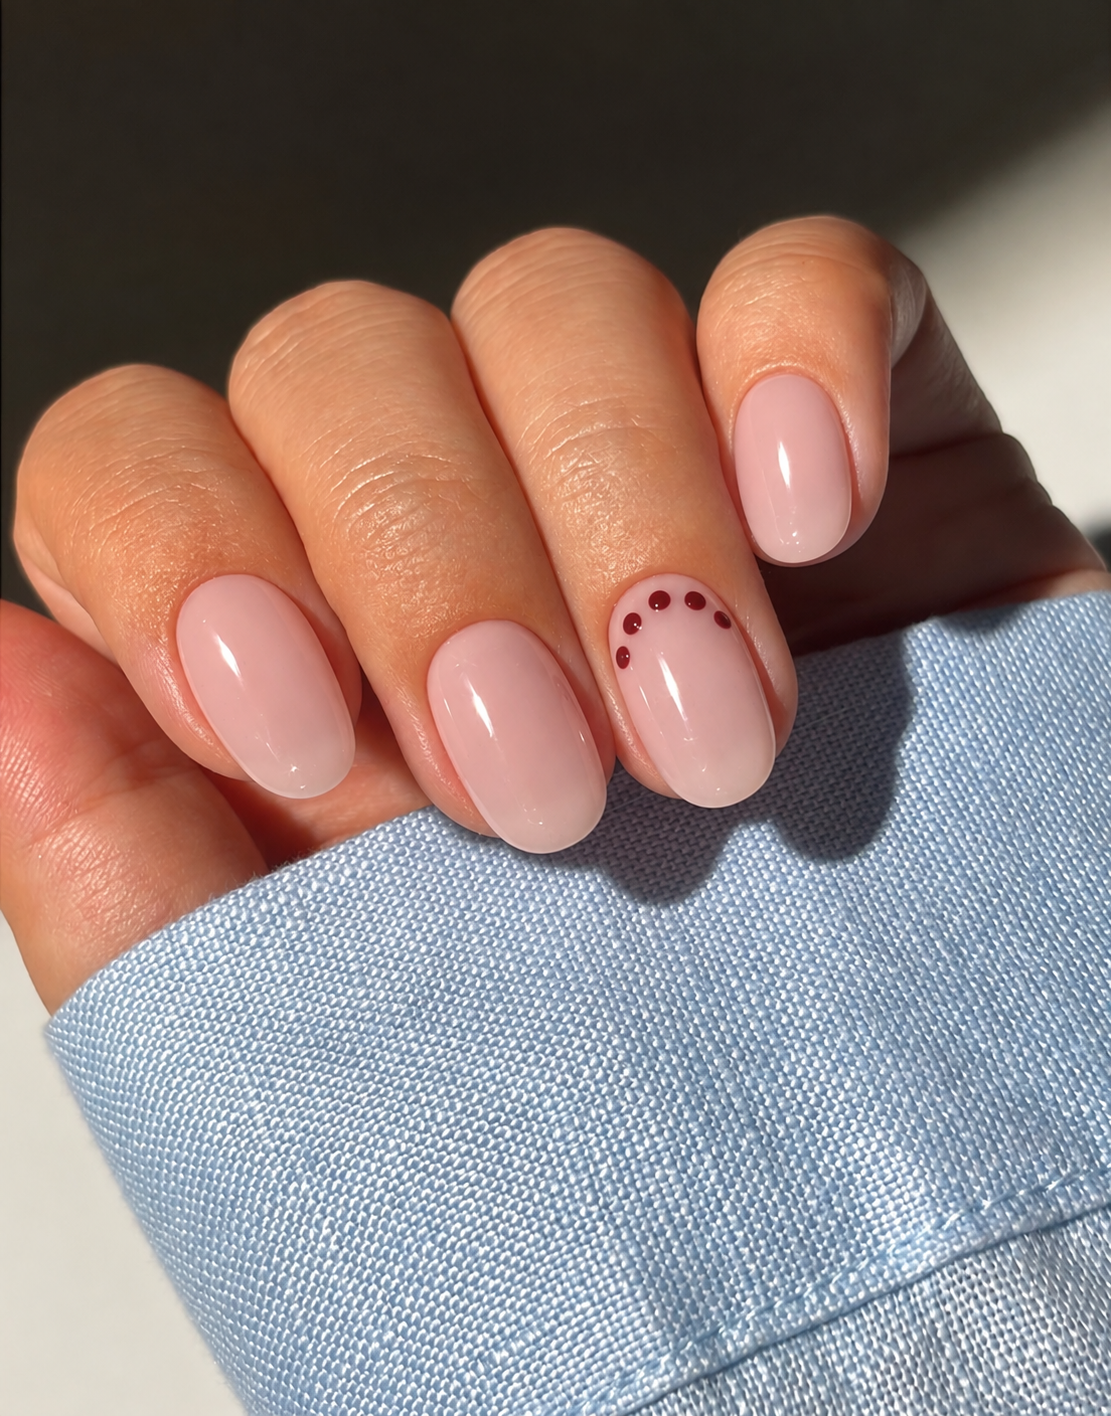
32. Cranberry dots around a blush half-moon
A blush manicure gets a small arc of cranberry dots around the base of the ring nail, with the other nails left plain. Five evenly spaced dots form a shallow half-moon, separated from the cuticle by a narrow margin. The effect is graphic and playful without requiring a recognizable holiday illustration.
Keep the dots similar in size and the curve gentle. If they spread too far up the sides, the design starts to look like a full border. Short rounded nails are a natural fit because the arc echoes their softer shape. Choose a blush with enough contrast against the cranberry, then keep the finish glossy throughout. No glitter is necessary to complete this small detail.
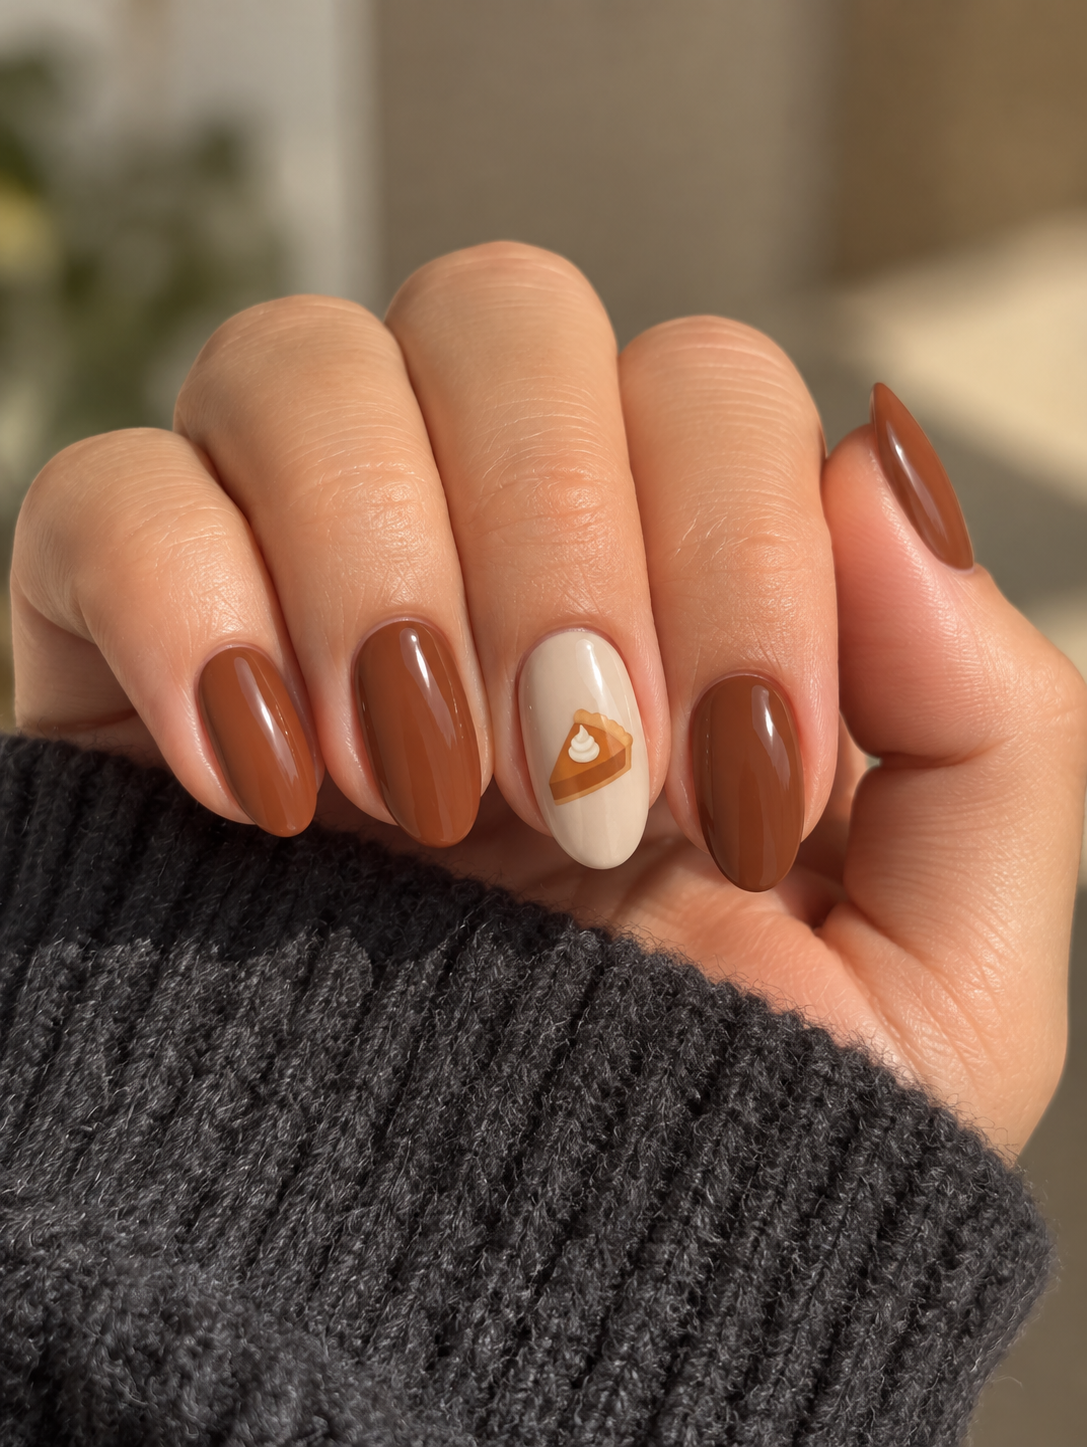
33. A little pumpkin-pie slice on oat
An oat ring nail carries one flat triangular slice of pumpkin pie: a muted orange filling, a thin tan crust along the wide edge and a tiny cream mark suggesting whipped cream. The remaining nails are a soft cinnamon brown. The motif is intentionally simple enough to read at nail size.
Keep the slice slightly angled and centered with space around it. A large sculpted topping would change both the look and the amount of detail, so specify a flat interpretation. On a very short nail, omit the cream mark before making the entire slice too small. This is the most dessert-specific option in the collection, ideal if you want the holiday reference to be obvious and lighthearted.
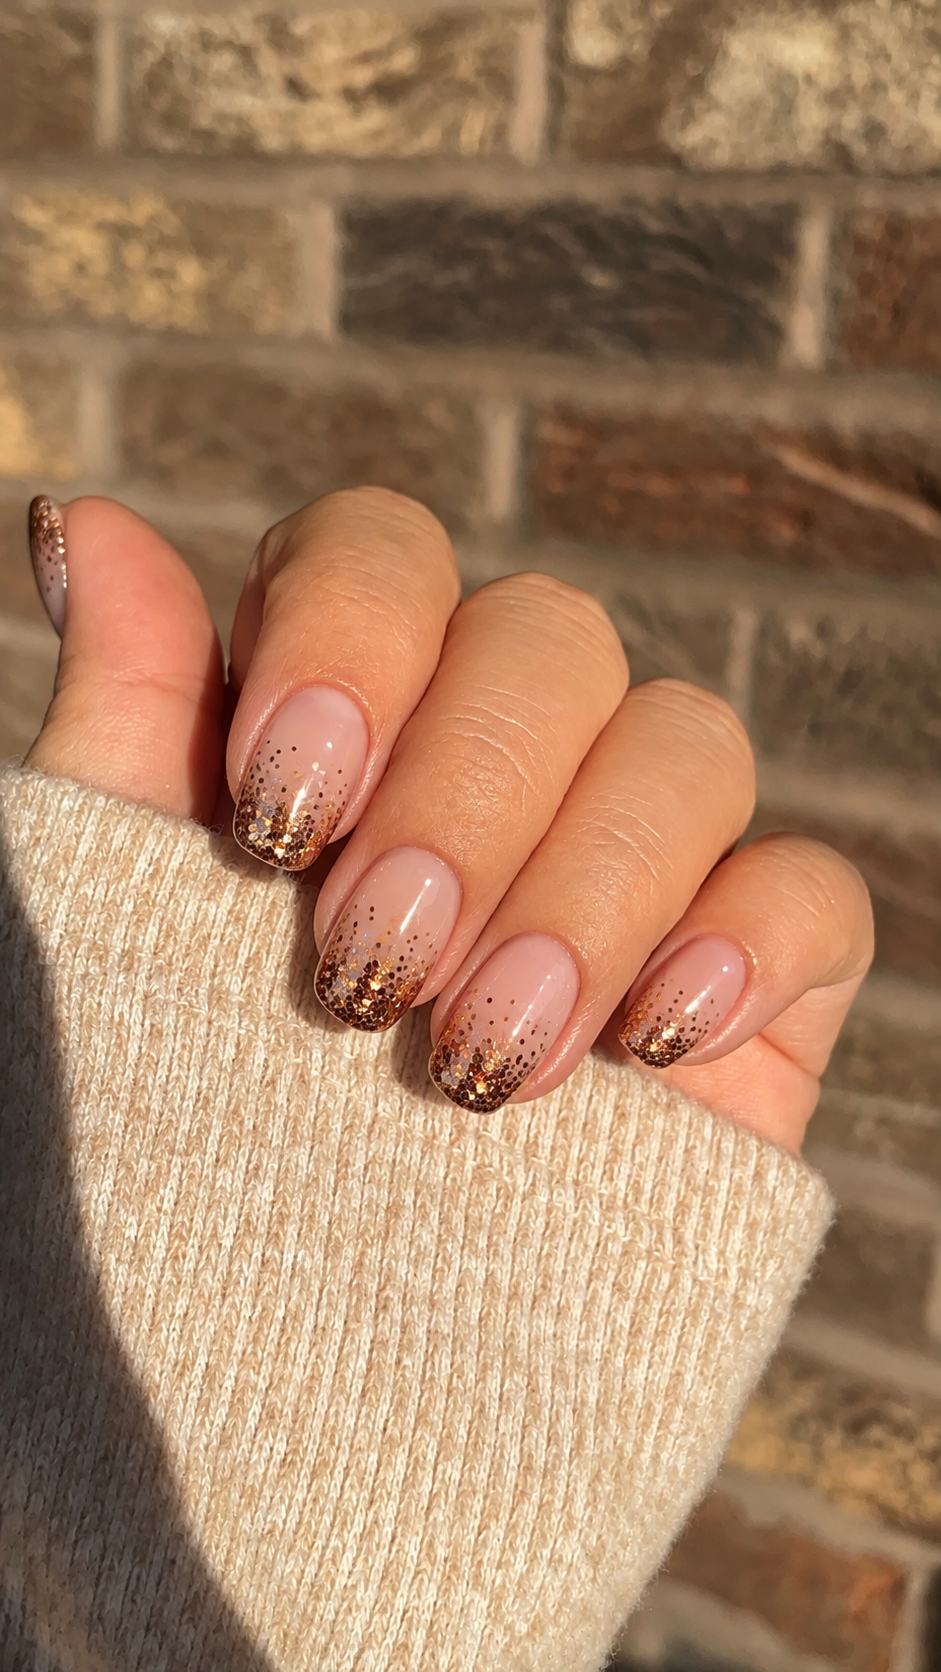
34. A restrained bronze confetti fade
Use a sheer warm-nude base and add small bronze glitter particles at the tips, becoming sparser toward the middle. Keep the cuticle area clear. The gradual spacing creates a fade without a solid metallic stripe, giving the manicure sparkle while preserving the lightness of the nude base.
Ask for small particles and a sparse transition rather than a dense glitter cap. This differs from chrome because you can see individual reflective pieces. Short soft squares give the fade a clean edge, while an oval makes it softer. If you want less sparkle, apply the fade only to the ring nail and leave the others plain nude; keep the particle size the same.
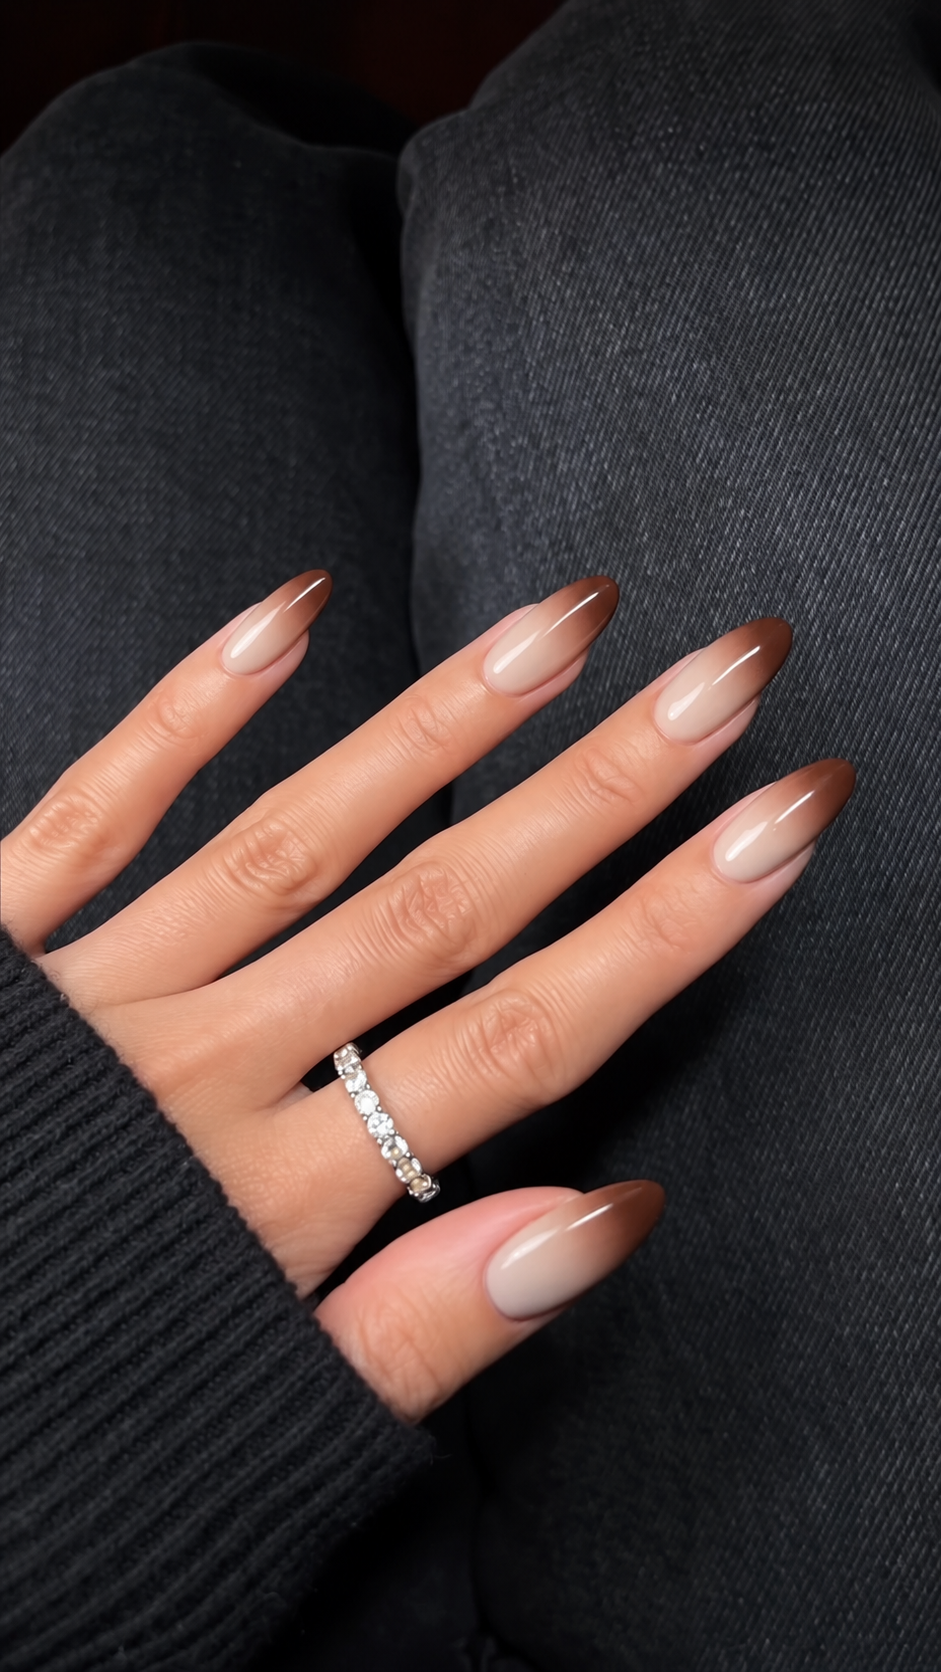
35. Cream-to-cocoa ombré on moderate almonds
Cream near the cuticle gradually deepens into cocoa toward the free edge on every nail. The colors blend within each nail, unlike a manicure where each finger wears a different shade. A moderate almond provides enough length for the transition to be gradual while keeping the point rounded.
Ask for a blended boundary with no visible dividing stripe. The cocoa should remain medium brown rather than near-black if you want the soft version shown here. On shorter nails, use closer shades so the compressed transition still looks gentle. Keep the finish glossy and skip extra line art. The changing color is the design, and a busy accent would interrupt its otherwise smooth rhythm.
36. A complete harvest palette with one leaf accent
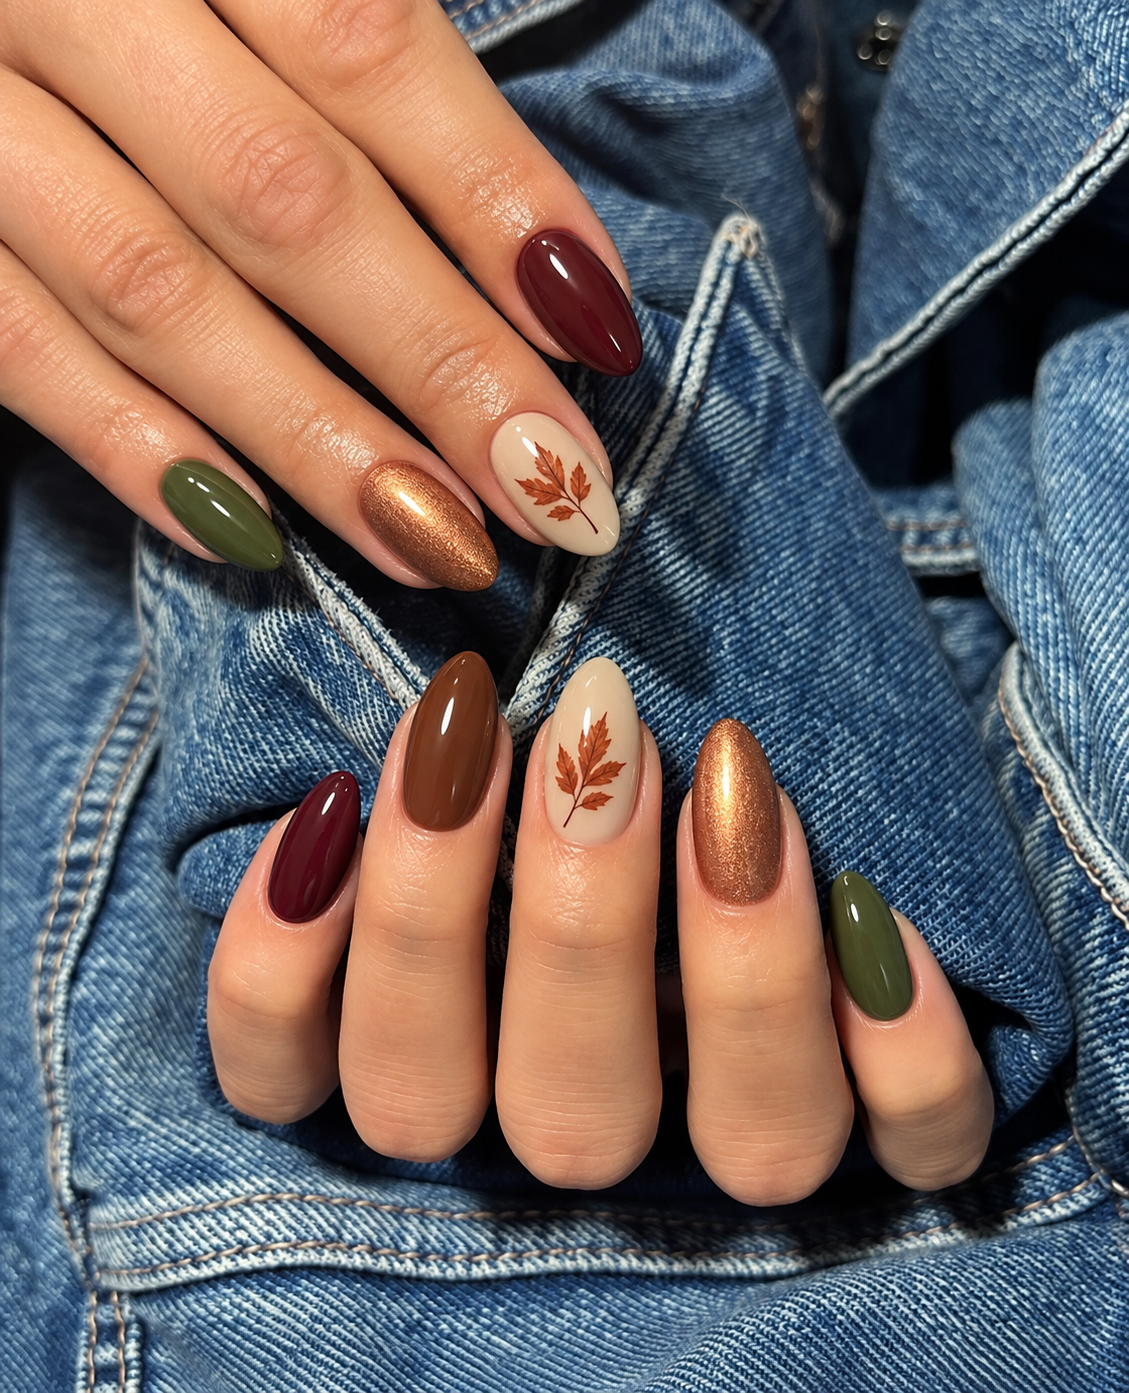
This coordinated set combines several ideas without giving every finger its own complicated artwork. Use glossy cranberry on the thumb, chestnut on the index, oat with one small russet leaf on the middle, soft copper metallic on the ring and muted olive on the little finger. Keep the nails short-to-medium and oval so the shape unifies the different colors.
The copper is the only finish change, and the leaf is the only painted motif. That hierarchy prevents the set from feeling like five unrelated samples. Lay out the colors first and check that the olive is not much brighter than the other shades. If you want a simpler version, make the ring nail plain caramel and leave the rest of the arrangement intact.
How to adapt a detailed design for short nails
Short Thanksgiving nails work best when the design has a clear priority. Decide whether that priority is color, a line, a finish or a small illustration. A short nail can carry any of these, but several equally prominent details can compete for the same space. Simplify by removing elements before you make every element smaller.
For French tips, preserve the relationship between the base and the colored edge. A broad tip from a long almond reference may need to become a shallow line on your nail. For plaid, use fewer intersections. For a pumpkin, keep the rounded silhouette and stem but omit some internal lines. For a turkey, prioritize a readable body and feather fan over tiny text or accessories.
Shape also changes the available space. A soft square gives a pattern a relatively broad end, while an oval creates a rounded frame for a small leaf or dot arrangement. Neither shape is automatically better. Start with the outline you comfortably wear, then adapt the design to it. A reference should help communicate your taste, not pressure you into a length you do not want.
Make your salon reference specific enough to use
Save one photograph for the overall design and, if necessary, one close-up for the finish. Explain which parts you want to retain. You might choose the short shape from idea 1, the color from idea 5 and the single leaf placement from idea 25. Naming those choices is clearer than presenting several screenshots and asking for a mixture of everything.
For mixed sets, agree on the finger placement before the work begins. Say whether both hands should repeat the same arrangement or mirror one another. Also distinguish an optional suggestion from a requirement: the fact that a reference includes rings, a sleeve or a certain skin tone does not make those features part of the manicure request.
Describe the result in ordinary visual language. Words such as sheer, opaque, smooth metallic, fine pearl, broad magnetic glow and visible glitter particles are more useful than a vague request for something shiny. Tell the nail artist what you would like to avoid, too, such as a nearly black brown, bulky decorations or a French tip that covers most of the nail.
Choosing between a home manicure and detailed nail art
If you already paint your own nails, the solid colors in ideas 1–6 are the simplest place to start. An accent in a second color is a smaller step than a detailed illustration. Dots or a correctly sized decal may also suit your routine, but a design that looks simple in a photograph can still require practice to place neatly.
For unfamiliar finishes or layered art, discuss the options with a nail professional and follow the directions for the products actually being used. This guide describes appearance rather than a universal application process. A chrome effect, a magnetic finish and a glossy conventional polish are different choices; a single photo does not reliably identify the products, curing requirements or removal method behind them.
Leave time to finish without rushing into travel or dressing; drying times depend on the products. Keep a simpler backup design in mind if you are trying unfamiliar artwork for the first time.
Photograph the manicure you want to remember
A useful manicure photograph shows the whole design clearly enough to take to a future appointment. Resting your hands on denim, letting the fingertips emerge from a knit cuff, or gently overlapping both hands can make the picture feel natural. Keep the nails larger in the frame than the surrounding clothing, and avoid a pose that hides the accent finger.
Light should explain the finish. A metallic or magnetic manicure benefits from a second angle because a single bright reflection can disguise its color. With tiny artwork, use a view where the motif is in focus and not crossed by a white highlight. Turn the hand slightly before changing the color of the photograph. Heavy warm filters can make a cranberry shade appear brick-red or a beige base look yellow.
Save one complete-hand view for the color arrangement and one close-up for the motif or finish. Together, they make a useful reference for your next appointment.
Thanksgiving nails: your questions answered
What colors work well for Thanksgiving nails?
Cranberry, chestnut, terracotta, olive and creamy oat are useful starting points because they can be combined in several ways. Choose a pair you already enjoy wearing, then decide whether you want a metallic accent. You can also use dusty sage or a neutral pearl finish if a warmer orange-and-brown palette is not your preference.
Can Thanksgiving nails be simple and still feel festive?
Yes. A single wine-red or warm brown polish can supply the seasonal color without a motif. If you want a small change from your everyday manicure, try a chocolate tip, a bronze accent or one painted leaf. Festive is a styling choice, not a minimum number of decorative details.
Which designs are good starting points for short nails?
Try the solid colors in ideas 1–6, the shallow chocolate French in idea 7, or the small dot arc in idea 32. For more detailed art, choose one accent nail and simplify its motif. Your nail's width matters as well as its length, so use a reference as a guide rather than a fixed template.
What is the difference between chrome and cat-eye nails?
Chrome describes a smooth metallic-looking reflection. Cat-eye has a concentrated luminous zone created with a magnetic nail product; that zone may appear as a band or a softer velvet glow. Glitter shows separate reflective particles. Since edited photographs can blur these differences, compare more than one view before choosing a finish.
Do I need long acrylic nails for these designs?
No. The visual idea and the product system are separate decisions. Many of these looks are shown on short shapes, and others can be simplified. A photograph does not establish whether the nail is natural, an extension or a particular overlay. Choose your length first, then discuss a suitable method for creating the design.
Which Thanksgiving designs still work after the holiday?
Solid colors, colored French tips, pearl finishes, tortoiseshell and simple line art are easy to keep wearing as general autumn manicures. A turkey or pie slice makes a more specific holiday reference. If you want that playful detail without committing the whole set to it, keep it on one nail and let the surrounding colors stay simple.
Choose one detail you genuinely want to wear
Start with your usual length and preferred amount of color. Add a warmer tip, a leaf or a little metallic light if you want it. Save one simple choice and one decorated alternative: two clear references are enough for your Thanksgiving manicure.